屏幕笔(C#版)
所谓屏幕笔就是可以直接在屏幕上绘图的工具,下面用C#给出一个简单的屏幕笔实现,虽然很简单,但是其中对多态(polymorphism)和工厂模式(factory pattern)的应用还是值得玩味的。
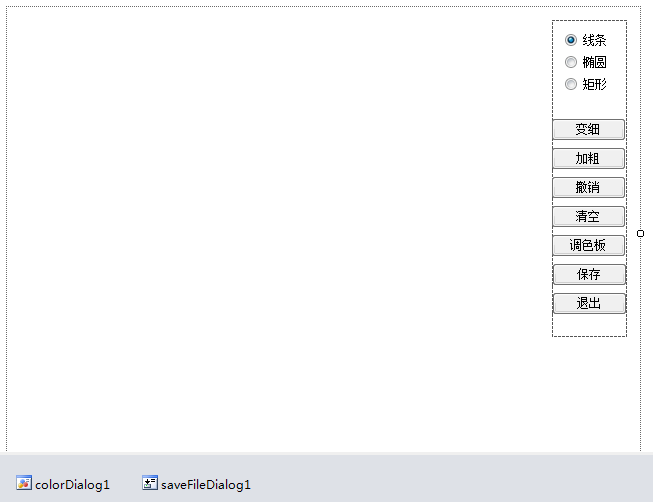
上图是在Visual Studio 2010中创建一个Windows应用程序,利用设计器放置了一个面板以及选择图形的单选按钮和其他相关的功能按钮。其中窗口设置为无边框的窗口,面板的Anchor属性设置为相对于窗口右上角固定。下面放置了一个颜色对话框和一个保存文件对话框分别用来为画笔选择颜色以及选择保存的文件。
由于绘制的图形有很多种,而且这些图形都有着共同的属性(坐标、颜色、粗细等)以及绘图的方法,因此可以定义一个继承结构,先设计抽象的图形,然后派生各种不同的图形,并对绘图的方法进行多态实现,代码如下所示:
using System;
using System.Drawing;namespace ScreenPen {/// /// 抽象图形类/// public abstract class Shape {/// /// 起点的横坐标/// public int StartX { set; get; }/// /// 起点的纵坐标/// public int StartY { set; get; }/// /// 终点的横坐标/// public int EndX { set; get; }/// /// 终点的纵坐标/// public int EndY { set; get; }/// /// 图形的颜色/// public Color Color { set; get; }/// /// 图形的粗细/// public float Thickness { set; get; }/// /// 绘制图形/// /// 画笔public abstract void Draw(Graphics g);}
}
using System;
using System.Drawing;namespace ScreenPen {/// /// 线条类/// public class Line : Shape {public override void Draw(Graphics g) {Pen pen = new Pen(Color, Thickness);g.DrawLine(pen, StartX, StartY, EndX, EndY);}}
}
using System;
using System.Drawing;namespace ScreenPen {/// /// 椭圆类/// public class Oval : Shape {public override void Draw(System.Drawing.Graphics g) {Pen pen = new Pen(Color, Thickness);int x = StartX < EndX ? StartX : EndX;int y = StartY < EndY ? StartY : EndY;int width = Math.Abs(StartX - EndX);int height = Math.Abs(StartY - EndY);g.DrawEllipse(pen, x, y, width, height);}}
}
using System;
using System.Drawing;namespace ScreenPen {/// /// 矩形类/// public class Rectangle : Shape {public override void Draw(Graphics g) {Pen pen = new Pen(Color, Thickness);int x = StartX < EndX ? StartX : EndX;int y = StartY < EndY ? StartY : EndY;int width = Math.Abs(StartX - EndX);int height = Math.Abs(StartY - EndY);g.DrawRectangle(pen, x, y, width, height);}}
}
接下来再设计一个简单工厂来创建这些图形对象,工厂模式的意图是将创建产品对象的过程封装起来,客户端可以跟具体的产品解耦合。
using System;namespace ScreenPen {/// /// 图形工厂(静态工厂模式)/// public static class ShapeFactory {/// /// 创建图形对象/// /// 图形的类型/// 图形对象 public static Shape Create(string type) {Shape sh = null;switch (type) {case "线条": sh = new Line(); break;case "矩形": sh = new Rectangle(); break;case "椭圆": sh = new Oval(); break;}return sh;}}
}
接下来是主窗口,通过处理鼠标事件来绘图
using System;
using System.Collections.Generic;
using System.Drawing;
using System.Windows.Forms;
using System.Drawing.Imaging;namespace ScreenPen {public partial class FrmScreenPen : Form {private Shape currentShape = null;			// 当前绘制的图形private string currentType = "线条";			// 当前选中的图形类型private Color currentColor = Color.Black;	// 当前选中的绘图颜色private float currentThick = 1f;			// 当前选中的图形粗细private bool isMouseLeftButtonDown = false;	// 鼠标左键是否被按下private IList list = new List();public FrmScreenPen() {InitializeComponent();// 开启双缓冲this.SetStyle(ControlStyles.UserPaint, true);this.SetStyle(ControlStyles.AllPaintingInWmPaint, true);this.SetStyle(ControlStyles.OptimizedDoubleBuffer, true);// 为单选按钮绑定事件foreach (Control c in panel1.Controls) {if (c is RadioButton) {(c as RadioButton).CheckedChanged += new EventHandler(ChangeShapeType);}}this.FormBorderStyle = FormBorderStyle.None;	// 窗口无边框this.WindowState = FormWindowState.Maximized;	// 窗口最大化this.TopMost = true;	// 窗口置顶this.Opacity = 0.75;	// 窗口不透明度}// 点击单选按钮private void ChangeShapeType(object sender, EventArgs e) {currentType = (sender as RadioButton).Text;	// 记录选中图形的类型}// 鼠标按下private void FrmMain_MouseDown(object sender, MouseEventArgs e) {if (e.Button == MouseButtons.Left) {isMouseLeftButtonDown = true;currentShape = ShapeFactory.Create(currentType);if (currentShape != null) {currentShape.Color = currentColor;currentShape.Thickness = currentThick;currentShape.StartX = currentShape.EndX = e.X;currentShape.StartY = currentShape.EndY = e.Y;}}}// 鼠标移动(模拟鼠标拖拽[按下鼠标左键移动鼠标])private void FrmMain_MouseMove(object sender, MouseEventArgs e) {if (isMouseLeftButtonDown && currentShape != null) {currentShape.EndX = e.X;currentShape.EndY = e.Y;this.Refresh();}}// 鼠标松开private void FrmMain_MouseUp(object sender, MouseEventArgs e) {if (isMouseLeftButtonDown && currentShape != null) {isMouseLeftButtonDown = false;list.Add(currentShape);currentShape = null;}}// 重绘窗体private void FrmMain_Paint(object sender, PaintEventArgs e) {Graphics g = e.Graphics;foreach (Shape shape in list) {shape.Draw(g);}if (currentShape != null) {currentShape.Draw(g);}}// 退出程序private void btnExit_Click(object sender, EventArgs e) {Application.Exit();}// 打开调色板private void btnColor_Click(object sender, EventArgs e) {DialogResult result = colorDialog1.ShowDialog();if (result == DialogResult.OK) {currentColor = colorDialog1.Color;}}// 保存图形private void btnSave_Click(object sender, EventArgs e) {DialogResult result = saveFileDialog1.ShowDialog();if (result == DialogResult.OK) {string filename = saveFileDialog1.FileName;using (Image image = new Bitmap(this.Width, this.Height)) {Graphics g = Graphics.FromImage(image);foreach (Shape shape in list) {shape.Draw(g);}image.Save(filename, ImageFormat.Png);}}}// 清除窗体中的图形private void btnClear_Click(object sender, EventArgs e) {list.Clear();this.Refresh();}// 撤销上一次绘制的图形private void btnUndo_Click(object sender, EventArgs e) {if (list.Count > 0) {list.RemoveAt(list.Count - 1);this.Refresh();}}// 增加画笔的粗细private void btnAddThick_Click(object sender, EventArgs e) {if (currentThick < 10) {currentThick += 0.5f;}}// 减小画笔的粗细private void btnSubThick_Click(object sender, EventArgs e) {if (currentThick > 0.5) {currentThick -= 0.5f;}}}
}
下面是Main方法,这个是IDE自动生成的代码。
using System;
using System.Windows.Forms;namespace ScreenPen {static class Program {/// /// 应用程序的主入口点。/// [STAThread]static void Main() {Application.EnableVisualStyles();Application.SetCompatibleTextRenderingDefault(false);Application.Run(new FrmScreenPen());}}
}
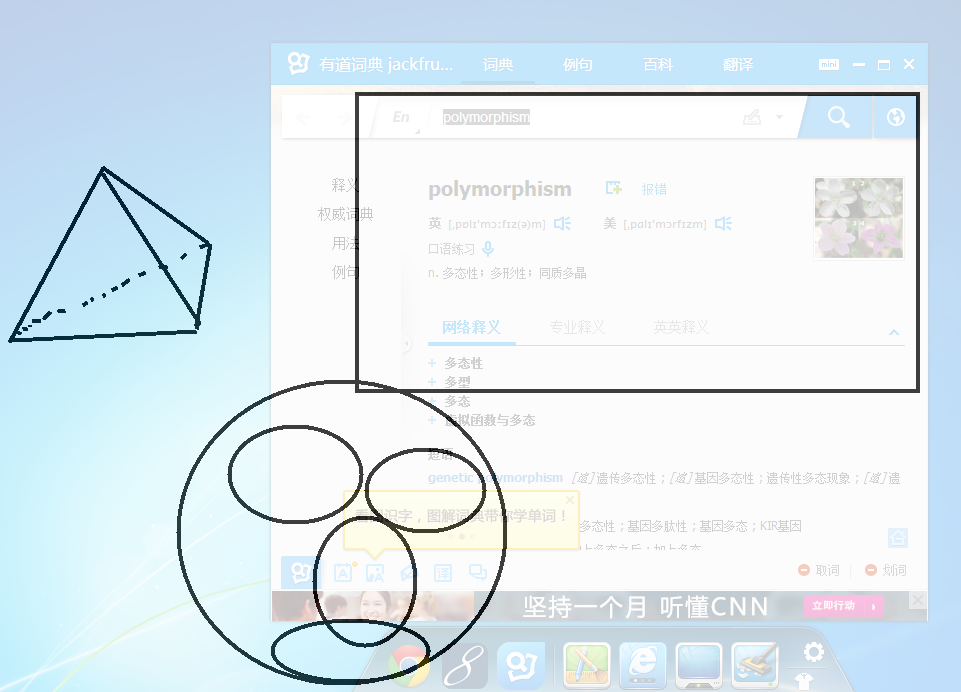
运行一下,就可以看到下面的效果图:
本文来自互联网用户投稿,文章观点仅代表作者本人,不代表本站立场,不承担相关法律责任。如若转载,请注明出处。 如若内容造成侵权/违法违规/事实不符,请点击【内容举报】进行投诉反馈!