yolov5实战之二维码检测(含数据集及模型)
数据集及模型下载见文末
目录
1.前沿
2.二维码数据
3.训练配置
3.1数据集设置
3.2训练参数的配置
3.3网络结构设置
3.4训练
3.5结果示例
附录:数据集及模型下载
1.前沿
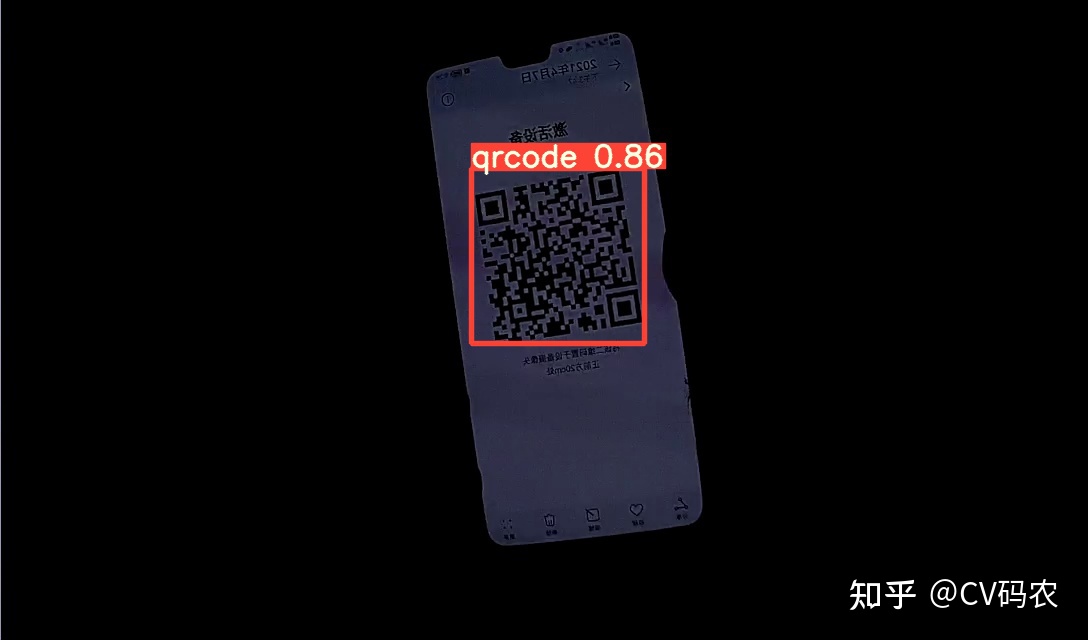
之前总结过yolov5来做皮卡丘的检测,用来熟悉yolov5的使用,不过总归是个demo型的应用,没啥实用价值。后来正好项目上有需要在成像条件不好的情况去检测二维码,传统的二维码检测方式基本上是通过角点检测定位二维码的三个定位点,在成像不好的时候,很容易失败。如果用深度学习去做鲁棒性就强很多,在检测到二维码之后,可以进行调焦或图像增强等手段,辅助后续的二维码识别过程。 环境准备同 yolov5实战之皮卡丘检测
训练好的二维码检测模型见文末
2.二维码数据
首先第一步肯定是需要准备数据了,通过网络我们可以找到不少二维码数据,通过打标后,就可以得到第一批数据了。仅通过网络图片还是不够的,因为找到的二维码图像的背景不一定符合我们的实际使用场景,仅仅用这些数据训练,虽然能检测到二维码,但是误检也会比较严重。所以还需要人造一些数据,我们可以将二维码抠出来,贴到各种各样的背景图上去,用于扩增我们的数据集。
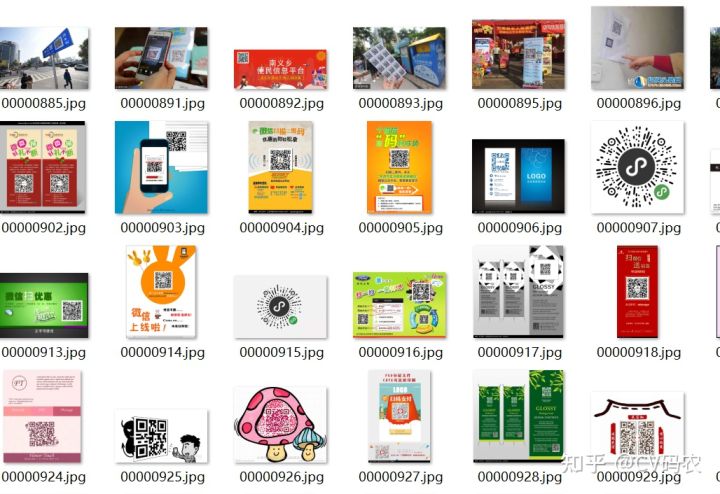
可以在文末去下载我收集的二维码数据,基于它们在自己的数据上贴图生成更多的数据。其中数据的标签和yolov5的格式一致,具体也可以参考皮卡丘那篇,或者官方repo: https://github.com/ultralytics/yolov5/wiki/Train-Custom-Data 数据生成大概的代码:
def synthetise_image(background_image,front_image,scale=0.1,degree=10,borderValue=(114,114,114)):background_image_cp=copy.deepcopy(background_image)bg_h, bg_w = background_image_cp.shape[0:2]qr_h, qr_w = front_image.shape[0:2]roate_image, rotate_label = random_perspective(front_image, np.array([0, 0, 0, qr_w, qr_h]).reshape((-1, 5)),translate=0, scale=scale,degrees=degree, shear=0, border=(qr_w//2,qr_w//2),borderValue=borderValue)crop_rotate = roate_image[rotate_label[0][2]:rotate_label[0][4], rotate_label[0][1]:rotate_label[0][3]]if bg_wbg_h or random_x + crop_rotate.shape[1]>bg_w:return None,Nonemask = (crop_rotate != np.array(list(borderValue)))mask = (mask[:, :, 0] | mask[:, :, 1] | mask[:, :, 2])mask_inv=(~mask)roi = background_image_cp[random_y:random_y + crop_rotate.shape[0], random_x:random_x + crop_rotate.shape[1]]roi_bg = cv2.bitwise_and(roi, roi, mask=mask_inv.astype(np.uint8))roi_fg = cv2.bitwise_and(crop_rotate, crop_rotate, mask=mask.astype(np.uint8))dst = cv2.add(roi_bg, roi_fg)roi[:, :] = dst[:, :]return background_image_cp,[random_x,random_y,crop_rotate.shape[1],crop_rotate.shape[0]]...    background_image=cv2.imread(os.path.join(background_dir,background_lst[index]))
background_h,background_w=background_image.shape[0:2]mixup_image,box=synthetise_image(background_image,qr_image,scale=0.2,degree=45)if mixup_image is None or (box[2]<60 or box[3]<60):continuecnt+=1center_x=box[0]+box[2]/2
center_y=box[1]+box[3]/2
label=[0,center_x/background_w,center_y/background_h,box[2]/background_w,box[3]/background_h]#save image
cv2.imwrite(os.path.join(save_dir,"{:0>8d}_sync_{}.jpg".format(thread_start_cnt,sub_dir)),mixup_image)
#save label
with open(os.path.join(save_label,"{:0>8d}_sync_{}.txt".format(thread_start_cnt,sub_dir)),'w') as f:f.write("{0} {1} {2} {3} {4}\n".format(label[0],label[1],label[2],label[3],label[4]))
3.训练配置
3.1数据集设置
新建qrcode_dataset.yml, 设置下数据集的路径
train: ./data/qrcode/images/train/  # train
val: ./data/qrcode/images/val/  # val# number of classes
nc: 1# class names
names: ['qrcode']
3.2训练参数的配置
可以根据自己的任务设置下数据增强比例这些:
# Hyperparameters for COCO training from scratch
# python train.py --batch 40 --cfg yolov5m.yaml --weights '' --data coco.yaml --img 640 --epochs 300
# See tutorials for hyperparameter evolution https://github.com/ultralytics/yolov5#tutorialslr0: 0.01  # initial learning rate (SGD=1E-2, Adam=1E-3)
lrf: 0.001  # final OneCycleLR learning rate (lr0 * lrf)
momentum: 0.937  # SGD momentum/Adam beta1
weight_decay: 0.0005  # optimizer weight decay 5e-4
warmup_epochs: 3.0  # warmup epochs (fractions ok)
warmup_momentum: 0.8  # warmup initial momentum
warmup_bias_lr: 0.1  # warmup initial bias lr
box: 0.05  # box loss gain
cls: 0.5  # cls loss gain
cls_pw: 1.0  # cls BCELoss positive_weight
obj: 1.0  # obj loss gain (scale with pixels)
obj_pw: 1.0  # obj BCELoss positive_weight
iou_t: 0.20  # IoU training threshold
anchor_t: 4.0  # anchor-multiple threshold
# anchors: 3  # anchors per output layer (0 to ignore)
fl_gamma: 0.0  # focal loss gamma (efficientDet default gamma=1.5)
hsv_h: 0.015  # image HSV-Hue augmentation (fraction)
hsv_s: 0.7  # image HSV-Saturation augmentation (fraction)
hsv_v: 0.4  # image HSV-Value augmentation (fraction)
degrees: 0.0  # image rotation (+/- deg)
translate: 0.  # image translation (+/- fraction)
scale: 0.0  # image scale (+/- gain)
shear: 0.0  # image shear (+/- deg)
perspective: 0.0  # image perspective (+/- fraction), range 0-0.001
flipud: 0.0  # image flip up-down (probability)
fliplr: 0.5  # image flip left-right (probability)
mosaic: 0.2  # image mosaic (probability)
mixup: 0.0  # image mixup (probability)
3.3网络结构设置
根据需要调整设置自己的网络大小以及根据想要检测的二维码大小设置anchor: anchor在非finetune训练方式下,默认是通过数据集计算出来的,若要关闭这个功能,需要训练时开启”--noautoanchor"选项。
# parameters
nc: 1  # number of classes
depth_multiple: 0.33  # model depth multiple
width_multiple: 0.50  # layer channel multiple# anchors
anchors:- [38,38,  53,53,  68,67]  # P3/8- [83,83,  101,100,  121,121]  # P4/16- [146,145,  176,175,  218,218]  # P5/32# YOLOv5 backbone
backbone:# [from, number, module, args][#[-1, 1, Focus, [64, 3]],  # 0-P1/2[ -1, 1, Conv, [ 32, 3, 2 ] ],[ -1, 1, Conv, [ 64, 3, 1 ] ], # 0-P1/2[-1, 1, Conv, [128, 3, 2]],  # 1-P2/4[-1, 3, BottleneckCSP, [128]],[-1, 1, Conv, [256, 3, 2]],  # 3-P3/8[-1, 9, BottleneckCSP, [256]],[-1, 1, Conv, [512, 3, 2]],  # 5-P4/16[-1, 9, BottleneckCSP, [512]],[-1, 1, Conv, [1024, 3, 2]],  # 7-P5/32[-1, 1, SPP, [1024, [5, 9, 13]]],[-1, 3, BottleneckCSP, [1024, False]],  # 10]# YOLOv5 head
head:[[-1, 1, Conv, [512, 1, 1]],[ -1, 1, DeConv, [ 512, 4, 2 ] ],[[-1, 7], 1, Concat, [1]],  # cat backbone P4[-1, 3, BottleneckCSP, [512, False]],  # 14[-1, 1, Conv, [256, 1, 1]],[ -1, 1, DeConv, [ 256, 4, 2 ] ],[[-1, 5], 1, Concat, [1]],  # cat backbone P3[-1, 3, BottleneckCSP, [256, False]],  # 18 (P3/8-small)[-1, 1, Conv, [256, 3, 2]],[[-1, 15], 1, Concat, [1]],  # cat head P4[-1, 3, BottleneckCSP, [512, False]],  # 21 (P4/16-medium)[-1, 1, Conv, [512, 3, 2]],[[-1, 11], 1, Concat, [1]],  # cat head P5[-1, 3, BottleneckCSP, [1024, False]],  # 24 (P5/32-large)[[18, 21, 24], 1, Detect, [nc, anchors]],  # Detect(P3, P4, P5)]
3.4训练
设置上述这些,就可以开始训练了,由于我修改了网络结构,所以先是从头训练了,然后又进行了一次finetune训练。训练可以指定的参数:
parser.add_argument('--weights', type=str, default='yolov5s.pt', help='initial weights path')#finetune时基于的模型parser.add_argument('--cfg', type=str, default='', help='model.yaml path')#模型结构文件parser.add_argument('--data', type=str, default='data/coco128.yaml', help='data.yaml path')#数据配置parser.add_argument('--hyp', type=str, default='data/hyp.scratch.yaml', help='hyperparameters path')#训练参数parser.add_argument('--epochs', type=int, default=300)parser.add_argument('--batch-size', type=int, default=16, help='total batch size for all GPUs')parser.add_argument('--img-size', nargs='+', type=int, default=[640, 640], help='[train, test] image sizes')parser.add_argument('--rect', action='store_true', help='rectangular training')parser.add_argument('--resume', nargs='?', const=True, default=False, help='resume most recent training')parser.add_argument('--nosave', action='store_true', help='only save final checkpoint')parser.add_argument('--notest', action='store_true', help='only test final epoch')parser.add_argument('--noautoanchor', action='store_true', help='disable autoanchor check')#开启后不自动计算anchorparser.add_argument('--evolve', action='store_true', help='evolve hyperparameters')parser.add_argument('--bucket', type=str, default='', help='gsutil bucket')parser.add_argument('--cache-images', action='store_true', help='cache images for faster training')parser.add_argument('--image-weights', action='store_true', help='use weighted image selection for training')parser.add_argument('--device', default='', help='cuda device, i.e. 0 or 0,1,2,3 or cpu')#显卡parser.add_argument('--multi-scale', action='store_true', help='vary img-size +/- 50%%')parser.add_argument('--single-cls', action='store_true', help='train multi-class data as single-class')parser.add_argument('--adam', action='store_true', help='use torch.optim.Adam() optimizer')parser.add_argument('--sync-bn', action='store_true', help='use SyncBatchNorm, only available in DDP mode')parser.add_argument('--local_rank', type=int, default=-1, help='DDP parameter, do not modify')parser.add_argument('--log-imgs', type=int, default=16, help='number of images for W&B logging, max 100')parser.add_argument('--log-artifacts', action='store_true', help='log artifacts, i.e. final trained model')parser.add_argument('--workers', type=int, default=8, help='maximum number of dataloader workers')#数据读取线程数parser.add_argument('--project', default='runs/train', help='save to project/name')parser.add_argument('--name', default='exp', help='save to project/name')同样的,训练结果可以在控制台看或通过wandb查看(参见pikachu那篇)。
3.5结果示例
附录:数据集
(32条消息) yolov5二维码检测数据集(3100+张)资源-CSDN文库x
训练好的二维码检测模型:面包多 CoderInCV 
本文来自互联网用户投稿,文章观点仅代表作者本人,不代表本站立场,不承担相关法律责任。如若转载,请注明出处。 如若内容造成侵权/违法违规/事实不符,请点击【内容举报】进行投诉反馈!