Springboot2.1 + Redis + Shiro集群
感谢博主:这个名字想了很久对本文shiro整合redis部分提供很多参考还有解答
crazycake官网:http://alexxiyang.github.io/shiro-redis/
Eclipse安装springboot插件:https://www.cnblogs.com/zjdxr-up/p/8617242.html
我用的mars 4.5.2 所以我下的tools是这个:****http://download.springsource.com/release/TOOLS/update/3.7.3.RELEASE/e4.5
IDEA修改Eclipse快捷键:****https://blog.csdn.net/dlz_mr/article/details/54341163
-
目录
前言:
正文:
前言:
出于对基于Springcloud的微服务的铺垫使用了Springboot来整合redis和shiro,以及swagger,本文中各项技术百度或者Google都能找得到,所以有些地方可能会一带而过,重点说明我在整合中遇到的坑,以及由于公司同事使用的IDE不同,最后给出eclipse的插件安装方法
ps:本文使用的是idea
正文:
项目结构
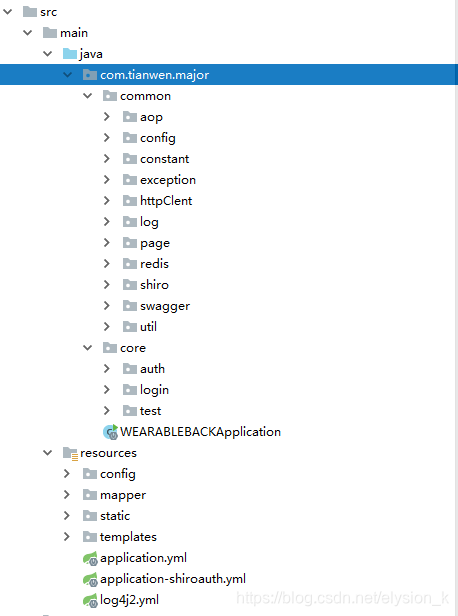
在application.yml中添加项目名称还有port等基本信息
spring:application:name:majorserver:port: 9500
然后在程序入口文件启动服务,访问9500端口就可以看到spring项目的基本信息,springboot最好的地方就在于无需做过多的配置,开箱即用,个性化不多的项目只需要添加项目名称和端口等基础信息就可以运行了,整个项目主要配置都在application.yml中
public class WEARABLEBACKApplication {public static void main(String[] args) {SpringApplication.run(WEARABLEBACKApplication.class, args);}
}
然后再来添加mysql配置
首先添加pom依赖
mysql mysql-connector-java runtime
org.mybatis.spring.boot mybatis-spring-boot-starter 1.2.2
com.alibaba druid 1.1.5
然后我们再去修改application.yml
springdatasource:url: jdbc:mysql://192.168.20.222:3306/hs?serverTimezone=GMT%2B8&characterEncoding=utf8username: tianwenpassword: tianwendriver-class-name: com.mysql.cj.jdbc.Drivertype: com.alibaba.druid.pool.DruidDataSource
配置mybatis的配置文件:在resources/config目录下创建mybatis-config.xml
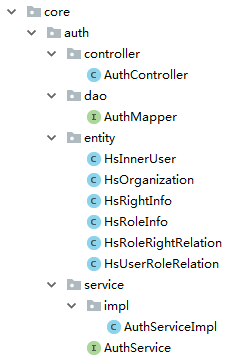
在core目录下创建一套业务目录并写好mvc架构的各个类
在resources/mapper目录下创建AuthMapper.xml
最后在程序入口类中添加mapper和dao的扫描注解
@SpringBootApplication(scanBasePackages = {"com.tianwen.major"})
@MapperScan(basePackages = {"com.tianwen.major.core.*.dao"})
@ComponentScan
public class WEARABLEBACKApplication {public static void main(String[] args) {SpringApplication.run(WEARABLEBACKApplication.class, args);}
}
这样就可以通过工具请求对应链接查询数据库获取数据了,如果是restful的项目到这里就可以进行下一步配置了, 但是本项目既不是restful也不是前后分离,所以还需要配置freemarker来供前端跳转
添加freemarker依赖
org.springframework.boot spring-boot-starter-freemarker
修改配置文件添加freemarker配置
springfreemarker:request-context-attribute: reqsuffix: .ftlcontent-type: text/htmlenabled: truecache: falsetemplate-loader-path: classpath:/templates #模板加载路径charset: UTF-8settings:number_format: '0.##' #数字格式化,无小数点
这样就可以在resources/templates目录中添加想要的ftl页面,以上就是一个比较基础的springboot项目架构 接下来开始整合shiro+redis框架(由于写本文之前在springmvc中已经实现shiro和redis的单独配置,所以本文直接开始整合配置,不单独提供配置)
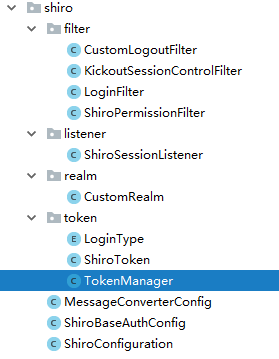
先附上shiro配置的项目结构
添加pom依赖
org.springframework.boot spring-boot-starter-data-redis 2.1.1.RELEASE
org.apache.shiro shiro-all 1.3.2
org.crazycake shiro-redis 3.1.0
新增ShiroConfiguration类
package com.tianwen.major.common.shiro;import com.tianwen.major.common.shiro.filter.CustomLogoutFilter;
import com.tianwen.major.common.shiro.filter.LoginFilter;
import com.tianwen.major.common.shiro.filter.ShiroPermissionFilter;
import com.tianwen.major.common.shiro.listener.ShiroSessionListener;
import com.tianwen.major.common.shiro.realm.CustomRealm;
import org.apache.shiro.mgt.SecurityManager;
import org.apache.shiro.session.SessionListener;
import org.apache.shiro.session.mgt.SessionManager;
import org.apache.shiro.session.mgt.eis.JavaUuidSessionIdGenerator;
import org.apache.shiro.session.mgt.eis.SessionDAO;
import org.apache.shiro.session.mgt.eis.SessionIdGenerator;
import org.apache.shiro.spring.LifecycleBeanPostProcessor;
import org.apache.shiro.spring.web.ShiroFilterFactoryBean;
import org.apache.shiro.web.filter.mgt.DefaultFilterChainManager;
import org.apache.shiro.web.filter.mgt.PathMatchingFilterChainResolver;
import org.apache.shiro.web.mgt.DefaultWebSecurityManager;
import org.apache.shiro.web.servlet.AbstractShiroFilter;
import org.apache.shiro.web.servlet.SimpleCookie;
import org.apache.shiro.web.session.mgt.DefaultWebSessionManager;
import org.crazycake.shiro.RedisCacheManager;
import org.crazycake.shiro.RedisClusterManager;
import org.crazycake.shiro.RedisManager;
import org.crazycake.shiro.RedisSessionDAO;
import org.springframework.aop.framework.autoproxy.DefaultAdvisorAutoProxyCreator;
import org.springframework.beans.factory.annotation.Autowired;
import org.springframework.beans.factory.annotation.Qualifier;
import org.springframework.boot.web.server.ConfigurableWebServerFactory;
import org.springframework.boot.web.server.ErrorPage;
import org.springframework.boot.web.server.WebServerFactoryCustomizer;
import org.springframework.boot.web.servlet.FilterRegistrationBean;
import org.springframework.context.annotation.Bean;
import org.springframework.context.annotation.Configuration;
import org.springframework.context.annotation.DependsOn;
import org.springframework.http.HttpStatus;
import org.springframework.web.filter.DelegatingFilterProxy;
import org.springframework.web.servlet.handler.SimpleMappingExceptionResolver;import javax.servlet.Filter;
import java.util.*;@Configuration
public class ShiroConfiguration {@Autowiredprivate ShiroBaseAuthConfig shiroBaseAuthConfig;private static final String CACHE_KEY = "shiro:cache:";private static final String SESSION_KEY = "shiro:session:";private static final String NAME = "custom.name";private static final String VALUE = "/";@Beanpublic ShiroPermissionFilter shiroPermissionFilter() {return new ShiroPermissionFilter();}@Bean("shiroFilter")public ShiroFilterFactoryBean shiroFilter(SecurityManager securityManager) {ShiroFilterFactoryBean shiroFilter = new ShiroFilterFactoryBean();shiroFilter.setSecurityManager(securityManager);shiroFilter.setLoginUrl("/auth/toLogin");shiroFilter.setSuccessUrl("/auth/loginSuccess");shiroFilter.setUnauthorizedUrl("/auth/unauthorized");//shiro自定义过滤器 对应shiro_auth的权限LinkedHashMap filterMap = new LinkedHashMap<>(1);filterMap.put("login",new LoginFilter());filterMap.put("logout",new CustomLogoutFilter());
//        filterMap.put("perms", shiroPermissionFilter());LinkedHashMap shiro_auth = new LinkedHashMap<>();shiroBaseAuthConfig.getBase_auth().stream().forEach(str -> {String[] strs = str.split("=");shiro_auth.put(strs[0], strs[1]);});
//        shiro_auth.put("/auth/**", "anon");
//
//        shiro_auth.put("/css/**", "anon");
//        shiro_auth.put("/fonts/**", "anon");
//        shiro_auth.put("/images/**", "anon");
//        shiro_auth.put("/js/**", "anon");
//        shiro_auth.put("/plugin/**", "anon");
//        shiro_auth.put("/ueditor/**", "anon");
//        shiro_auth.put("/captcha.jpg", "anon");
//
//        shiro_auth.put("/**", "login");System.out.println("base_auth:" + shiro_auth);shiroFilter.setFilters(filterMap);shiroFilter.setFilterChainDefinitionMap(shiro_auth);return shiroFilter;}@Bean("customRealm")public CustomRealm realm(){return new CustomRealm();}/*** shiro缓存管理器;* 需要添加到securityManager中* @return*/@Bean("redisCacheManager")public RedisCacheManager redisCacheManager(){RedisCacheManager redisCacheManager = new RedisCacheManager();redisCacheManager.setRedisManager(redisClusterManager());//redisCacheManager.setRedisManager(redisManager());//redis中针对不同用户缓存redisCacheManager.setPrincipalIdFieldName("userId");//用户权限信息缓存时间redisCacheManager.setExpire(200000);return redisCacheManager;}@Beanpublic RedisClusterManager redisClusterManager(){RedisClusterManager redisClusterManager = new RedisClusterManager();redisClusterManager.setHost("192.168.20.161:7000,192.168.20.161:7001,192.168.20.161:7002,192.168.20.161:7003,192.168.20.161:7004,192.168.20.161:7005");return redisClusterManager;}@Beanpublic RedisManager redisManager(){RedisManager redisManager = new RedisManager();redisManager.setHost("192.168.20.161");redisManager.setPort(6379);
//        redisManager.setPassword("123456");return redisManager;}/*** 配置session监听* @return*/@Bean("sessionListener")public ShiroSessionListener sessionListener(){ShiroSessionListener sessionListener = new ShiroSessionListener();return sessionListener;}/*** 配置会话ID生成器* @return*/@Beanpublic SessionIdGenerator sessionIdGenerator() {return new JavaUuidSessionIdGenerator();}/*** 配置保存sessionId的cookie* 注意:这里的cookie 不是上面的记住我 cookie 记住我需要一个cookie session管理 也需要自己的cookie* 默认为: JSESSIONID 问题: 与SERVLET容器名冲突,重新定义为sid* @return*/@Bean("sessionIdCookie")public SimpleCookie sessionIdCookie(){//这个参数是cookie的名称SimpleCookie simpleCookie = new SimpleCookie("sid");//setcookie的httponly属性如果设为true的话,会增加对xss防护的安全系数。它有以下特点://setcookie()的第七个参数//设为true后,只能通过http访问,javascript无法访问//防止xss读取cookiesimpleCookie.setHttpOnly(true);simpleCookie.setPath("/");//maxAge=-1表示浏览器关闭时失效此CookiesimpleCookie.setMaxAge(-1);return simpleCookie;}/*** SessionDAO的作用是为Session提供CRUD并进行持久化的一个shiro组件* MemorySessionDAO 直接在内存中进行会话维护* EnterpriseCacheSessionDAO  提供了缓存功能的会话维护,默认情况下使用MapCache实现,内部使用ConcurrentHashMap保存缓存的会话。* @return*/@Beanpublic SessionDAO sessionDAO() {RedisSessionDAO redisSessionDAO = new RedisSessionDAO();redisSessionDAO.setRedisManager(redisManager());//session在redis中的保存时间,最好大于session会话超时时间redisSessionDAO.setExpire(12000);return redisSessionDAO;}/*** 配置会话管理器,设定会话超时及保存* @return*/@Bean("sessionManager")public SessionManager sessionManager() {DefaultWebSessionManager sessionManager = new DefaultWebSessionManager();Collection listeners = new ArrayList();//配置监听listeners.add(sessionListener());sessionManager.setSessionListeners(listeners);sessionManager.setSessionIdCookie(sessionIdCookie());sessionManager.setSessionDAO(sessionDAO());sessionManager.setCacheManager(redisCacheManager());//全局会话超时时间(单位毫秒),默认30分钟  暂时设置为10秒钟 用来测试sessionManager.setGlobalSessionTimeout(1800000);//是否开启删除无效的session对象  默认为truesessionManager.setDeleteInvalidSessions(true);//是否开启定时调度器进行检测过期session 默认为truesessionManager.setSessionValidationSchedulerEnabled(true);//设置session失效的扫描时间, 清理用户直接关闭浏览器造成的孤立会话 默认为 1个小时//设置该属性 就不需要设置 ExecutorServiceSessionValidationScheduler 底层也是默认自动调用ExecutorServiceSessionValidationScheduler//暂时设置为 5秒 用来测试sessionManager.setSessionValidationInterval(3600000);//取消url 后面的 JSESSIONIDsessionManager.setSessionIdUrlRewritingEnabled(false);return sessionManager;}@Bean("securityManager")public SecurityManager securityManager(@Qualifier("customRealm") CustomRealm customRealm) {DefaultWebSecurityManager manager = new DefaultWebSecurityManager();//配置redis缓存manager.setCacheManager(redisCacheManager());//配置自定义session管理,使用redismanager.setSessionManager(sessionManager());manager.setRealm(customRealm);return manager;}@Beanpublic SimpleCookie simpleCookie() {SimpleCookie simpleCookie = new SimpleCookie();simpleCookie.setName(NAME);simpleCookie.setValue(VALUE);return simpleCookie;}@Bean("defaultAdvisorAutoProxyCreator")@DependsOn("lifecycleBeanPostProcessor")public DefaultAdvisorAutoProxyCreator defaultAdvisorAutoProxyCreator() {DefaultAdvisorAutoProxyCreator defaultAdvisorAutoProxyCreator = new DefaultAdvisorAutoProxyCreator();//指定强制使用cglib为action创建代理对象defaultAdvisorAutoProxyCreator.setProxyTargetClass(true);return defaultAdvisorAutoProxyCreator;}@Bean("lifecycleBeanPostProcessor")public static LifecycleBeanPostProcessor lifecycleBeanPostProcessor() {return new LifecycleBeanPostProcessor();}@Beanpublic FilterRegistrationBean delegatingFilterProxy(){FilterRegistrationBean filterRegistrationBean = new FilterRegistrationBean();DelegatingFilterProxy proxy = new DelegatingFilterProxy();proxy.setTargetFilterLifecycle(true);proxy.setTargetBeanName("shiroFilter");filterRegistrationBean.setFilter(proxy);List urlPatters = new ArrayList<>();urlPatters.add("/*");filterRegistrationBean.setUrlPatterns(urlPatters);return filterRegistrationBean;}/*** 解决: 无权限页面不跳转 shiroFilterFactoryBean.setUnauthorizedUrl("/unauthorized") 无效* shiro的源代码ShiroFilterFactoryBean.Java定义的filter必须满足filter instanceof AuthorizationFilter,* 只有perms,roles,ssl,rest,port才是属于AuthorizationFilter,而anon,authcBasic,auchc,user是AuthenticationFilter,* 所以unauthorizedUrl设置后页面不跳转 Shiro注解模式下,登录失败与没有权限都是通过抛出异常。* 并且默认并没有去处理或者捕获这些异常。在SpringMVC下需要配置捕获相应异常来通知用户信息* @return*/@Beanpublic SimpleMappingExceptionResolver simpleMappingExceptionResolver() {SimpleMappingExceptionResolver simpleMappingExceptionResolver=new SimpleMappingExceptionResolver();Properties properties=new Properties();//这里的 /unauthorized 是页面,不是访问的路径properties.setProperty("org.apache.shiro.authz.UnauthorizedException","/common/unauthorized");properties.setProperty("org.apache.shiro.authz.UnauthenticatedException","/common/unauthorized");simpleMappingExceptionResolver.setExceptionMappings(properties);return simpleMappingExceptionResolver;}/*** 解决spring-boot Whitelabel Error Page* @return*/@Beanpublic WebServerFactoryCustomizer webServerFactoryCustomizer(){return new WebServerFactoryCustomizer() {@Overridepublic void customize(ConfigurableWebServerFactory factory) {ErrorPage error401Page = new ErrorPage(HttpStatus.UNAUTHORIZED, "/common/unauthorized");ErrorPage error404Page = new ErrorPage(HttpStatus.NOT_FOUND, "/common/404");ErrorPage error500Page = new ErrorPage(HttpStatus.INTERNAL_SERVER_ERROR, "/common/500");HashSet set = new HashSet<>();set.add(error401Page);set.add(error404Page);set.add(error500Page);factory.setErrorPages(set);}};}}
配置讲解:
从配置文件可以看出来其实springboot整合shiro和springmvc没有本质上的区别,只是从配置xml文件变成了配置bean
创建shiro核心配置类SecurityManager,由于本项目涉及权限模块所以自定义了CustomRealm
cache整合redis使用的RedisCacheManager
session控制器由于使用了redis整合可以用redis托管redissession所以自定义sessionManager
在springmvc中整合redis+shiro时自己实现sessionDao,cacheManager等配置,但是使用了crazycake就可以省掉很多配置,我们只需要借助crazycake定义redis的bean:redisCacheManager,然后自定义sessionDao设置redisCacheManager最后在自定义sessionManager中设置就可以了,仅仅只需要3个bean就完成了redis+shiro的配置(本文中提供了redis单点和集群的cacheManager,可以按需定义)
最后定义shiro核心过滤器ShiroFilter配置过滤器链以及权限就可以了
ps:由于权限地址可能有很多 所以全部写在配置文件中太过繁琐而且不利于配置, 所以我单独配了application-shiroauth.yml文件利用spring注解读取出来然后配置过去,这里有个坑:必须要单独建一个类去接收配置信息,直接在shiro配置文件中是拿不到的,文末会贴出配置文件以及配置类
另外一个坑就是关于shiro自定义拦截器:如果直接在shiro配置文件中以bean定义自定义过滤器然后在shiroFilter中配置时,因为shiroFilter会提前把bean类注入到过滤器中,但这时所有权限地址还没有读取到, 所以会产生配置权限地址不管用导致无限重定向的可能,修改为:
filterMap.put("login",new LoginFilter());
脱离出spring的托管即可
创建自定义CustomRealm,如果项目简单没有权限而只有身份校验的时候可以不用自定义realm或者返回null,本文的权限方法doGetAuthorizationInfo涉及隐私就没有贴出来了
package com.tianwen.major.common.shiro.realm;import com.tianwen.major.common.constant.SystemConstant;
import com.tianwen.major.common.shiro.token.ShiroToken;
import com.tianwen.major.common.shiro.token.TokenManager;
import com.tianwen.major.common.util.SysUtil;
import com.tianwen.major.core.auth.entity.HsInnerUser;
import com.tianwen.major.core.auth.service.AuthService;
import org.apache.shiro.SecurityUtils;
import org.apache.shiro.authc.*;
import org.apache.shiro.authz.AuthorizationInfo;
import org.apache.shiro.authz.SimpleAuthorizationInfo;
import org.apache.shiro.realm.AuthorizingRealm;
import org.apache.shiro.subject.PrincipalCollection;
import org.springframework.beans.factory.annotation.Autowired;import java.util.Map;
import java.util.concurrent.ConcurrentHashMap;public class CustomRealm extends AuthorizingRealm {protected final Map roles = new ConcurrentHashMap<>();@Autowiredprivate AuthService authService;@Overrideprotected AuthorizationInfo doGetAuthorizationInfo(PrincipalCollection principalCollection) {HsInnerUser user = TokenManager.getToken();SimpleAuthorizationInfo authorizationInfo = new SimpleAuthorizationInfo();return authorizationInfo;}@Overrideprotected AuthenticationInfo doGetAuthenticationInfo(AuthenticationToken authenticationToken) throws AuthenticationException {ShiroToken shiroToken = (ShiroToken) authenticationToken;String account = shiroToken.getUsername();String password = shiroToken.getPwd();HsInnerUser user = authService.findUserByAccountAndPassword(account, password);if(SysUtil.isEmpty(user)){throw new UnknownAccountException("用户名或密码错误!");}SecurityUtils.getSubject().getSession().setAttribute(SystemConstant.LOG_USER_INFO, user);SimpleAuthenticationInfo info = new SimpleAuthenticationInfo(user, user.getPassword(), getName());return info;}@Overridepublic void clearCache(PrincipalCollection principals) {super.clearCache(principals);}
}
以上就是springboot整合redis+shiro的基础框架,各种自定义过滤器及权限地址配置就不赘述了
附上FilterChainDefinitionMap配置及完整pom.xml
application-shiroauth.yml:
auth:base_auth: ["/auth/**=anon","/css/**=anon","/fonts/**=anon","/images/**=anon","/js/**=anon","/plugin/**=anon","/ueditor/**=anon","/captcha.jpg=anon","/logout=logout","/**=login"]
ShiroBaseAuthConfig:
package com.tianwen.major.common.shiro;import lombok.Data;
import org.apache.shiro.spring.web.ShiroFilterFactoryBean;
import org.apache.shiro.web.filter.mgt.DefaultFilterChainManager;
import org.apache.shiro.web.filter.mgt.PathMatchingFilterChainResolver;
import org.apache.shiro.web.servlet.AbstractShiroFilter;
import org.springframework.boot.context.properties.ConfigurationProperties;
import org.springframework.context.annotation.Bean;
import org.springframework.context.annotation.Configuration;import java.util.List;
import java.util.Map;@Data
@Configuration
@ConfigurationProperties(prefix = "auth")
public class ShiroBaseAuthConfig {private List base_auth;
}
pom.xml:
org.springframework.boot spring-boot-starter org.springframework.boot spring-boot-starter-logging org.springframework.boot spring-boot-starter-data-rest org.springframework.boot spring-boot-starter-freemarker org.springframework.boot spring-boot-starter-validation org.springframework.boot spring-boot-starter-web org.springframework.boot spring-boot-starter-aop org.springframework.boot spring-boot-starter-log4j2 com.alibaba fastjson 1.2.47 commons-lang commons-lang 2.6 org.aspectj aspectjweaver 1.8.11 tk.mybatis mapper-spring-boot-starter 1.2.4 com.github.pagehelper pagehelper-spring-boot-starter 1.2.3 mysql mysql-connector-java runtime org.mybatis.spring.boot mybatis-spring-boot-starter 1.2.2 com.alibaba druid 1.1.5 org.projectlombok lombok true com.fasterxml.jackson.dataformat jackson-dataformat-yaml org.springframework.boot spring-boot-starter-test test org.springframework.boot spring-boot-starter-data-redis 2.1.1.RELEASE org.apache.shiro shiro-all 1.3.2 org.crazycake shiro-redis 3.1.0 org.springframework.boot spring-boot-configuration-processor true org.apache.httpcomponents httpclient 4.5.1 com.google.code.kaptcha kaptcha 2.3 io.springfox springfox-swagger2 2.8.0 io.springfox springfox-swagger-ui 2.8.0 本文来自互联网用户投稿,文章观点仅代表作者本人,不代表本站立场,不承担相关法律责任。如若转载,请注明出处。 如若内容造成侵权/违法违规/事实不符,请点击【内容举报】进行投诉反馈!