YOLOV3网络搭建 and 代码复现Pytorch and 元器件检测
目录
一. YOLOV3 网络
1.主干网络DarkNet53
二. 代码复现
1.DarkNet53搭建
2.特征加强 and 结果预测编辑
3. 源码地址
三. 检测效果
一. YOLOV3 网络
1.主干网络DarkNet53
YoloV3所使用的主干特征提取网络为Darknet53,它具有两个重要特点:
1、Darknet53具有一个重要特点是使用了残差网络Residual(残差结构可以在"分类"栏中的ResNet中了解)...... 。通过不断的1X1卷积和3X3卷积以及残差边的叠加,我们便大幅度的加深了网络。残差网络的特点是容易优化,并且能够通过增加相当的深度来提高准确率。其内部的残差块使用了跳跃连接,缓解了在深度神经网络中增加深度带来的梯度消失问题。
2、Darknet53的每一个卷积部分使用了特有的DarknetConv2D结构,每一次卷积的时候进行l2正则化,完成卷积后进行BatchNormalization标准化与LeakyReLU。普通的ReLU是将所有的负值都设为零,Leaky ReLU则是给所有负值赋予一个非零斜率。以数学的方式我们可以表示为:
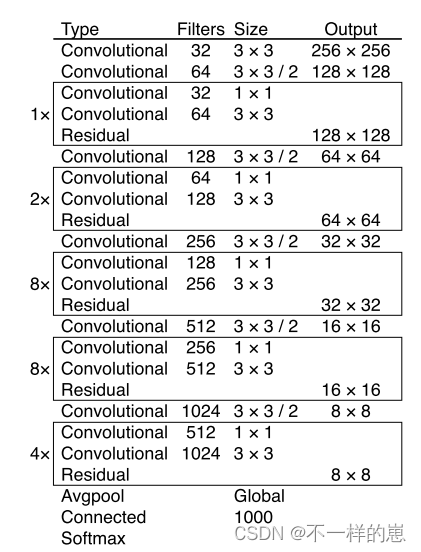
Fig1. DarkNet53结构表
画成流程图如下,更好理解:

上述流程图的关键字均与下面列出的代码中的参数名一样, 对照网络结构看代码 更易于理解。
二. 代码复现
1.DarkNet53搭建
import math
from collections import OrderedDictimport torch.nn as nn#---------------------------------------------------------------------#
#   残差块结构
#   利用一个1x1卷积下降通道数,然后利用一个3x3卷积提取特征并且上升通道数
#   最后接上一个残差边
#---------------------------------------------------------------------#
class BasicBlock(nn.Module):def __init__(self, inplanes, planes):super(BasicBlock, self).__init__()self.conv1 = nn.Conv2d(inplanes, planes[0], kernel_size=1, stride=1, padding=0, bias=False)self.bn1   = nn.BatchNorm2d(planes[0])self.relu1 = nn.LeakyReLU(0.1)self.conv2 = nn.Conv2d(planes[0], planes[1], kernel_size=3, stride=1, padding=1, bias=False)self.bn2   = nn.BatchNorm2d(planes[1])self.relu2 = nn.LeakyReLU(0.1)def forward(self, x):residual = xout = self.conv1(x)out = self.bn1(out)out = self.relu1(out)out = self.conv2(out)out = self.bn2(out)out = self.relu2(out)out = out + residualreturn outclass DarkNet(nn.Module):def __init__(self, layers):super(DarkNet, self).__init__()   #调用父类nn.Mudule的构造函数self.inplanes = 32                #输入通道# 416,416,3 -> 416,416,32 Conv2D 32x3x3   卷积核          步长       填充       偏置self.conv1 = nn.Conv2d(3, self.inplanes, kernel_size=3, stride=1, padding=1, bias=False)self.bn1   = nn.BatchNorm2d(self.inplanes)self.relu1 = nn.LeakyReLU(0.1)    #和cnn的Relu()不同 此LeakyReLU不为0->0.1*x# 416,416,32 -> 208,208,64self.layer1 = self._make_layer([32, 64], layers[0])# 208,208,64 -> 104,104,128self.layer2 = self._make_layer([64, 128], layers[1])# 104,104,128 -> 52,52,256self.layer3 = self._make_layer([128, 256], layers[2])# 52,52,256 -> 26,26,512self.layer4 = self._make_layer([256, 512], layers[3])# 26,26,512 -> 13,13,1024self.layer5 = self._make_layer([512, 1024], layers[4])self.layers_out_filters = [64, 128, 256, 512, 1024]#进行权值初始化# isinstance(m, nn.Conv2d) 判断 m 是否是 Conv2dfor m in self.modules():if isinstance(m, nn.Conv2d):n = m.kernel_size[0] * m.kernel_size[1] * m.out_channelsm.weight.data.normal_(0, math.sqrt(2. / n))elif isinstance(m, nn.BatchNorm2d):m.weight.data.fill_(1)m.bias.data.zero_()#---------------------------------------------------------------------#
#   在每一个layer里面,首先利用一个步长为2的3x3卷积进行下采样
#   然后进行残差结构的堆叠
#---------------------------------------------------------------------#def _make_layer(self, planes, blocks):layers = []# 步长为2 的 下采样  , 卷积核为3x3layers.append(("ds_conv", nn.Conv2d(self.inplanes, planes[1], kernel_size=3, stride=2, padding=1, bias=False)))layers.append(("ds_bn", nn.BatchNorm2d(planes[1])))layers.append(("ds_relu", nn.LeakyReLU(0.1)))#加入残差结构self.inplanes = planes[1]    #更新当前的输入通道数for i in range(0, blocks):layers.append(("residual_{}".format(i), BasicBlock(self.inplanes, planes)))return nn.Sequential(OrderedDict(layers))def forward(self, x):x = self.conv1(x)x = self.bn1(x)x = self.relu1(x)x = self.layer1(x)x = self.layer2(x)out3 = self.layer3(x)out4 = self.layer4(out3)out5 = self.layer5(out4)return out3, out4, out5def darknet53():model = DarkNet([1, 2, 8, 8, 4])return model
2.特征加强 and 结果预测
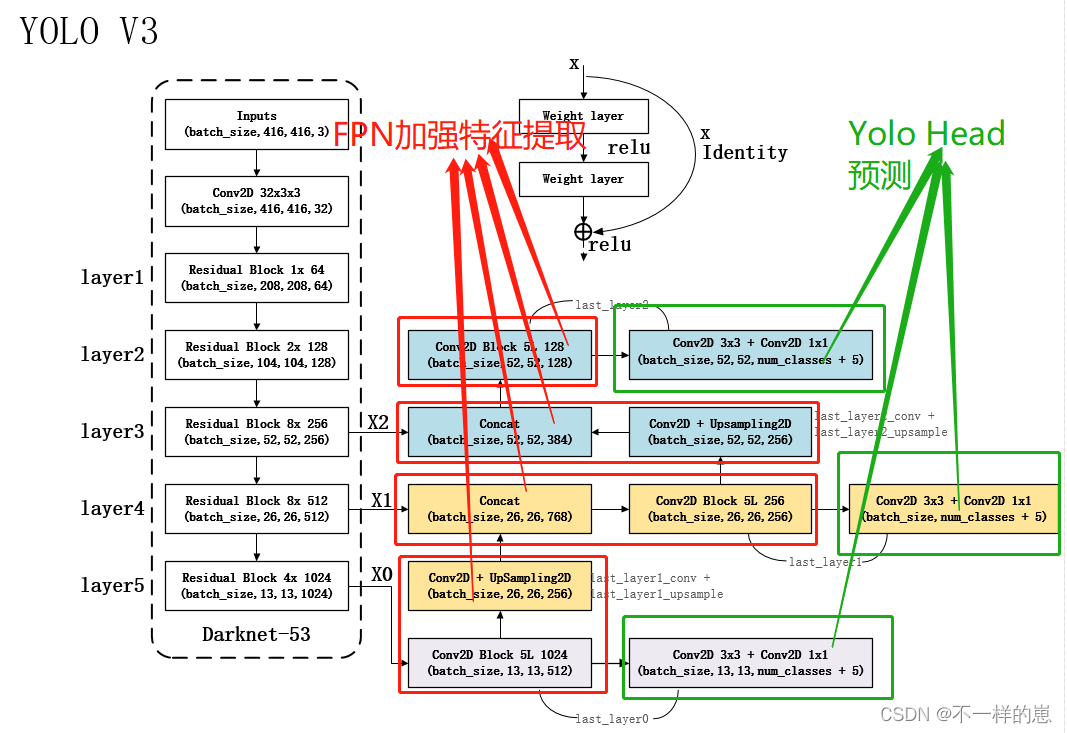
从特征获取预测结果的过程可以分为两个部分,分别是:
- 构建FPN特征金字塔进行加强特征提取(红色部分)
- 利用Yolo Head对三个有效特征层进行预测(绿色部分)
from tensorflow.keras.layers import Concatenate, Input, Lambda, UpSampling2D
from tensorflow.keras.models import Model
from utils.utils import composefrom nets.darknet import DarknetConv2D, DarknetConv2D_BN_Leaky, darknet_body
from nets.yolo_training import yolo_loss#---------------------------------------------------#
#   特征层->最后的输出
#---------------------------------------------------#
def make_five_conv(x, num_filters, weight_decay=5e-4):x = DarknetConv2D_BN_Leaky(num_filters, (1,1), weight_decay=weight_decay)(x)x = DarknetConv2D_BN_Leaky(num_filters*2, (3,3), weight_decay=weight_decay)(x)x = DarknetConv2D_BN_Leaky(num_filters, (1,1), weight_decay=weight_decay)(x)x = DarknetConv2D_BN_Leaky(num_filters*2, (3,3), weight_decay=weight_decay)(x)x = DarknetConv2D_BN_Leaky(num_filters, (1,1), weight_decay=weight_decay)(x)return xdef make_yolo_head(x, num_filters, out_filters, weight_decay=5e-4):y = DarknetConv2D_BN_Leaky(num_filters*2, (3,3), weight_decay=weight_decay)(x)# 255->3, 85->3, 4 + 1 + 80y = DarknetConv2D(out_filters, (1,1), weight_decay=weight_decay)(y)return y#---------------------------------------------------#
#   FPN网络的构建,并且获得预测结果
#---------------------------------------------------#
def yolo_body(input_shape, anchors_mask, num_classes, weight_decay=5e-4):inputs      = Input(input_shape)#---------------------------------------------------#   #   生成darknet53的主干模型#   获得三个有效特征层,他们的shape分别是:#   C3 为 52,52,256#   C4 为 26,26,512#   C5 为 13,13,1024#---------------------------------------------------#C3, C4, C5  = darknet_body(inputs, weight_decay)#---------------------------------------------------##   第一个特征层#   y1=(batch_size,13,13,3,85)#---------------------------------------------------## 13,13,1024 -> 13,13,512 -> 13,13,1024 -> 13,13,512 -> 13,13,1024 -> 13,13,512x   = make_five_conv(C5, 512, weight_decay)P5  = make_yolo_head(x, 512, len(anchors_mask[0]) * (num_classes+5), weight_decay)# 13,13,512 -> 13,13,256 -> 26,26,256x   = compose(DarknetConv2D_BN_Leaky(256, (1,1), weight_decay=weight_decay), UpSampling2D(2))(x)# 26,26,256 + 26,26,512 -> 26,26,768x   = Concatenate()([x, C4])#---------------------------------------------------##   第二个特征层#   y2=(batch_size,26,26,3,85)#---------------------------------------------------## 26,26,768 -> 26,26,256 -> 26,26,512 -> 26,26,256 -> 26,26,512 -> 26,26,256x   = make_five_conv(x, 256, weight_decay)P4  = make_yolo_head(x, 256, len(anchors_mask[1]) * (num_classes+5), weight_decay)# 26,26,256 -> 26,26,128 -> 52,52,128x   = compose(DarknetConv2D_BN_Leaky(128, (1,1), weight_decay=weight_decay), UpSampling2D(2))(x)# 52,52,128 + 52,52,256 -> 52,52,384x   = Concatenate()([x, C3])#---------------------------------------------------##   第三个特征层#   y3=(batch_size,52,52,3,85)#---------------------------------------------------## 52,52,384 -> 52,52,128 -> 52,52,256 -> 52,52,128 -> 52,52,256 -> 52,52,128x   = make_five_conv(x, 128, weight_decay)P3  = make_yolo_head(x, 128, len(anchors_mask[2]) * (num_classes+5), weight_decay)return Model(inputs, [P5, P4, P3])def get_train_model(model_body, input_shape, num_classes, anchors, anchors_mask):y_true = [Input(shape = (input_shape[0] // {0:32, 1:16, 2:8}[l], input_shape[1] // {0:32, 1:16, 2:8}[l], \len(anchors_mask[l]), num_classes + 5)) for l in range(len(anchors_mask))]model_loss  = Lambda(yolo_loss, output_shape    = (1, ), name            = 'yolo_loss', arguments       = {'input_shape'       : input_shape, 'anchors'           : anchors, 'anchors_mask'      : anchors_mask, 'num_classes'       : num_classes, 'balance'           : [0.4, 1.0, 4],'box_ratio'         : 0.05,'obj_ratio'         : 5 * (input_shape[0] * input_shape[1]) / (416 ** 2), 'cls_ratio'         : 1 * (num_classes / 80)})([*model_body.output, *y_true])model       = Model([model_body.input, *y_true], model_loss)return model
3. 源码地址
https://github.com/mcuwangzaiacm/YOLOV3_Pytorch/tree/main/utils
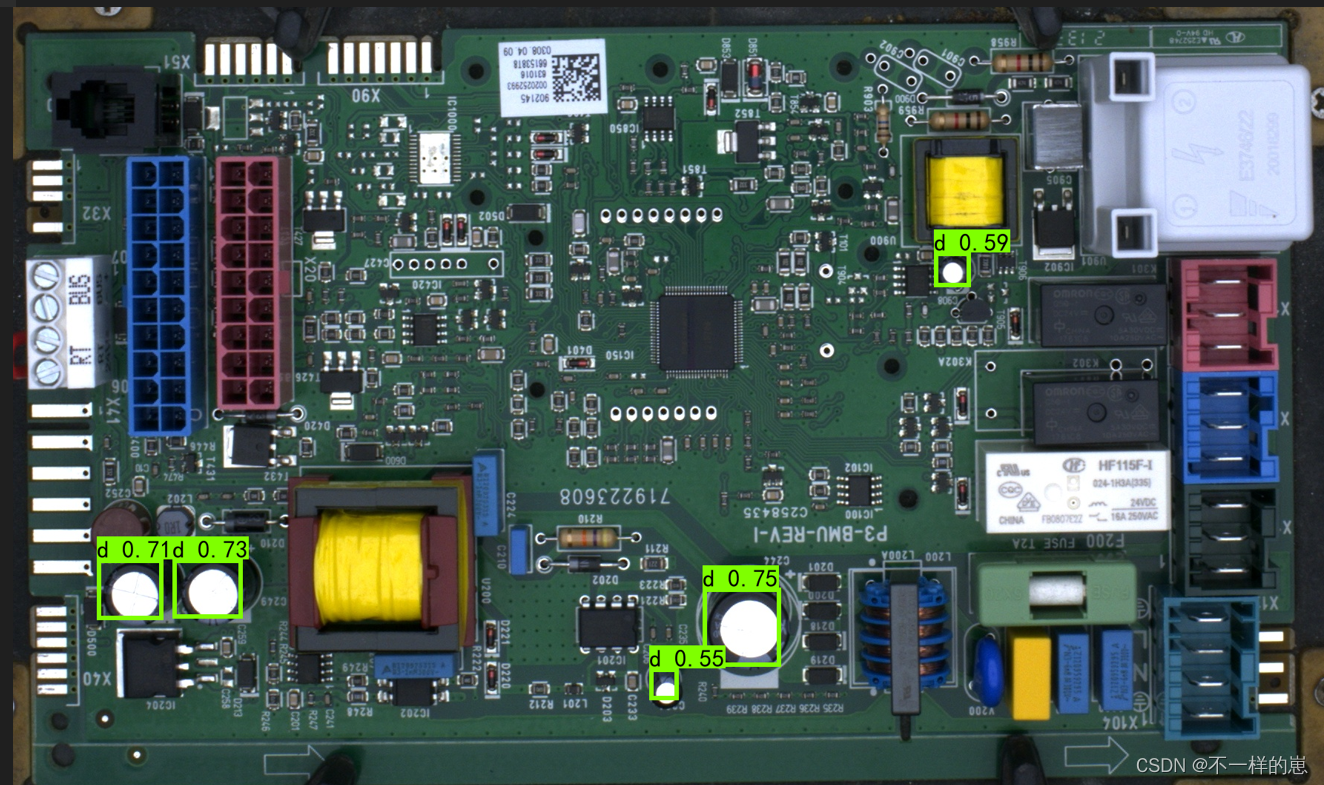
三. 检测效果
训练采用5000张电路板, 每张电路板上标记了4-30个的电容,4个种类(上,下,左, 右),检测电容极性,检测效果如下
本文来自互联网用户投稿,文章观点仅代表作者本人,不代表本站立场,不承担相关法律责任。如若转载,请注明出处。 如若内容造成侵权/违法违规/事实不符,请点击【内容举报】进行投诉反馈!