[机器学习笔记-3]识别服饰图像的神经网络
目录
1.安装tensorflow数据集(命令行输入) & 导入依赖
2.导入Fasion MINST数据集
3.处理数据
4.构建模型
5.训练模型
6.评估准确度
7.预测数据
8.图表显示数据
jupyter notebook中运行注意事项
术语
tensorflow_datasets中70000张衣服图片,60000张用作训练,10000张用作测试。
1.安装tensorflow数据集(命令行输入) & 导入依赖
from __future__ import absolute_import, division, print_function# Import TensorFlow and TensorFlow Datasets
import tensorflow as tf
import tensorflow_datasets as tfds
tf.logging.set_verbosity(tf.logging.ERROR)# Helper libraries
import math
import numpy as np
import matplotlib.pyplot as plt# Improve progress bar display
import tqdm
import tqdm.auto
tqdm.tqdm = tqdm.auto.tqdmprint(tf.__version__)# This will go away in the future.
# If this gives an error, you might be running TensorFlow 2 or above
# If so, the just comment out this line and run this cell again
tf.enable_eager_execution()
2.导入Fasion MINST数据集
Fashion MNIST 作为一种插入式的数据集代替传统的 MNIST 数据集
dataset, metadata = tfds.load('fashion_mnist', as_supervised=True, with_info=True)
train_dataset, test_dataset = dataset['train'], dataset['test']
图片为 28*28 的像素矩阵,标签为0-9的整数。
| Label | Class |
|---|---|
| 0 | T-shirt |
| 1 | Trouser |
| 2 | Pullover |
| 3 | Dress |
| 4 | Coat |
| 5 | Sandal |
| 6 | Shirt |
| 7 | Sneaker |
| 8 | Bag |
| 9 | Ankle boot |
class_names = ['T-shirt/top', 'Trouser', 'Pullover', 'Dress', 'Coat', 'Sandal', 'Shirt', 'Sneaker', 'Bag', 'Ankle boot']Number of training examples: 60000 Number of test examples: 10000
3.处理数据
图片数据中的每个像素的值为[0-255]的整数,为了方便模型工作,将之归一化为[0-1]的范围
def normalize(images, labels):images = tf.cast(images, tf.float32)images /= 255return images, labels# The map function applies the normalize function to each element in the train
# and test datasets
train_dataset =  train_dataset.map(normalize)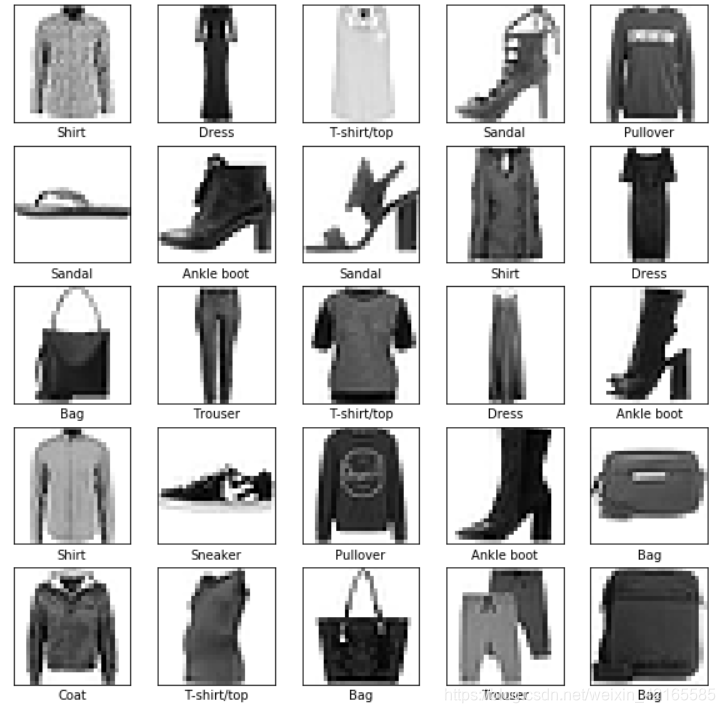
test_dataset = test_dataset.map(normalize)- 展示处理后数据
4.构建模型
- 设置层
1.输入层 tf.keras.layers.Flatten 本层将2D数组转换为1D数组,就像将图片首尾一拉成一条线。无需学习参数,只是转换数据格式
2.隐藏层 tf.keras.layers.Dense 128个节点的全连接层,激活函数为Relu函数
3.输出层 tf.keras.layers.Dense 10个节点的softmax层,表示服装种类
- 编译模型
1.损失函数 交叉熵
2.优化函数 Adam算法——可参考上一篇文章
3.指标 用于监控训练测试步骤,下面使用‘准确度’——正确预测服装种类的比率
model = tf.keras.Sequential([tf.keras.layers.Flatten(input_shape=(28, 28, 1)),tf.keras.layers.Dense(128, activation=tf.nn.relu),tf.keras.layers.Dense(10,  activation=tf.nn.softmax)
])model.compile(optimizer='adam', loss='sparse_categorical_crossentropy',metrics=['accuracy'])
5.训练模型
- 为训练数据定义迭代行为
1.设定dataset.repeat()反复迭代 (epochs限制训练周期)
2.dataset.shuffle(60000) 将序列随机化 —— 使模型学习与序列无关
3.dataset.batch(32) 更新模型变量时 使用32个图片样本
- model.fit()训练数据
epochs=5限制对训练数据进行5组完整迭代,即共 5 * 60000 = 300000 个样本
BATCH_SIZE = 32
train_dataset = train_dataset.repeat().shuffle(num_train_examples).batch(BATCH_SIZE)
test_dataset = test_dataset.batch(BATCH_SIZE)model.fit(train_dataset, epochs=5, steps_per_epoch=math.ceil(num_train_examples/BATCH_SIZE))
6.评估准确度
test_loss, test_accuracy = model.evaluate(test_dataset, steps=math.ceil(num_test_examples/32))print('Accuracy on test dataset:', test_accuracy)
Accuracy on test dataset: 0.8746
7.预测数据
prediction.shape的形状为 32 * 10 , 是因为test_dataset.take(1)一次取32个样本,之前设置了batch size
for test_images, test_labels in test_dataset.take(1):test_images = test_images.numpy()test_labels = test_labels.numpy()predictions = model.predict(test_images)predictions.shape(32, 10)
predictions[0]是一个长度10的数组,其值代表分别位于某个分类的置信度
使用np.argmax得到值最大的一列
用模型预测的结果是Shirt,标签为6. 可以直接查看test_label[0],预测正确
print(predictions[0])
print('predict:' ,np.argmax(predictions[0]))
print('label:', test_labels[0])
[ 6.36486875e-05 2.26871691e-07 2.66306940e-02 5.13825107e-056.68537542e-02 1.19448359e-07 9.06397164e-01 3.48995073e-083.06051402e-06 3.64431081e-08] predict: 6 label: 6
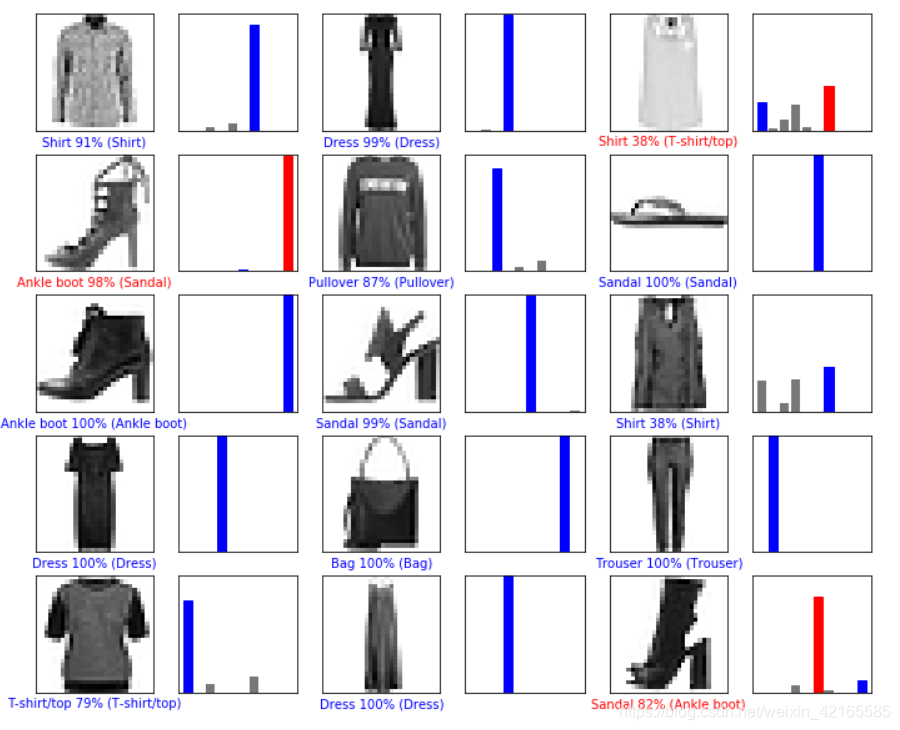
8.图表显示数据
%matplotlib inline画图的就省略了
jupyter notebook中运行注意事项
- (tensorflow环境下) pip install -U tensorflow_datasets
- 在jupyter notebook使用tqdm会报错,需要执行下列指令后重启jupyter noteboook
conda install -n base -c conda-forge widgetsnbextensionconda install -n tensorflow(装tf的环境名) -c conda-forge ipywidgets- jupyter notebook中显示matplotlib画图,导入包后写一段代码
import matplotlib.pyplot as plt%matplotlib inline
术语
- 扁平化: 将二维图像转换为一维向量的过程
- ReLU:一种激活函数,使模型能够解决非线性问题
- Softmax:一种函数,能够为每个潜在输出类别生成概率
- 分类:一种机器学习模型,用于区分两个或多个输出类别
参考链接:colab.research.google.com/github/tensorflow/examples
本文来自互联网用户投稿,文章观点仅代表作者本人,不代表本站立场,不承担相关法律责任。如若转载,请注明出处。 如若内容造成侵权/违法违规/事实不符,请点击【内容举报】进行投诉反馈!