【Ultra-Fast-Lane-Detection-v2代码实现】
Ultra-Fast-Lane-Detection-v2代码实现
文章目录
- Ultra-Fast-Lane-Detection-v2代码实现
- 前言
- 一、背景介绍
- 二、环境搭建
- 1.克隆项目
- 2.创建 conda 虚拟环境并将其激活
- 3.安装依赖项
- 三、数据准备(我准备的图森数据集)
- 三、开始work
- 四、评估
- 五、可视化
- 总结
前言
第一次写,别骂我
一、背景介绍
做毕设中,需要先跑几个模型起来
paper:https://arxiv.org/pdf/2206.07389.pdf
代码链接:https://github.com/cfzd/Ultra-Fast-Lane-Detection-v2
论文解读(我的解读,正常人别看):暂时还没有
二、环境搭建
1.克隆项目
下载代码(要是这个代码不太行就直接下载哈):
git clone https://github.com/cfzd/Ultra-Fast-Lane-Detection-V2
cd Ultra-Fast-Lane-Detection-V2
2.创建 conda 虚拟环境并将其激活
conda create -n lane-det python=3.7 -y
conda activate lane-det
3.安装依赖项
# If you dont have pytorch
conda install pytorch torchvision torchaudio pytorch-cuda=11.7 -c pytorch -c nvidia
注意:这里如果这条代码没法直接下载就是cuda和pytorch版本不对应
处理方法:
1. 查看版本:方式一:
conda list可以看到pytorch版本和cuda的版本
方式二:在python代码中验证查看print(torch.cuda.is_available()) # 查看CUDA是否可用 print(torch.cuda.device_count()) # 查看可用的CUDA数量 print(torch.version.cuda) # 查看CUDA的版本号方式三:
nvcc -V
nvcc-version
nvidia-smi
2.寻找匹配的pytorch版本
去官网找:https://pytorch.org/
找到符合的pytorch版本,用官网代码下载(一般来说云服务器都换过源,不需要再换源,能直接下下来),如果下不下来就自己换源,方法链接:https://blog.csdn.net/qq_31754085/article/details/126581171?spm=1001.2014.3001.5501
pip install -r requirements.txtpip install --extra-index-url https://developer.download.nvidia.com/compute/redist --upgrade nvidia-dali-cuda110
# Install Nvidia DALI (Very fast data loading lib))cd my_interpsh build.sh
# If this fails, you might need to upgrade your GCC to v7.3.0
No module named ‘sklearn‘ 解决方案
我在环境配置完之后,遇到了这个问题。主要是因为sklearn改名了,所以conda install scikit-learn或者pip install scikit-learn就可以
三、数据准备(我准备的图森数据集)
数据集下载链接:https://github.com/TuSimple/tusimple-benchmark/issues/3
Tusimple的目录排列应该是这样的:test_label.json
$TUSIMPLE
|──clips
|──label_data_0313.json
|──label_data_0531.json
|──label_data_0601.json
|──test_tasks_0627.json
|──test_label.json
|──readme.md
对于 Tusimple,没有提供分段注释,因此我们需要从 json 注释生成分段。
python scripts/convert_tusimple.py --root /path/to/your/tusimple#this will generate segmentations and two list files: train_gt.txt and test.txt
如果你用的图森数据集,那到这步就暂时完成环境配置喽,congratulations!
三、开始work
训练模型:
打开configs文件夹,里面有很多py文件:
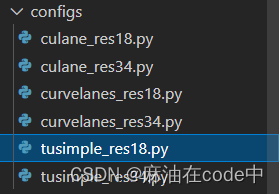
找到tusimple_res18.py(我想用这个,你想用别的也行),找到之后打开这个文件,修改root:
dataset= 'Tusimple'
data_root= '/mnt/Tusimple' # Need to be modified before running 这里本来是空的,你修改上自己的数据集路径
epoch= 100
batch_size= 32
optimizer= 'SGD'
learning_rate= 0.05
weight_decay= 0.0001
momentum= 0.9
scheduler= 'multi'
steps= [50,75]
gamma= 0.1
warmup= 'linear'
warmup_iters= 100
backbone= '18'
griding_num= 100
use_aux= False
sim_loss_w= 0.0
shp_loss_w= 0.0
note= ''
log_path= ''
finetune= None
resume= None
test_model= ''
test_work_dir= ''
num_lanes= 4
var_loss_power= 2.0
auto_backup= True
num_row= 56
num_col= 41
train_width= 800
train_height= 320
num_cell_row= 100
num_cell_col= 100
mean_loss_w= 0.05
fc_norm= False
soft_loss= True
cls_loss_col_w= 1.0
cls_ext_col_w= 1.0
mean_loss_col_w= 0.05
eval_mode= 'normal'
crop_ratio = 0.8
看这里:
data_root= ‘/mnt/Tusimple’ # Need to be modified before running 这里本来是空的,你修改上自己的数据集路径
运行:
python train.py configs/tusimple_res18.py --log_path /path/to/your/work/dir
或者
python -m torch.distributed.launch --nproc_per_node=8 train.py configs/tusimple_res18.py --log_path /path/to/your/work/dir
需要注意的是,如果使用不同数量的 GPU,则应相应地调整学习率。配置的学习率对应于CULane和CurveLanes数据集上的8-GPU训练。如果您想使用单个 GPU 在 CULane 或 CurveLanes 上进行训练,请将学习率降低 1/8 倍。在Tusimple上,学习率对应于单个GPU训练。
暂时是这样,现在在跑,跑完再说
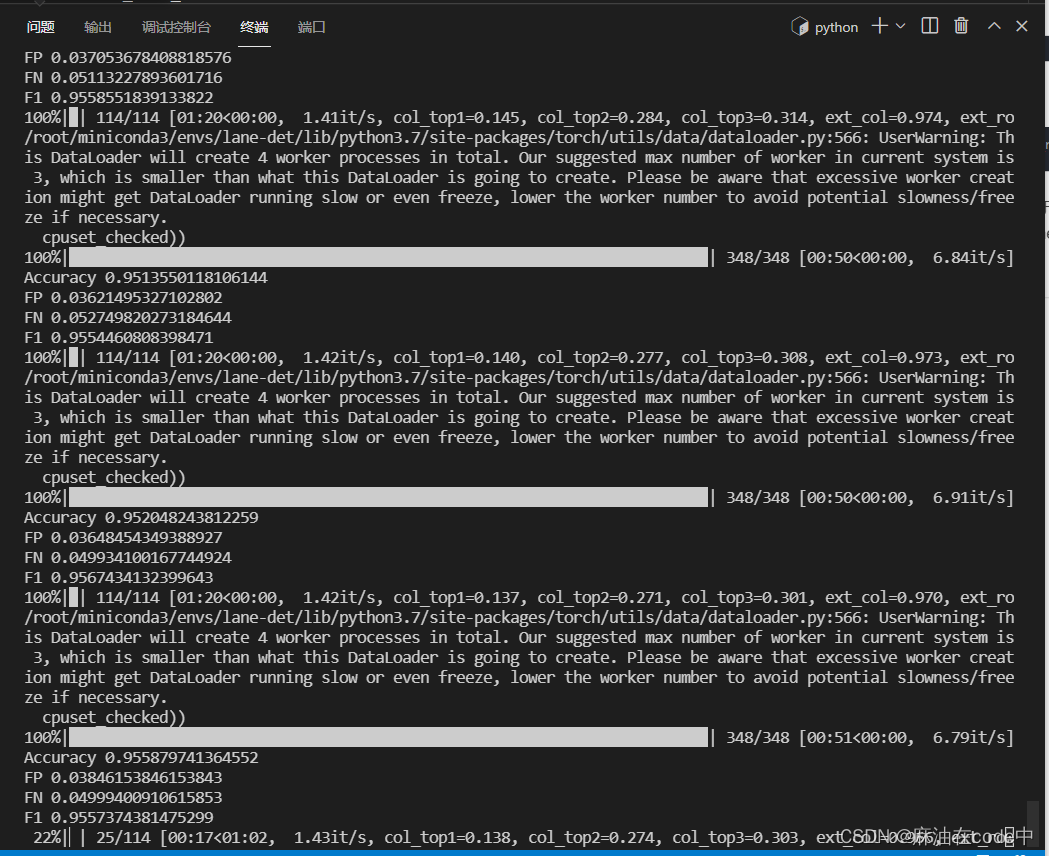
我回来了,跑完100轮喽
四、评估
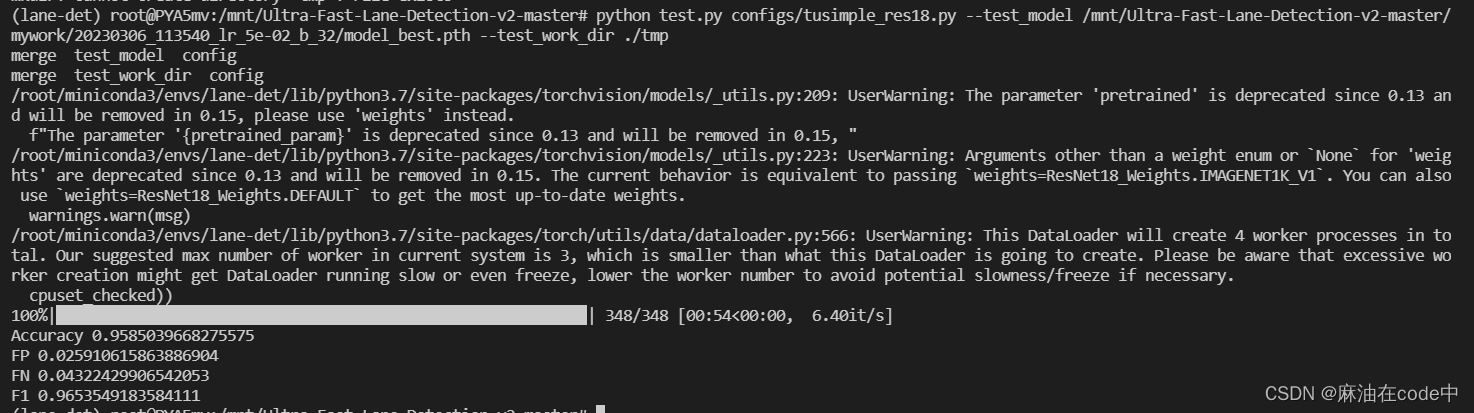
先试一下跑出来的best.pth
python test.py configs/tusimple_res18.py --test_model /mnt/Ultra-Fast-Lane-Detection-v2-master/mywork/20230306_113540_lr_5e-02_b_32/model_best.pth --test_work_dir ./tmp
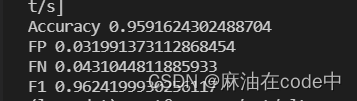
结果如下:
学习几个评价指标(笨蛋是这样的)
https://zhuanlan.zhihu.com/p/514732098
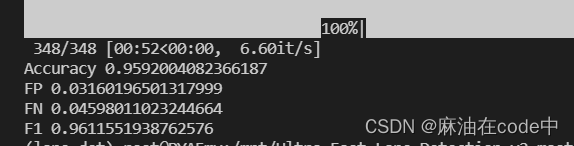
这是tusimple_res18.pth的评估结果:
这是tusimple_res34.pth的评估结果:
五、可视化
总结
Ultra-Fast-Lane-Detection-v2
本文来自互联网用户投稿,文章观点仅代表作者本人,不代表本站立场,不承担相关法律责任。如若转载,请注明出处。 如若内容造成侵权/违法违规/事实不符,请点击【内容举报】进行投诉反馈!