3. QML实现蓝牙通信
1. 说明:
复杂的软件系统里面,可能不止包括一种通讯协议,可能是多种通讯的结合才能实现软件控制的整个流程。目前,使用蓝牙通讯在短距离传输信号是比较常见的一种方式,特别是在安卓端开发软件时,使用蓝牙通讯很常见的。本篇文章记录一下在QML中使用蓝牙通讯的小案例。
2. 实现步骤:
在QML中使用蓝牙通讯有两种方案,一种是使用quick自带的三个控件BluetoothDiscoveryModel,BluetoothService,BluetoothSocket来实现,也可以使用qwidget的三个对应的类QBluetoothDeviceDiscoveryAgent,QBluetoothLocalDevice,QBluetoothSocket来实现。
目前,第一种方式貌似qt支持的还不是很完善,某种情况下会出现bug,导致无法连接到蓝牙设备,第二种方式实现起来还是可以的。
所以,本篇文章使用的是QML搭建界面,蓝牙通讯的功能在Qt中利用上面的三个类进行实现。
效果展示:
2.1 类功能说明:
前提:在***.Pro文件中加入蓝牙模块QT += bluetooth***,在自定义的蓝牙协议类文件中加入以下头文件:
#include 在连接蓝牙设备时,需要知道目标蓝牙设备的地址,这个可以通过QBluetoothDeviceDiscoveryAgent这个类搜索到的信息进行提取,还需要知道UUID标识号,一般都是使用串口类的uuid,具体使用什么类型可以自己去查找,参考网址:https://www.jianshu.com/p/eb85cb690e86
2.2 自定义蓝牙协议类:
因为要在QML当中调用蓝牙配置的相关函数,需要QML与C++进行交互,可以将蓝牙服务模块封装成一个单独类,然后注册的QML中进行使用,类中函数的相关解释请看代码注释,都挺详细的。核心代码如下:
BluetoothProxy.h:
#ifndef BLUETOOTHPROXY_H
#define BLUETOOTHPROXY_H#include BluetoothProxy.cpp:
#include "bluetoothproxy.h"//这个UUID要根据自己的使用情况来确定,我使用的是串口类的UUID,具体可https://www.jianshu.com/p/eb85cb690e86
static const QLatin1String serviceUuid("00001101-0000-1000-8000-00805F9B34FB");BluetoothProxy::BluetoothProxy(QObject *parent) : QObject(parent)
{//在构造函数中初始化一些成员变量discoveryAgent = new QBluetoothDeviceDiscoveryAgent();  // 否则搜寻周围的蓝牙设备localDevice = new QBluetoothLocalDevice();      // 负责控制设备上的蓝牙(比如开启/关闭等操作)socket = new QBluetoothSocket(QBluetoothServiceInfo::RfcommProtocol);   // 负责通信数据传输//搜寻到蓝牙设备后,将启动设备信息存储函数connect(discoveryAgent,SIGNAL(deviceDiscovered(QBluetoothDeviceInfo)),this,SLOT(addBlueToothDevicesToList(QBluetoothDeviceInfo)));//接收到有数据传输过来时,将启动读取信息的函数connect(socket,SIGNAL(readyRead()),this,SLOT(readBluetoothDataEvent()));//与目标设备成功连接够,启动提示函数connect(socket,SIGNAL(connected()),this,SLOT(bluetoothConnectedEvent()));//与目标设备断开连接时,启动顿开蓝牙提示函数connect(socket,SIGNAL(disconnected()),this,SLOT(bluetoothDisconnectedEvent()));//出西安错误时,启动错误响应函数connect(socket,SIGNAL(error(QBluetoothSocket::SocketError)),this,SLOT(onError(QBluetoothSocket::SocketError)));}BluetoothProxy::~BluetoothProxy()
{}void BluetoothProxy::onError(QBluetoothSocket::SocketError error)
{QString str;if(QBluetoothSocket::UnknownSocketError == error){str = "UnknownSocketError";}else if(QBluetoothSocket::NoSocketError == error){str = "NoSocketError";}else if(QBluetoothSocket::HostNotFoundError == error){str = "HostNotFoundError";}else if(QBluetoothSocket::ServiceNotFoundError == error){str = "ServiceNotFoundError";}else if(QBluetoothSocket::NetworkError == error){str = "NetworkError";}else if(QBluetoothSocket::UnsupportedProtocolError == error){str = "UnsupportedProtocolError";}else if(QBluetoothSocket::OperationError == error){str = "OperationError";}else if(QBluetoothSocket::RemoteHostClosedError == error){str = "RemoteHostClosedError";}qDebug()<<error;
}//开始搜寻蓝牙设备
void BluetoothProxy::startSearch()
{
//    if(localDevice->hostMode() == QBluetoothLocalDevice::HostPoweredOff){
//        localDevice->powerOn();//调用打开本地的蓝牙设备
//        discoveryAgent->start();
//    }discoveryAgent->start();
}//发送数据到蓝牙设备
void BluetoothProxy::sendData(QString mData)
{socket->write(mData.toUtf8());
}//断开蓝牙
void BluetoothProxy::disconnectBth()
{socket->close();
}//显示蓝牙设备信息
void BluetoothProxy::addBlueToothDevicesToList( const QBluetoothDeviceInfo &info )
{QString deviceInfo = QString("%1 %2").arg(info.address().toString()).arg(info.name());qDebug()<<deviceInfo;emit deviceFind(deviceInfo);//如果发现目标蓝牙,则进行连接if(deviceInfo.contains("这里换成自己蓝牙设备的名称")){int index = deviceInfo.indexOf(' ');if(index == -1){qDebug()<<"index";return;}//获取目标蓝牙设备地址QBluetoothAddress address(deviceInfo.left(index));QString name(deviceInfo.mid(index + 1));//开始连接socket->connectToService(address, QBluetoothUuid(serviceUuid) ,QIODevice::ReadWrite);//向qml端发送信号emit connectProcess(QString("蓝牙连接中,请稍后....(%1)").arg(name));}
}//接收蓝牙设备发送过来的数据
void BluetoothProxy::readBluetoothDataEvent()
{QByteArray receiceData = socket->readAll();if(receiceData.size() > 4)return;}void BluetoothProxy::bluetoothConnectedEvent()
{emit connectProcess("蓝牙连接成功....");
}void BluetoothProxy::bluetoothDisconnectedEvent()
{emit connectProcess("蓝牙已断开....");
}
2.3 具体使用:
在main.cpp文件中将上述自定义类注册到QML中:
#include 将上面的自定义蓝牙类注册到QML当中后,即可在.qml文件中进行调用,主界面代码如下:
main.qml:
import QtQuick 2.15
import QtQuick.Window 2.15
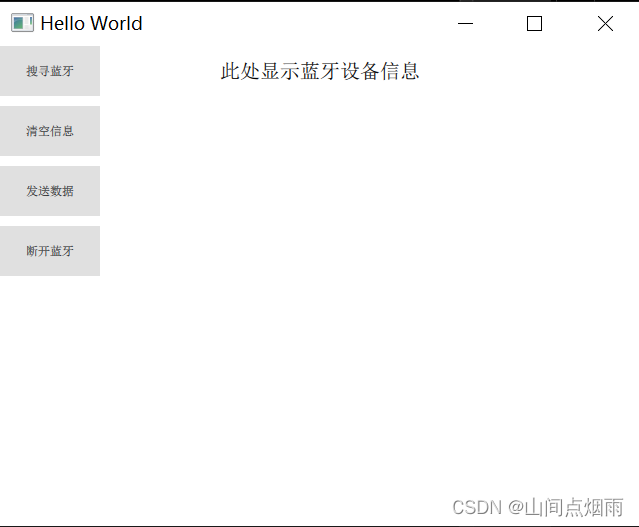
import QtQuick.Controls 2.15ApplicationWindow {id:rootwidth: 640height: 480visible: truetitle: qsTr("Hello World")Connections{target: myBlueToothfunction onDeviceFind(mDeviceInfo){blueToothList.append({info:mDeviceInfo})}function onConnectProcess(mProcessInfo){popText.text = mProcessInfopop.open()}}Text{id:titleNameanchors.horizontalCenter: btView.horizontalCenteranchors.top: parent.topanchors.topMargin: 15text: "此处显示蓝牙设备信息"font.pixelSize: 20}ListView{id:btViewwidth: 300height: 400anchors.horizontalCenter: parent.horizontalCenteranchors.top: titleName.bottomanchors.topMargin: 15spacing: 10focus:trueenabled: truehighlight: Rectangle {width: parent.widthheight: 20color: "lightsteelblue"radius: 5y: btView.currentItem.yBehavior on y {SpringAnimation {spring: 3damping: 0.2}}}model: ListModel{id:blueToothList// ListElement{// info:""// }}delegate: Rectangle{color: Qt.rgba(0,0,0,0)width: parent.widthheight: 20anchors.horizontalCenter: parent.horizontalCenterText{id:deviceInfoanchors.centerIn: parenttext: infofont.pixelSize: 15color: "black"}MouseArea{anchors.fill: parentonClicked: {btView.currentIndex = index}}}}Button{id:searchBtnwidth: 100height: 50text: "搜寻蓝牙"onClicked: {myBlueTooth.startSearch()}}Button{id:clearBtnwidth: 100height: 50anchors.top:searchBtn.bottomanchors.topMargin: 10text:"清空信息"onClicked: {blueToothList.clear()}}Button{id:sendBtnwidth: 100height: 50anchors.top:clearBtn.bottomanchors.topMargin: 10text:"发送数据"onClicked: {myBlueTooth.sendData("1")}}Button{id:discBtnwidth: 100height: 50anchors.top:sendBtn.bottomanchors.topMargin: 10text:"断开蓝牙"onClicked: {myBlueTooth.disconnectBth()}}Popup{id:popwidth: 300height: 200x:(root.width-pop.width)/2y:(root.height-pop.height)/2//visible: true// the default value is falsebackground: Rectangle {anchors.fill: parentborder.width: 0radius: 20color: Qt.rgba(0,0,0,0.4)}contentItem: Rectangle{anchors.fill: parentcolor: Qt.rgba(0,0,0,0.4)border.width: 0radius: 20Text{id:popTextanchors.centerIn: parentfont.pixelSize: 20color: "white"}Row{id:btnRowanchors.bottom: parent.bottomanchors.left: parent.leftanchors.right: parent.rightheight: 50Button{id:cancelBtnwidth: 60height: 25anchors.right: parent.rightanchors.rightMargin: 15anchors.bottom: parent.bottomanchors.bottomMargin: 15text: "Yes"onClicked: {pop.close()}}}}}}界面设计比较简单,以实现功能为主,界面效果如下:
2.4 功能测试:
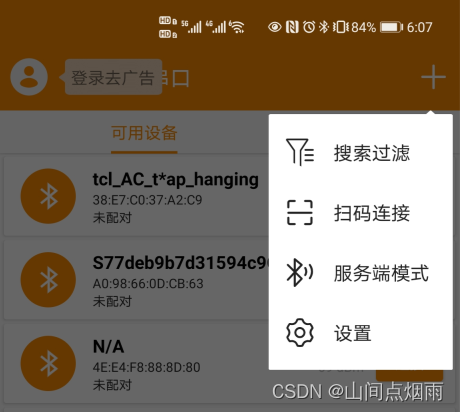
我是在安卓手机上下载了一个SPP蓝牙串口软件,这个可以在手机的应用商店里下载到,软件打开后选择页面右上角的***+号,再选择服务端模式***,如下图所示:
启动服务端后,即可运行Qt程序,然后点击界面的搜寻蓝牙按钮,即可自动搜寻附近的蓝牙设备,注意:将代码中蓝牙设备名称修改成自己设备的名称,否则连接不上蓝牙。
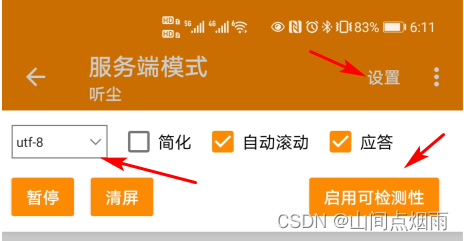
如果碰到检测不到蓝牙的情况,可点击手机蓝牙助手右上角的设置按钮,选择启用可检测性,注意将数据的接收格式改成utf-8,因为上面代码中蓝牙端发送的数据格式定义为了utf-8的格式。如下图所示:
然后就可以愉快的传输数据啦。。。。
持续更新中,请大家多多关注…
本文来自互联网用户投稿,文章观点仅代表作者本人,不代表本站立场,不承担相关法律责任。如若转载,请注明出处。 如若内容造成侵权/违法违规/事实不符,请点击【内容举报】进行投诉反馈!