【数据集】浙大动态人类3d数据集LightStage
LightStage
LightStage是一个多视图数据集,在NeuralBody中提出。该数据集使用具有 20+ 同步摄像头的多摄像头系统捕获多个动态人类视频。人类执行复杂的动作,包括旋转、太极、手臂摆动、热身、拳击和踢腿。我们提供使用EasyMocap恢复的SMPL-X参数,其中包含身体,手和面部的运动。
23个摄像机
363到388都有类似结构(396有点特殊)
整体架构(以363文件夹为例)
D:.
├─annots
│  ├─01
│  ├─02
│  ├─03
│  ├─04
│  ├─05
│  ├─06
│  ├─07
│  ├─08
│  ├─09
│  ├─10
│  ├─11
│  ├─12
│  ├─13
│  ├─14
│  ├─15
│  ├─16
│  ├─17
│  ├─18
│  ├─19
│  ├─20
│  ├─21
│  ├─22
│  └─23
├─smplx
└─videos

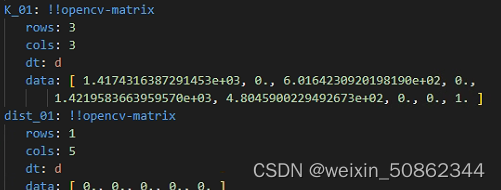
相机内参文件intri.yaml
相机内参参数k 和 畸变系数(但是好像全部都是0)
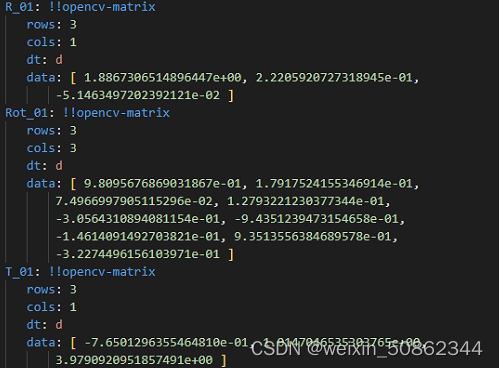
相机外参文件extri.yml
自上到下应该是旋转向量,旋转矩阵,平移量
25个2d关节点对应
鼻子 下颈 右肩 右肘 右手腕左肩 左肘 左手腕 骨盆 右骨盆 右膝 右脚踝 左骨盆 左膝 左脚踝 右眼 左眼 右耳 左耳 左大脚趾 左脚小拇指趾 左脚跟 右大脚趾 右脚小拇指趾 右脚跟 浙大指南【快速开始】
画点代码直接拿去用就行
def draw_points(img,uv,color=(255,255,255)):for i in range(len(uv)):img=cv.circle(img,(int(uv[i][0]),int(uv[i][1])),3, color, -1)  #(x,y)return imgdef draw_points_one(imgpath,uv,outpath,color=(255,255,255)):for i in range(len(uv)):img=cv.imread(imgpath)img=cv.circle(img,(int(uv[i][0]),int(uv[i][1])),3, color, -1)  #(x,y)cv.imwrite(os.path.join(outpath,"kp_{}.jpg".format(i)),img)return img
def draw(points_2d,GT_2d,path):img = cv.imread(path)img = draw_points(img, GT_2d, color=(0, 255, 0))img = draw_points(img, points_2d)cv.imwrite(r"result.jpg", img)
annots文件夹中每个json文件的架构如下:
{"filename": "images/23/000000.jpg","height": 1024,"width": 1024,"annots": [{"bbox": [#应该是x1,y1,x2,y2,confidence],"personID": 0,"keypoints": [[581.913,249.231,0.819745],#....25个关键点],"isKeyframe": false,"face2d": [#.....],"handl2d": [#......],"handr2d": [#......]}],"isKeyframe": false
}
smplx文件夹:
[{"id": 0,"Rh": [[1.408, 1.083, 1.204]],"Th": [[0.218, 0.511, 1.286]],"poses": [[0.000, 0.000, 0.000, -0.113, 0.069, -0.113, -0.062, -0.023, -0.183, -0.000, 0.000, 0.000, 0.076, 0.079, 0.044, 0.141, -0.106, -0.004, -0.000, 0.000, 0.000, -0.073, 0.085, -0.084, -0.231, -0.099, 0.008, -0.000, -0.000, 0.000, -0.000, 0.000, -0.000, 0.000, -0.000, 0.000, -0.097, 0.088, 0.070, 0.002, -0.000, -0.000, -0.000, 0.000, 0.258, -0.148, 0.070, -0.140, -0.069, -0.218, 0.653, -0.157, -0.054, 0.909, -0.173, -0.300, 0.053, -0.140, 0.038, 0.026, -0.199, 0.010, 0.237, 0.016, -0.177, -0.255, -1.322, 0.320, 0.552, -0.574, 0.144, 0.157, -0.867, 0.247, 0.371, -0.428, 0.013, 0.106, 0.022, -0.019, 0.006, -0.001, -0.000, 0.000, -0.001, -0.000, -0.000]],"expression": [[0.000, 0.000, 0.000, -0.000, 0.000, 0.000, 0.000, -0.000, 0.000, 0.000]],"shapes": [[-0.066, 0.078, 0.101, -0.077, -0.047, -0.080, 0.004, 0.010, 0.012, 0.008]]}
]
读取该数据集的脚本
import yaml
import cv2
import zipfile
import glob
import os
import jsonimport skvideo.io# read_yml,write_yml 获得普通格式的文件夹
def read_yml(file):"""读取yml,传入文件路径file"""f = open(file, 'r', encoding="utf-8")  # 读取文件yml_config = yaml.load(f, Loader=yaml.FullLoader)  # Loader为了更加安全"""Loader的几种加载方式BaseLoader - -仅加载最基本的YAMLSafeLoader - -安全地加载YAML语言的子集。建议用于加载不受信任的输入。FullLoader - -加载完整的YAML语言。避免任意代码执行。这是当前(PyYAML5.1)默认加载器调用yaml.load(input)(发出警告后)。UnsafeLoader - -(也称为Loader向后兼容性)原始的Loader代码,可以通过不受信任的数据输入轻松利用。"""return yml_configdef write_yml(file, data):# 写入数据:with open(file, "a", encoding='utf-8') as f:# data数据中有汉字时,加上:encoding='utf-8',allow_unicode=Truef.write('\n')  # 插入到下一行yaml.dump(data, f, encoding='utf-8', allow_unicode=True)# readListInFileNode,readCameraCfg用来获得opencv格式的yaml文件夹
def readListInFileNode(filenode):assert (filenode.isSeq())res = []for i in range(filenode.size()):res.append(filenode.at(i).real())return resdef readextriCfg(yamlpath):cv_file = cv2.FileStorage(yamlpath, cv2.FILE_STORAGE_READ)"""R: Rot:T:"""res = {}for i in range(1, 24):R = r'R_{}'.format(str(i).zfill(2))Rot = r'Rot_{}'.format(str(i).zfill(2))T = r'T_{}'.format(str(i).zfill(2))extri = {'R': cv_file.getNode(R).mat(),'Rot': cv_file.getNode(Rot).mat(),'T': cv_file.getNode(T).mat()}res['{}'.format(i)] = extrireturn resdef readintriCfg(yamlpath):cv_file = cv2.FileStorage(yamlpath, cv2.FILE_STORAGE_READ)"""K:内参dist:畸变系数"""res = {}for i in range(1, 24):K = r'R_{}'.format(str(i).zfill(2))dist = r'Rot_{}'.format(str(i).zfill(2))intri = {'K': cv_file.getNode(K).mat(),'dist': cv_file.getNode(dist).mat(),}res['{}'.format(i)] = intri# res = {#         "CameraExtrinsicMat": cv_file.getNode("CameraExtrinsicMat").mat(),#         "CameraMat": cv_file.getNode("CameraMat").mat(),#         "DistCoeff": cv_file.getNode("DistCoeff").mat(),#         # "ImageSize": readListInFileNode(cv_file.getNode("ImageSize")),#         # "ReprojectionError": cv_file.getNode("ReprojectionError").real(),#         # "DistModel": cv_file.getNode("DistModel").string()#         }return res# 解压文件夹
def unzip_file(zip_src, dst_dir):r = zipfile.is_zipfile(zip_src)if r:fz = zipfile.ZipFile(zip_src, 'r')for file in fz.namelist():fz.extract(file, dst_dir)print('unzip successfully {}'.format(zip_src))else:print('{} is not zip'.format(zip_src))def unzipfile(datasetpath, dataset):"""解压zip数据集"""if dataset == 'LightStage':# 获得所有zip文件夹zipfiles = glob.glob(r"{}/*.zip".format(datasetpath))for zipfile in zipfiles:unzip_file(zipfile)print("finish unzip!!!")def readdata(datasetpath, dataset, tar, extract_img=True):"""datasetpath:数据集文件的路径dataset:数据集名称tar:是否进行解压extract_img:是否提取视频文件(存放在"images/相机/"文件夹下)return 字典{文件夹序号(e.g.363){   #相机    外参       内参{'camera':{'1':{'excfg':{},'incfg':{}},.....}{'annots':{'01':#相机编号[{ #图片编号"filename": "images/01/000000.jpg","height": 1024,"width": 1024,"annots":[`                            { "bbox": []"personID": 0,"keypoints": [....] #2d关键点,三个维度(x,y,confidence)"face2d":[]"handl2d": [..]"handr2d":[....]`}]"isKeyframe":.}......]}{'smpl':[....]....}}"""# 这里最好加一个转化为小写的if tar:unzipfile(datasetpath, dataset)if dataset == 'LightStage':"""(1)396号文件夹中不包含smpl文件和annot文件,故没有添加"""userlist = [i for i in range(363, 389)]# userlist = [363]cameralist = [i for i in range(1, 24)]# cameralist= [1]results = {}for user in userlist:user = str(user)# step1:相机参数文件camera = {}res = {}extripath = os.path.join(datasetpath, user, "extri.yml")  # 外参文件intripath = os.path.join(datasetpath, user, "extri.yml")  # 内参文件# intri.yml# yaml文件上可以使用异常处理(opencv格式yaml文件和普通yaml文件)excfg = readextriCfg(extripath)incfg = readintriCfg(intripath)camera['excfg'] = excfgcamera['incfg'] = incfgres['camera'] = cameravideopath = os.path.join(datasetpath, user, "videos")# step2:json文件处理: 处理对应annot中的json文件camindex = {}for cam in cameralist:numberOfFrame = 0cam = str(cam).zfill(2)video = cam + '.mp4'vid_file = os.path.join(videopath, video)vidcap = cv2.VideoCapture(vid_file)success, image = vidcap.read()frames_num = vidcap.get(7)print(">>>当前视频{}的总帧数是".format(video), int(frames_num))annots_path = os.path.join(datasetpath, user, 'annots', cam)annotlist = glob.glob("{}/*.json".format(annots_path))# print(annotlist)# 转成有序数列????print(">>>只有{}个json文件,只生成{}帧".format(len(annotlist), len(annotlist)))# step2.1:视频处理 (图片生成)jsonInCamera = []"""for i in range(0,len(annotlist)):print(i)if extract_img:success, image = vidcap.read()if not success:print('fail!')breakprint(cv2.CAP_PROP_POS_FRAMES)"""imgarray = skvideo.io.vread(vid_file)print(">>>the total frames of {} is".format(video), imgarray.shape)for frame in imgarray:# 创建对应路径images/相机(images/01/000000.jpg)img_dir = os.path.join(datasetpath, user, 'images')if extract_img:if not os.path.exists(img_dir):os.mkdir(img_dir)cam_dir = os.path.join(img_dir, cam)if not os.path.exists(cam_dir):os.mkdir(cam_dir)imagename = "{}.jpg".format(str(numberOfFrame).zfill(6))img_out = os.path.join(cam_dir, imagename)cv2.imwrite(img_out, frame)print(">>> creating {} frame of {} ".format(str(numberOfFrame).zfill(6), video))annots = json.load(open(r"{}/{}/annots/{}/{}.json".format(datasetpath, user, str(cam).zfill(2),str(numberOfFrame).zfill(6)), 'r'))jsonInCamera.append(annots)numberOfFrame = numberOfFrame + 1camindex[(cam)] = jsonInCamerares['annots'] = camindex# step3:处理smplx参数smplInCamera = []smpllist = glob.glob(r"{}/{}/smplx/*.json".format(datasetpath, user))print("smplx标注文件共有{}".format(len(smpllist)))for i in range(0, len(smpllist)):smplx = json.load(open(r"{}/{}/smplx/{}.json".format(datasetpath, user, str(i).zfill(6)), 'r'))smplInCamera.append(smplx)res['smplx'] = smplInCamera# print(res)results[(user)] = resreturn resultsif __name__ == '__main__':datasetpath = '/hy-tmp/LightStage'dataset = 'LightStage'result = readdata(datasetpath, dataset, False, True)package363 = result['363']# 相机参数# camera=package363['camera']# print(">>>相机参数如下:",camera)# annotannot = package363['annots']['01'][0]  # 第一帧的标注文件print(type(annot))print(">>>第一个annot如下:\n ", annot)print(">>> filename \n", annot['filename'])print(">>> height \n", annot['height'])print(">>> width \n", annot['width'])print(">>> annots \n", annot['annots'])print(">>> bbox \n", annot['annots'][0]['bbox'])# smplx参数print(">>> smplx \n", package363['smplx'][0])  ## print(">>> box \n",annot['box'])# print(">>> box \n",annot['box'])# print(result)i = 363# extripath = r"{}/{}/extri.yml".format(datasetpath, i)  # 外参文件# intripath = r"{}\{}\intri.yml".format(datasetpath, i)  # 内参文件## extripath = os.path.join(datasetpath, str(i), "extri.yml")  # 外参文件# excfg = readextriCfg(extripath)# intripath = os.path.join(datasetpath, str(i), "extri.yml")# incfg = readintriCfg(intripath)# camera={}# # print(incfg)# camera['excfg'] = excfg# camera['incfg'] = incfg# print(camera)# # print(extripath)# # print(intripath)# # excfg = read_yml(extripath)# # incfg = read_yml(intripath)## # print(excfg)# # print(incfg)# # excfg=readCameraCfg(extripath)# # print(excfg)## # filepath = "/home/yxhuang/data/CICV/task4/task4/camera.yaml"# #D:\computervision\work\dataset\363\extri.yml# # camera_cfg = readextriCfg(extripath)# # print(camera_cfg)# ## # vid_file=r'D:\computervision\work\dataset\363\videos\02.mp4'# # vidcap = cv2.VideoCapture(vid_file)# # success, image = vidcap.read()# # frames_num = vidcap.get(7)# # print(frames_num)# # img_dir = '{}/{}/images/'.format(datasetpath, i)# # if not os.path.exists(img_dir):# #     os.mkdir(img_dir)# annots = json.load(open(r"{}/{}/annots/{}/{}".format(datasetpath, i, str(1).zfill(2),'000000.json'), 'r'))# print(annots)# expected alphabetic or numeric character, but found ':'
"""
问题来自于:
%YAML:1.0
!!opencv-matrix
"""
本文来自互联网用户投稿,文章观点仅代表作者本人,不代表本站立场,不承担相关法律责任。如若转载,请注明出处。 如若内容造成侵权/违法违规/事实不符,请点击【内容举报】进行投诉反馈!