OpenCV人脸识别,训练模型为cv2.face.LBPHFaceRecognizer_create()
OpenCV内部自带有三种人脸检测方式:LBPH人脸识和其他两种方法(Eigen人脸识别,FisherFace人脸识别)本次主要说明第一种方式LBPH检测。
1.素材创建
1.创建需要训练的图片的集文件夹,和识别功能测试图片集的文件夹。
图(1)训练图集文件夹 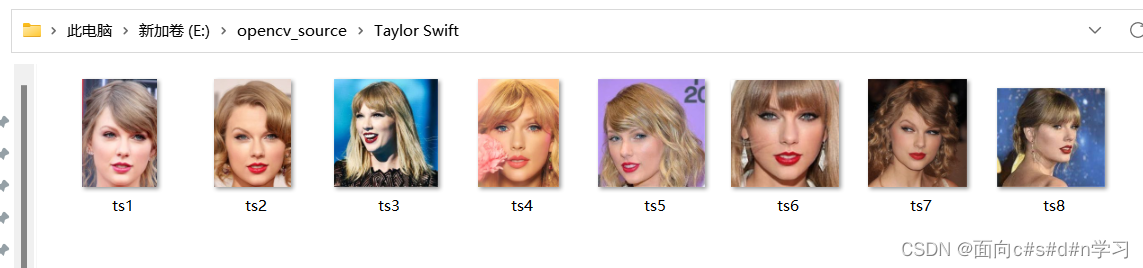
图(1.1)taylorswift照片(尽量选用背景没其他人和尺寸小的照片,不然不好打开,也可以用resize函数进行缩小)

图(2)识别文件夹,一样放入需要识别的照片
2.识别过程
1.使用Haar-cascade进行训练,针对与Haar-cascade的识别原理,大家可以自行Google查询,主要说明如何使用Haar-cascade进行训练。首先创建haar_cascade实例,
haar_cascade = cv2.CascadeClassifier('haar_face.xml') # .xml文件可从opencv官网下载2.导入文件内容(目标图片和对应标签)
def create_train():# loop every folderfor person in people:path = os.path.join(DIR, person)label = people.index(person)# loop every image in the folderfor img in os.listdir(path):img_path = os.path.join(path, img)# read the image from the pathimg_array = cv2.imread(img_path)gary = cv2.cvtColor(img_array, cv2.COLOR_BGR2GRAY)faces_rect = haar_cascade.detectMultiScale(gary, scaleFactor=1.1, minNeighbors=7)for (x, y, w, h) in faces_rect:faces_roi = gary[y:y + h, x:x + w]features.append(faces_roi)labels.append(label)
文件路径名根据自己创建的文件所在路径更改
3.用函数cv2.face.LBPHFaceRecognizer_ create ( ) 生成LBPH识别器实例模型
首先创建训练实例对象
cv2.face.LBPHFaceRecognizer_ create ( radius,neighbors,grid_ x,grid_ y, threshold)四个参数均可选,通常默认不设置
face_recognizer = cv2.face.LBPHFaceRecognizer_create()4.训练模型
face_recognizer.train(features,labels)
通常传入两个参数scr和label
scr:训练图像,用来识别的人脸图像
label:人脸图像对于的标签,名字
5.通常需要将训练好的模型进行保存
face_recognizer.save('face_trained.yml')6.函数face_recognizer.predict( ) 对一个待测人脸图像进行判断,寻找与当前图像距离最近的人脸图像。与哪个人脸图像最近,就将当前待测图像标注为其对应的标签。该函数有两个返回值,label和confidence。
label:返回的识别结果标签。
confidence:置信度,衡量识别结果与原有模型之间的距离。在LBPH识别方式中,0表示完全匹配。通常情况下,认为小于50的值是可以接受的,如果该值大于85则认为差别较大。
以下为代码,分为训练代码和识别代码两个部分
训练代码
# face_train.py
# by liangyu 2020.7.19
# use opencv's built in face recognizer
import os
import cv2
import numpy as nppeople = ['Avril Lavigne', 'Chris Martin', 'Emma Watson', 'Taylor Swift']
# p = []
# for i in os.listdir(r'E:\opencv_source'):
#     p.append(i)
# print(p)
DIR = r'E:\opencv_source'haar_cascade = cv2.CascadeClassifier('haar_face.xml')  # .xml文件可从opencv官网下载features = []
labels = []def create_train():# loop every folderfor person in people:path = os.path.join(DIR, person)label = people.index(person)# loop every image in the folderfor img in os.listdir(path):img_path = os.path.join(path, img)# read the image from the pathimg_array = cv2.imread(img_path)gary = cv2.cvtColor(img_array, cv2.COLOR_BGR2GRAY)faces_rect = haar_cascade.detectMultiScale(gary, scaleFactor=1.1, minNeighbors=7)for (x, y, w, h) in faces_rect:faces_roi = gary[y:y + h, x:x + w]features.append(faces_roi)labels.append(label)create_train()
# print(f'Length of the features = {len(features)}')
# print(f'Length of the features = {len(labels)}')
print('Training Done ------------------')features = np.array(features,dtype='object')
labels = np.array(labels)face_recognizer = cv2.face.LBPHFaceRecognizer_create()# Train the Recognizer on the features list and the labels list
face_recognizer.train(features,labels)
# Pass two parameters: 1.scr--->the target image 2.label---->the corresponding label of the image
face_recognizer.save('face_trained.yml')
np.save('features.npy',features)
np.save('labels.npy',labels)
识别代码
# faces_recognition.py
import numpy as np
import cv2haar_cascade = cv2.CascadeClassifier('haar_face.xml')people = ['Avril Lavigne', 'Chris Martin', 'Emma Watson', 'Taylor Swift']
features = np.load('features.npy', allow_pickle=True)
labels = np.load('labels.npy', allow_pickle=True)face_recognizer = cv2.face.LBPHFaceRecognizer_create()
face_recognizer.read('face_trained.yml')
img = cv2.imread(r'E:\image\verify\Chris Martin\cm3.jpg')
gray = cv2.cvtColor(img, cv2.COLOR_BGR2GRAY)
cv2.imshow('Person', gray)# Detect the face in the image
face_rect = haar_cascade.detectMultiScale(gray, 1.1, 4)
for (x, y, w, h) in face_rect:face_roi = gray[y:y + h, x:x + w]label, confidence = face_recognizer.predict(face_roi)# Return two values: label and confidenceprint(f'label = {people[label]} with a confidence of {confidence}')# confidence :'0' indicates an exact match,value less than 50 is considered acceptable# value greater than 85 means the difference is hugecv2.putText(img, str(people[label]), (10, 30), cv2.FONT_HERSHEY_COMPLEX, 0.8, (0, 255, 0), thickness=1)cv2.rectangle(img, (x, y), (x + w, y + h), (0, 255, 0), thickness=2)
cv2.imshow('Detected Face', img)
cv2.waitKey(0)
3.识别结果展示
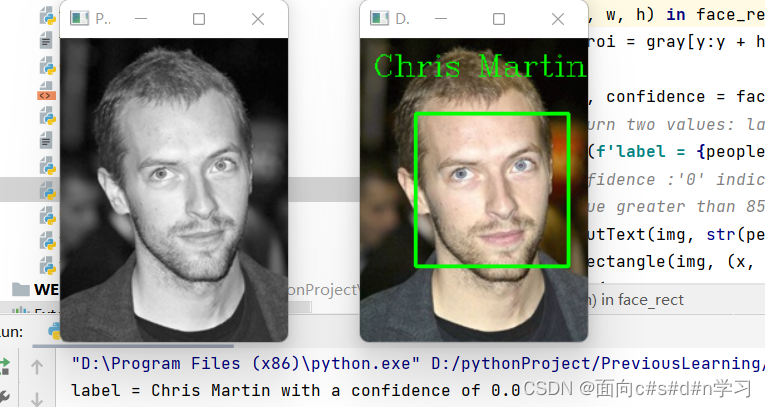
对Coldplay主唱 Chris Martin进行识别可以看到与其相匹配且置信度为0表示完全匹配。
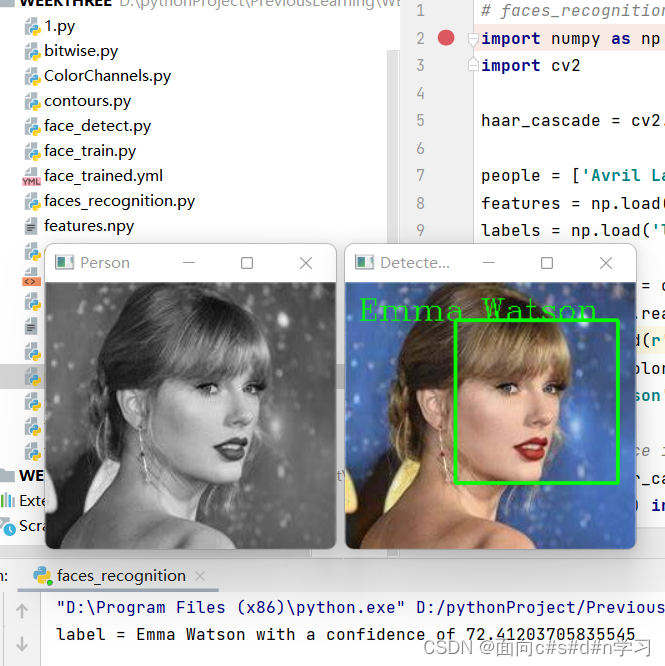
对霉霉进行识别,结果识别出来为艾玛沃特森!!置信度72表示和实际有较大的误差
4.结束语:
对于opencv内部自带的人脸检测(LBPH人脸识别)和其他两种方法(Eigen人脸识别,FisherFace人脸识别)方法大致相同,通常情况下这三种方法识别精度较低,且对噪声较为敏感,识别效果并不是十分精准,和预期还是有一定出入的。其他两种识别方法可参考这篇文章https://blog.csdn.net/weixin_43810267/article/details/106650055
Haar特征分类器介绍可以参考 (55条消息) opencv人脸检测--detectMultiScale函数_walker lee的博客-CSDN博客_detectmultiscale
本文来自互联网用户投稿,文章观点仅代表作者本人,不代表本站立场,不承担相关法律责任。如若转载,请注明出处。 如若内容造成侵权/违法违规/事实不符,请点击【内容举报】进行投诉反馈!