OpenAI GPT3.5/GPT3 + Flask 制作自己的交互网页教程 | 附源码 和 Github链接
1. OpenAI GPT API
1.1 GPT 3.5 API (更新)
真正的 ChatGPT API, gpt-3.5-turbo,终于来了!不同于之前的 GPT3 text-davinci-003 的 api 版本。 GPT 3.5 版本生成的回答将十分的智能。
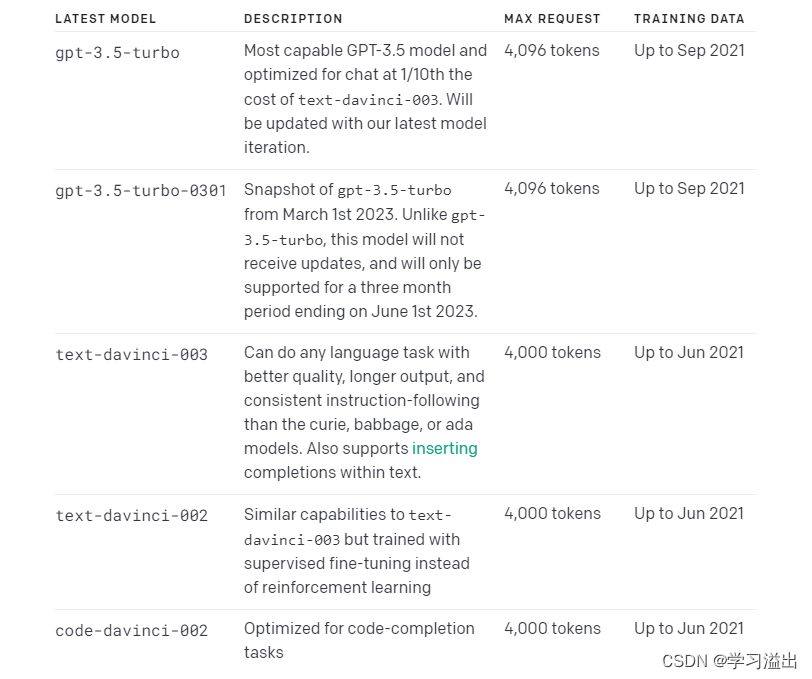
下图是现在OpenAI提供的模型。其中 gpt-3.5-turbo 是效果最好的模型。
1.1 OpenAI GPT3 text-davinci-003 API
最近ChatGPT很火,使用与InstructGPT相同的方法,使用来自人类反馈的强化学习 Reinforcement Learning from Human Feedback (RLHF) 来训练该模型,但数据收集设置略有不同。ChatGPT是在 GPT-3.5 系列中的一个模型进行微调的,该模型于 2022 年初完成训练。
现在因为官网 https://chat.openai.com/ 一直是满载状态,我决定使用GPT-3的公开API做一个基于python flask的网站。GPT-3的模型虽然比不上GPT-3.5的,但其功能仍然是十分强大。
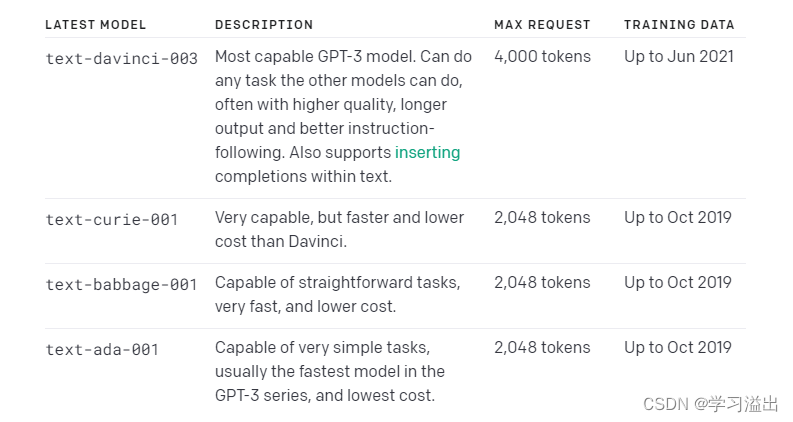
GPT-3 一共有4个模型,其中davinci是最有能力的模型,而ada是最快的模型。Davinci 最大请求量是4000个tokens,这其中包含了问题和回答。
本文代码使用的是GPT3.5 + Flask,如果想用GPT3的同学可以在下面找到 GPT 3 + Flask 的 Github 链接。
2. 环境介绍
- OpenAI API Key
- Python 3
- python库:openai flask
GPT 3 和 GPT3.5 用的是同一个 API, 所以已经有 API key 的兄弟不用再重新生成了。
电脑要有python 3 的环境。
确认用pip安装 openai 和 flask 两个库。
pip install openai
pip install flask
如果说你之前在玩GPT3的时候已经装了openai,这时需要用 pip 更新一下openai库,把openai更新到 0.27.0 版本即可。
pip install --upgrade openai
3. GPT 3.5 API + Flask 代码
3.1 Python Flask 代码
python 文件为 main.py。
from flask import Flask, request, render_template, redirect
import openaiopenai.api_key = 'your API key'server = Flask(__name__)def send_gpt(prompt):try:response = openai.ChatCompletion.create(model='gpt-3.5-turbo',messages=[{"role": "user", "content": prompt}])return response["choices"][0]['message']['content']except Exception as e:return e@server.route('/', methods=['GET', 'POST'])
def get_request_json():if request.method == 'POST':if len(request.form['question']) < 1:return render_template('chat3.5.html', question="NULL", res="Question can't be empty!")question = request.form['question']print("======================================")print("Receive the question:", question)res = send_gpt(question)print("Q:\n", question)print("A:\n", res)return render_template('chat3.5.html', question=question, res=str(res))return render_template('chat3.5.html', question=0)if __name__ == '__main__':server.run(debug=True, host='0.0.0.0', port=80)
3.2 网页代码 HTML
html网页(chat3.5.html)放在templates文件夹里,templates文件夹和python文件(main.py)放在同一目录下。
DOCTYPE html>
<html lang="en"><head><meta charset="UTF-8"><meta name="viewport" content="width=device-width, initial-scale=1"><title>ChatGPTtitle><link rel="stylesheet" href="https://stackpath.bootstrapcdn.com/bootstrap/5.0.0-alpha2/css/bootstrap.min.css"><link rel="stylesheet" href="static/style.css">
head><body><header><h1>ChatGPT APIh1><h2>Artificial Intelligence at Your Fingertipsh2>header><main><div class="content"><form method="post" onsubmit="submit.disabled=true"><br><center><textarea name="question" placeholder="Type your question here." rows="4">textarea>center><br><input type="submit" value="Submit" id="submit">form><div id="loading"><b>Waiting for response...b>div>div><div class="dia">                {% if question %}<div class="result"><div class="question"><b>Alittlebean:b><pre>{{ question }}pre>div><hr><div class="response"><b>ChatGPT:b><pre>{{ res }}pre>div>div>{% endif %}div>main><script src="https://code.jquery.com/jquery-3.5.1.slim.min.js">script><script src="https://cdn.jsdelivr.net/npm/@popperjs/core@2.9.3/dist/umd/popper.min.js">script><script src="https://stackpath.bootstrapcdn.com/bootstrap/5.0.0-alpha2/js/bootstrap.min.js">script><script src="static/script.js">script>
body>html>
3.3 样式代码 CSS
样式代码 style.css 放在 static 文件夹下。
/* import Bootstrap */
@import url('https://maxcdn.bootstrapcdn.com/bootstrap/4.0.0/css/bootstrap.min.css');/* add custom styles */
body {font-family: sans-serif;
}header {padding: 1rem;background-color: #fff;box-shadow: 0 2px 5px rgba(0, 0, 0, 0.2);
}h1 {margin: 0;font-size: 2rem;
}main {padding: 1rem;
}h2 {margin-top: 1rem;font-size: 1.5rem;
}form {margin-top: 1rem;
}textarea {align-items: center;width: 90%;border: 1px solid #ccc;border-radius: 0.5rem;resize: vertical;font-size: 1.2rem;
}input[type="range"] {width: 60%;margin: 0 1rem;
}input[type="text"] {border: none;background: none;width: 30px;
}input[type="submit"] {display: block;margin: 1rem auto;width: 150px;height: 50px;background-color: lightpink;border: 1px solid #ccc;border-radius: 0.25rem;font-size: 1.5rem;cursor: pointer;
}#loading {display: none;color: gray;margin-top: 1rem;
}pre {margin-top: 1rem;font-size: 1.5rem;white-space: pre-wrap;word-break: break-word;text-align: justify;line-height: 1.5;
}.dia{margin-left: 15px;margin-right: 15px;
}
3.4 脚本代码 JS
脚本代码 script.js 放在static 文件夹下。
const loading = document.getElementById('loading');
const form = document.querySelector('form');form.addEventListener('submit', () => {loading.style.display = 'block';
});
4. Github 链接
GPT 3 + Flask (text-davinci-003 API):
https://github.com/redemptionwxy/GPT3-API-Flask-Python_Chat_Website
GPT 3.5 + Flask (gpt-3.5-turbo API ):
https://github.com/redemptionwxy/ChatGPT-API-Flask-Website
5. 网站效果展示以及美化
5.1 原网页
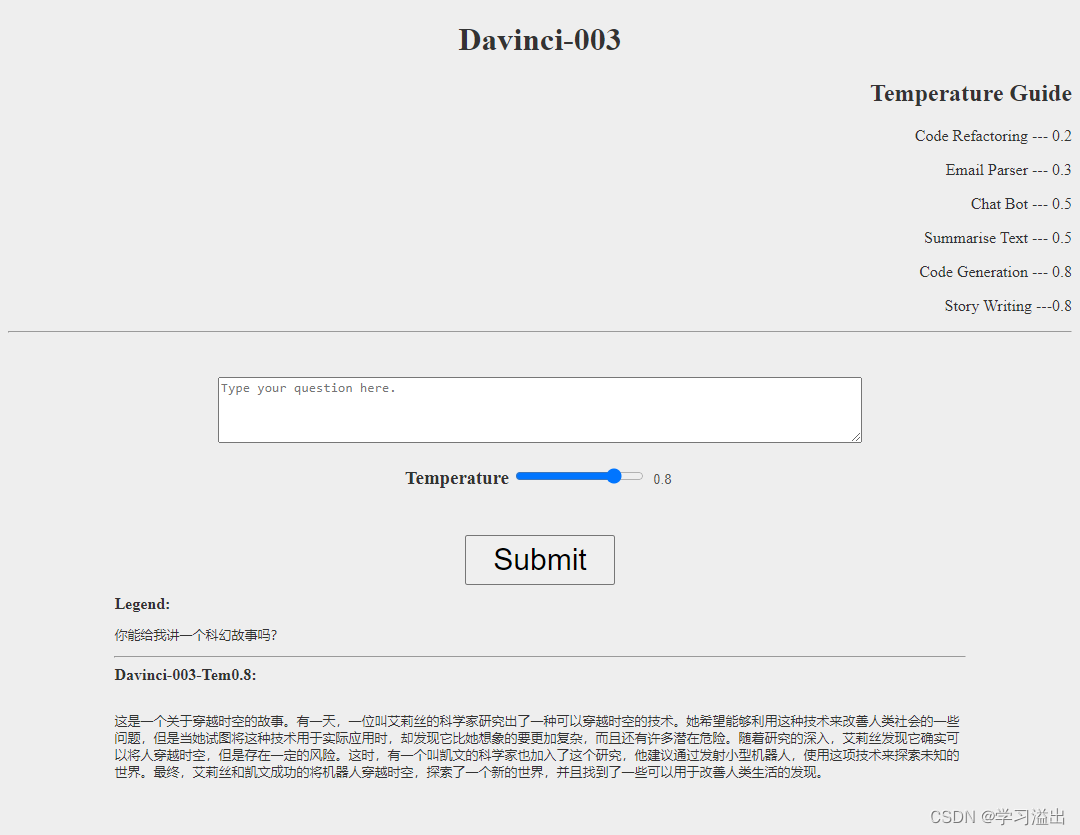
成功运行python代码将如下图显示,打开浏览器输入 127.0.0.1:80 或者 localhost 进行访问。

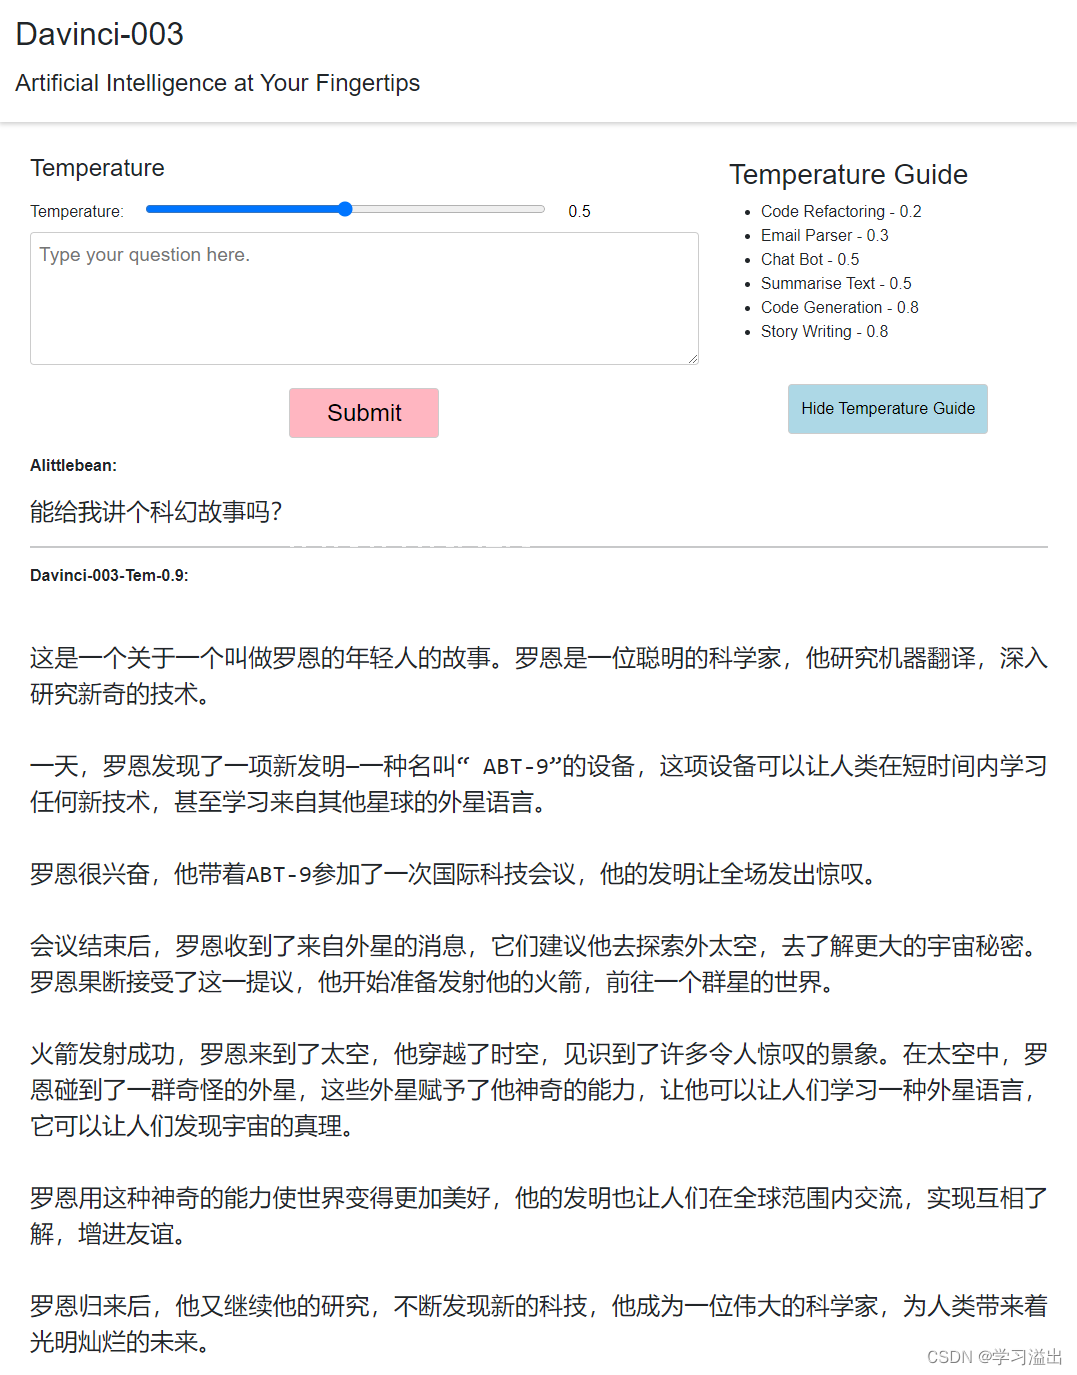
这个Flask网站可以自定义 Temperature 即GPT-3的回答随机度。网站上也给出了温度设置的建议,下面为效果图。
网站效果一般,主要是实现功能。如果还想加除Temperature之外的变量,可以照葫芦画瓢。
原网页用的是chat.html
Github 链接:https://github.com/redemptionwxy/GPT3-API-Flask-Python_Chat_Website
5.2 美化后(更新)
大家可以看到原来我自己写的网页十分简单。于是我把html代码发给chatgpt希望它能给我做一下优化和美观。我向它提了几个功能:
- 将html,css,js 文件分开,保留原有功能
- 实用bootstrap样式模板进行设计
- Temperature Guide放在网站右侧,点击可以隐藏
经过了一番调试,最终我得到了一下网页:
注:由于代码太长且有重复,我只将美化后的代码在github中更新。
在github中是chat_2.html
GPT 3.5 + Flask Gitgub 链接:
https://github.com/redemptionwxy/ChatGPT-API-Flask-Website
以上。
本文来自互联网用户投稿,文章观点仅代表作者本人,不代表本站立场,不承担相关法律责任。如若转载,请注明出处。 如若内容造成侵权/违法违规/事实不符,请点击【内容举报】进行投诉反馈!