源码敲门砖-mybatis源码-mapper详解和底层如何解析sql
文章目录
- (一)配置mapper的方式:
- (二)如何解析:
- 2.1 解析主配置文件的主要方法:
- 2.2 解析mappers
- 2.2.1、源码:
- 2.2.2 mappers中子标签的优先级和配置规则
- Package子标签:
- Mapper子标签:
- 2.2.3 跟踪源码探查根源:
- 解析mapper时,会将mapper接口放到configuration。
- addMapper源码:
- 跟踪parse(下面2.2.4会对parse方法的每一步进行分析:)
- 2.2.4 parse中的核心方法:
- ① 首先执行的是loadXmlResource
- ② configuration.addLoadedResource(resource);
- ③ 查缓存
- ④解析方法和sql
- ④-1、mapper方法解析和结果集解析源码:
- ④-2、sql解析与处理(${}、#{})
上一篇只是简单的对mybatis的基本流程进行了,探查。
这次准备深入看一下上篇的 使用XMLConfigBuilder进行解析, mapper到底如何配置,注解的sql如何获取的?
(一)配置mapper的方式:
根据官方文档,可以找到一共有四种方式。
官方文档链接
那么这几种方式的优先级和配置如何解析和加载的?
(二)如何解析:
上片文章中已经提到,
2.1 解析主配置文件的主要方法:
栈调用:
org.apache.ibatis.session.SqlSessionFactoryBuilder#build(java.io.InputStream, java.lang.String, java.util.Properties)
org.apache.ibatis.builder.xml.XMLConfigBuilder#parse
org.apache.ibatis.builder.xml.XMLConfigBuilder#parseConfiguration
private void parseConfiguration(XNode root) {try {// issue #117 read properties firstpropertiesElement(root.evalNode("properties"));Properties settings = settingsAsProperties(root.evalNode("settings"));loadCustomVfs(settings);loadCustomLogImpl(settings);typeAliasesElement(root.evalNode("typeAliases"));pluginElement(root.evalNode("plugins"));objectFactoryElement(root.evalNode("objectFactory"));objectWrapperFactoryElement(root.evalNode("objectWrapperFactory"));reflectorFactoryElement(root.evalNode("reflectorFactory"));settingsElement(settings);// read it after objectFactory and objectWrapperFactory issue #631environmentsElement(root.evalNode("environments"));databaseIdProviderElement(root.evalNode("databaseIdProvider"));typeHandlerElement(root.evalNode("typeHandlers"));mapperElement(root.evalNode("mappers"));} catch (Exception e) {throw new BuilderException("Error parsing SQL Mapper Configuration. Cause: " + e, e);}
}
2.2 解析mappers
2.2.1、源码:
org.apache.ibatis.builder.xml.XMLConfigBuilder#mapperElement
private void mapperElement(XNode parent) throws Exception {if (parent != null) {for (XNode child : parent.getChildren()) {if ("package".equals(child.getName())) {String mapperPackage = child.getStringAttribute("name");configuration.addMappers(mapperPackage);} else {String resource = child.getStringAttribute("resource");String url = child.getStringAttribute("url");String mapperClass = child.getStringAttribute("class");if (resource != null && url == null && mapperClass == null) {ErrorContext.instance().resource(resource);InputStream inputStream = Resources.getResourceAsStream(resource);XMLMapperBuilder mapperParser = new XMLMapperBuilder(inputStream, configuration, resource, configuration.getSqlFragments());mapperParser.parse();} else if (resource == null && url != null && mapperClass == null) {ErrorContext.instance().resource(url);InputStream inputStream = Resources.getUrlAsStream(url);XMLMapperBuilder mapperParser = new XMLMapperBuilder(inputStream, configuration, url, configuration.getSqlFragments());mapperParser.parse();} else if (resource == null && url == null && mapperClass != null) {//通过反射获取接口,将接口放到configuration Class<?> mapperInterface = Resources.classForName(mapperClass);configuration.addMapper(mapperInterface);} else {throw new BuilderException("A mapper element may only specify a url, resource or class, but not more than one.");}}}}
}
2.2.2 mappers中子标签的优先级和配置规则
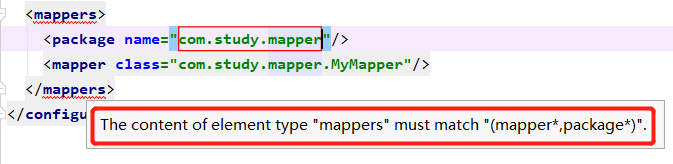
根据代码可知,首先会判断mappers标签下,子元素是package还是mapper。
Package与mapper是不可同时存在的。下图可知:
Package子标签:
Package指定这个包下所有的接口都是持久层接口,或者就是使用指定一个个mapper。
Mapper子标签:
Mapper标签下:三种类型的路径指定属性(resource,class,url),且每种只能使用一个属性。
Resource:xml相对于本配置文件的相对路径
Class:接口的包名全路径
url:绝对路径(file://+xml文件的全路径)
规则:
三种属性不能配置在同一个标签内:
就会导致报错:
A mapper element may only specify a url, resource or class, but not more than one.
同一个文件,只能配置一次mapper,否则也会报错:
Mapped Statements collection already contains value for org.apache.ibatis.domain.blog.mappers.BlogMapper.selectOne. please check mapper/BlogMapper.xml and file:///F:\IDEAR\IdeaProjects\mybatis3\mybatis-3\src\test\resources\mapper\BlogMapper.xml
正确使用示例:
<!--"com.study.mapper"/>-->class="com.study.mapper.MyMapper"/><!--"mapper/BlogMapper.xml" />-->"file:///F:\IDEAR\IdeaProjects\mybatis3\mybatis-3\src\test\resources\mapper\BlogMapper.xml"/>
</mappers>
2.2.3 跟踪源码探查根源:
根据2.2.1的源码可知,
Class<?> mapperInterface = Resources.classForName(mapperClass);
configuration.addMapper(mapperInterface);
解析mapper时,会将mapper接口放到configuration。
DEBUG 在addMapper打断点:
对应的栈调用:
parse:126, MapperAnnotationBuilder (org.apache.ibatis.builder.annotation)
addMapper:72, MapperRegistry (org.apache.ibatis.binding)
addMapper:810, Configuration (org.apache.ibatis.session)
mapperElement:383, XMLConfigBuilder (org.apache.ibatis.builder.xml)
parseConfiguration:120, XMLConfigBuilder (org.apache.ibatis.builder.xml)
parse:99, XMLConfigBuilder (org.apache.ibatis.builder.xml)
build:78, SqlSessionFactoryBuilder (org.apache.ibatis.session)
build:64, SqlSessionFactoryBuilder (org.apache.ibatis.session)
main:42, MybatisMain (com.study.anno)
addMapper源码:
configuration的addmapper:mapperRegistry.addMapper(type);
public <T> void addMapper(Class<T> type) {if (type.isInterface()) {if (hasMapper(type)) {首先会判断是否已存在,如果有了就不会再往里放了throw new BindingException("Type " + type + " is already known to the MapperRegistry.");}boolean loadCompleted = false;try {//放入mapper的动态代理工厂knownMappers.put(type, new MapperProxyFactory<>(type));/*解析前先将mapper的类型type(我这里是myMapper)配置给解析器parser,这样会直接用这个类型去解析mapper接口。否则会尝试去找对应的类型然后再解析。   */MapperAnnotationBuilder parser = new MapperAnnotationBuilder(config, type);parser.parse();loadCompleted = true;} finally {if (!loadCompleted) {knownMappers.remove(type);}}}
}
跟踪parse(下面2.2.4会对parse方法的每一步进行分析:)
MapperAnnotationBuilder源码
这个构建者类,以静态代码块来初始化这些属性:
static {SQL_ANNOTATION_TYPES.add(Select.class);SQL_ANNOTATION_TYPES.add(Insert.class);SQL_ANNOTATION_TYPES.add(Update.class);SQL_ANNOTATION_TYPES.add(Delete.class);SQL_PROVIDER_ANNOTATION_TYPES.add(SelectProvider.class);SQL_PROVIDER_ANNOTATION_TYPES.add(InsertProvider.class);SQL_PROVIDER_ANNOTAION_TYPES.add(UpdateProvider.class);SQL_PROVIDER_ANNOTATION_TYPES.add(DeleteProvider.class);
}
parse方法:
public void parse() {String resource = type.toString();//interface com.study.mapper.MyMapperif (!configuration.isResourceLoaded(resource)) {loadXmlResource();//先尝试通过找到接口对应的映射文件xml,并解析//将resource放到configuration 的loadedResources(HashSet 类型)
configuration.addLoadedResource(resource);
assistant.setCurrentNamespace(type.getName());parseCache();parseCacheRef();for (Method method : type.getMethods()) {if (!canHaveStatement(method)) {continue;}if (getSqlCommandType(method) == SqlCommandType.SELECT && method.getAnnotation(ResultMap.class) == null) {parseResultMap(method);}try {parseStatement(method);} catch (IncompleteElementException e) {configuration.addIncompleteMethod(new MethodResolver(this, method));}}}parsePendingMethods();
}
2.2.4 parse中的核心方法:
① 首先执行的是loadXmlResource
这个方法:尝试接口名和接口包名路径来获取xml文件:
private void loadXmlResource() {// Spring may not know the real resource name so we check a flag// to prevent loading again a resource twice// this flag is set at XMLMapperBuilder#bindMapperForNamespaceif (!configuration.isResourceLoaded("namespace:" + type.getName())) {
他会先根据接口路径com.study.mapper. MyMapper去拼接一个xml路径出来,去获取这个mapper的xml
com/study/mapper/MyMapper.xml。也就是说,你配置成接口注解的方式,他也会先去查有没有xml方式的接口映射文件。
String xmlResource = type.getName().replace('.', '/') + ".xml";// #1347InputStream inputStream = type.getResourceAsStream("/" + xmlResource);if (inputStream == null) {
//如果根据包名找不到,那就试着到主配置文件同级找// Search XML mapper that is not in the module but in the classpath.try {
//通过项目路径没有获取对应的xml,再试着到resources下获取接口的xmlinputStream = Resources.getResourceAsStream(type.getClassLoader(), xmlResource);} catch (IOException e2) {// ignore, resource is not required}}
//无论上面的那种方式,只要找到就用xml方式:if (inputStream != null) {
//最终都会构造XMLMapperBuilderXMLMapperBuilder xmlParser = new XMLMapperBuilder(inputStream, assistant.getConfiguration(), xmlResource, configuration.getSqlFragments(), type.getName());xmlParser.parse();}}
}
结论:
如果找不到xml才会去找注解,所以在mybatis中xml的优先级是高于注解方式的。
因此如果之前用的是xml,后来改成注解了,要将相应的mapper的映射xml文件删除或者让注解所在的mapper接口路径与xml路径不一致,否则会导致在接口上的注解时效。
 这种结构或者Mymapper.xml在resources下:都会导致–>只要在主配置文件的mapper配置上了MyMapper的路径,无论主配置文件有没有配置,在Mymapper接口方法上有没有加了注解,都会导致xml有效,注解失效。
② configuration.addLoadedResource(resource);
对应的Configuration源码:
将上一步获取到的需要加载的mapper放到待加载集合loadedResources 中
protected final Set<String> loadedResources = new HashSet<>();
public void addLoadedResource(String resource) {loadedResources.add(resource);}
③ 查缓存
1、设置当前mapper的Namespace
assistant.setCurrentNamespace(type.getName());
type:interface com.study.mapper.MyMapper
2、获取CacheNamespace :
private void parseCache() {
//根据获取的这个Mapper,来获取对应的命名空间下的缓存CacheNamespace cacheDomain = type.getAnnotation(CacheNamespace.class);if (cacheDomain != null) {Integer size = cacheDomain.size() == 0 ? null : cacheDomain.size();Long flushInterval = cacheDomain.flushInterval() == 0 ? null : cacheDomain.flushInterval();Properties props = convertToProperties(cacheDomain.properties());assistant.useNewCache(cacheDomain.implementation(), cacheDomain.eviction(), flushInterval, size, cacheDomain.readWrite(), cacheDomain.blocking(), props);}}
3、获取CacheNamespaceRef 缓存:
private void parseCacheRef() {CacheNamespaceRef cacheDomainRef = type.getAnnotation(CacheNamespaceRef.class);if (cacheDomainRef != null) {Class<?> refType = cacheDomainRef.value();String refName = cacheDomainRef.name();if (refType == void.class && refName.isEmpty()) {throw new BuilderException("Should be specified either value() or name() attribute in the @CacheNamespaceRef");}if (refType != void.class && !refName.isEmpty()) {throw new BuilderException("Cannot use both value() and name() attribute in the @CacheNamespaceRef");}String namespace = (refType != void.class) ? refType.getName() : refName;try {assistant.useCacheRef(namespace);} catch (IncompleteElementException e) {configuration.addIncompleteCacheRef(new CacheRefResolver(assistant, namespace));}}}
对上面缓存类CacheNamespace和CacheNamespaceRef进行一下总结:
mybatis的缓存:
(1)为每一个Mapper分配一个Cache缓存对象(使用节点配置或者 @CacheNamespace注解 );
(2)多个Mapper共用一个Cache缓存对象(使用节点配置或者本文所提到的@CacheNamespaceRef注解);
④解析方法和sql
④-1、mapper方法解析和结果集解析源码:
//获取指定type对应的mapper的所有方法。
for (Method method : type.getMethods()) {if (!canHaveStatement(method)) {//将桥连方法和default方法直接跳过//桥连方法https://blog.csdn.net/mhmyqn/article/details/47342577continue;}//判断这个方法对应的注解是不是select,如果是就解析查询结果集if (getSqlCommandType(method) == SqlCommandType.SELECT && method.getAnnotation(ResultMap.class) == null) {//下面单独详解parseResultMap(method);}try {//下面单独详解parseStatement(method);} catch (IncompleteElementException e) {configuration.addIncompleteMethod(new MethodResolver(this, method));}}
//parseResultMap
private String parseResultMap(Method method) {//这里我的返回对象是 com.study.bean.MyBeanClass<?> returnType = getReturnType(method);Arg[] args = method.getAnnotationsByType(Arg.class);Result[] results = method.getAnnotationsByType(Result.class);TypeDiscriminator typeDiscriminator = method.getAnnotation(TypeDiscriminator.class);//resultMapId为 com.study.mapper.MyMapper.selectOne-intString resultMapId = generateResultMapName(method);//这里是将上面的结果集应用上,即赋值到Configuration的Result Maps collectionapplyResultMap(resultMapId, returnType, args, results, typeDiscriminator);return resultMapId;}
拼接处每个方法的resultMapId ,作为key放到Configuration的resultMaps(是Result Maps collection)中。
④-2、sql解析与处理(${}、#{})
第一步 parseStatement(method);
void parseStatement(Method method) {//获取方法的参数类型集合Class<?> parameterTypeClass = getParameterType(method);LanguageDriver languageDriver = getLanguageDriver(method);/*获取注解类型(本次是SELECT)和对应的sql(select * from MyBean where id = #{id}),并将sql中的${}#{}处理掉,后面我会单独写一下*/SqlSource sqlSource = getSqlSourceFromAnnotations(method, parameterTypeClass, languageDriver);if (sqlSource != null) {.....boolean isSelect = sqlCommandType == SqlCommandType.SELECT;boolean flushCache = !isSelect;boolean useCache = isSelect;......if (isSelect) {ResultMap resultMapAnnotation = method.getAnnotation(ResultMap.class);if (resultMapAnnotation != null) {resultMapId = String.join(",", resultMapAnnotation.value());} else {resultMapId = generateResultMapName(method);}}assistant.addMappedStatement(......languageDriver,// ResultSetsoptions != null ? nullOrEmpty(options.resultSets()) : null);}}
第二步 从注解获取sql并解析(${})
getSqlSourceFromAnnotations:
private SqlSource getSqlSourceFromAnnotations(Method method, Class<?> parameterType, LanguageDriver languageDriver) {try {//获取注解的类型 这里我的是SELECTClass<? extends Annotation> sqlAnnotationType = getSqlAnnotationType(method);Class<? extends Annotation> sqlProviderAnnotationType = getSqlProviderAnnotationType(method);if (sqlAnnotationType != null) {if (sqlProviderAnnotationType != null) {throw new BindingException("You cannot supply both a static SQL and SqlProvider to method named " + method.getName());}Annotation sqlAnnotation = method.getAnnotation(sqlAnnotationType);/*sqlAnnotation.getClass().getMethod("value")对应的值就是sql: select * from MyBean where id = #{id}*/final String[] strings = (String[]) sqlAnnotation.getClass().getMethod("value").invoke(sqlAnnotation);return buildSqlSourceFromStrings(strings, parameterType, languageDriver);} else if (sqlProviderAnnotationType != null) {Annotation sqlProviderAnnotation = method.getAnnotation(sqlProviderAnnotationType);return new ProviderSqlSource(assistant.getConfiguration(), sqlProviderAnnotation, type, method);}return null;} catch (Exception e) {throw new BuilderException("Could not find value method on SQL annotation. Cause: " + e, e);}}// buildSqlSourceFromStringsprivate SqlSource buildSqlSourceFromStrings(String[] strings, Class<?> parameterTypeClass, LanguageDriver languageDriver) {//sql转成字符串作为参数,创建sqlSourcereturn languageDriver.createSqlSource(configuration, String.join(" ", strings).trim(), parameterTypeClass);}
第三步 languageDriver.createSqlSource远程调用的是XMLLanguageDriver。
public SqlSource createSqlSource(Configuration configuration, String script, Class<?> parameterType) {// issue #3if (script.startsWith("
