IOS开发笔记(五)——IOS AVFoundation,课程设计主题介绍
中山大学数据科学与计算机学院本科生实验报告
(2019年春季学期)
一、实验题目
IOS课程设计主题讲述
IOS AVFoundation
二、实现内容
- 总结三个课程设计主题
- AVFoundation简介
- AVPlayer
- AVAudio
- AVCapture
- 完成AVPlayer Demo
三、实验结果
A.课程设计主题
1. Feeds信息流咨询APP
参考今日头条app
功能
- 多tab展示
- UIScrollView使用 (tableview列表
- Container View Controller & ChildViewController (上部
- 下拉刷新
- 分页逻辑
- Feeds流展示
- tableViewCell重用 (纯文本,单图,多图
- 不同格式图片加载 (jpg/png
- 图片浮层
- 图片动效(小图片展示大图片,UIViewControllerTransitioning
- 多图预加载 (解决加载缓慢的问题,例如打开第一张图的时候后面的图开始下载
- 详情页
- 评论分页 (手机长度两倍的
- TableViewCell复用
- 详情页面和Feeds页面复用性设计
- 写操作
- 多界面信息评论 (点赞、评论实时显示
- 信息同步的设计模式 (广播或者观察者,解决多个页面需要刷新UI的情况
应用架构设计
网络
本地存储,避免每一次都从网络拉取
其他相关技术
- AutoLayout 排版
- 缓存 (文件缓存或者DB SQLite
- 网络通讯 (NSURLSession 基于http
- 性能测量 (Instruments使用 加分点
2. MV录歌APP
需求
- 下载音乐伴奏
- 录制歌曲
- 录制视频
- 编辑视频 (可选
- 合成mv
- 上传到竞技场 (可选
- 竞技场MV展示和互动 (可选
相关技术
- 音频播放和录制 AVAudioSession 手机麦克风
- 视频录制,视频编辑与合成 AVFoundation
- 文件上传与下载 NSURLSession
相关框架
用户两种操作
- 录制mv -> 选择配曲 -> 开始录制 -> MV回放 ->发布到广场 (生产者
- 浏览MV广场 -> 播放mv -> 点赞互动(消费者,加入评论点赞之类
总体设计
C/S架构
CDN:解决数据在网络干线上传输的延迟,将美国的数据拷贝一份到中国各省CDN结点,查询的时候就先查询结点
模块设计
涉及客户端的操作多一点
3. IM聊天工具
需求
- 消息收发,保存
- 联系人管理
- 聊天管理
技术难点
- 网络通信
- 长连接 TCP
- 消息收发
- 用户下线后,仍收到消息,如何解决用户重新上线后再次向其发送之前未收到的消息
- 利用sequence来解决,客户端与服务器都保存一个seq,用户新登陆后带着seq去询问服务器哪一些没有收到
- 用户下线后,仍收到消息,如何解决用户重新上线后再次向其发送之前未收到的消息
- 本地存储
- 数据库 保存 查询信息从新到旧,会话管理
- 联系人管理
- 如何加好友
- 用户名改名如何进行通知
- 会话管理
- 高性能
相关技术
- 网络编程
- 本地存储
- 性能调优 (instrument)
B. AVFoundation简介
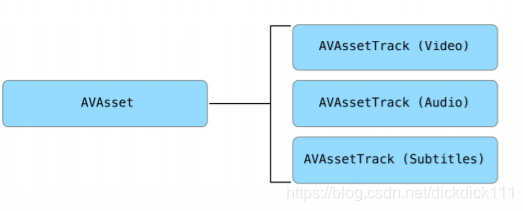
1. AVAssert
一个资源类,负责加载音视频资源。多媒体资源的静态模型
let url: URL = // Local or Remote Asset URL
let asset = AVAsset(url: url)
//AVAsset是一个抽象类,实际使用AVURLAsset来初始化。如果需要更多的控制那么使用AVURLAsset来初始化
let url: URL = // Remote Asset URL
let options = [AVURLAssetAllowsCellularAccessKey: false]//设置移动蜂窝网络下不会读取资源,只有在WiFi网络下才会加载资源
let asset = AVURLAsset(url: url, options: options)
2. AVPlayer
负责播放音视频及时间管理,AVPlayer一次只能播放一个资源,如果需要顺序播放多个资源,可以使用它的子类AVQueuePlayer来管理播放队列。
-
监听播放器状态变化
-
通过CMTime来控制视频进度
3. AVAssetExportSession
视频剪切、合并、压缩。对象转码以及输出,对一个AVAsset对象进行操作,用来做视频处理输出。
4. AVAudioSession
Audio Session 配置
- 控制声道的表现,包括⻨克风
- 处理AirPlay
- 后台播放
Audio Session 权限设置
- ⾳功能是隐私相关功能,注意Info.plist中的wording,跟审核相关
- 正确处理授权的回调
5. AVCapture
照相功能
AVCaptureDevice重要属性
- position,表示是前置摄像头还是后置摄像头
- hasTorch,表示是否带闪光灯
- focusMode,表示聚焦模式
- exposureMode,表示曝光模式
- flashMode,表示闪光灯模式
- touchMode,表示把闪光灯当作⼿电筒⽤
- videoStabilizationMode,表示录制模式
- whiteBalanceMode,表示⽩平衡设置
AVCaptureSession重要属性
- sessionPreset,⽤于控制显示分辨率
- running,表示当前摄像头正在⼯作
- interrupted,表示摄像头⼯作停⽌
- videoOrientation,表示当前视频⽅向
AVCapture相关的类
- AVCaptureDeviceInput:摄像头的输⼊流
- AVCaptureMovieFileOutput:摄像头的输出流
- AVCaptureVideoDataOutput:管理视频流的每⼀帧
- AVCaptureStillImageOutput:照⽚的输出流
- AVCaptureVideoPreviewLayer:摄像头的实时渲染图层
C. 视频播放器demo
1. 自定义播放器RHPlayer
- RHFullViewController
处理全屏播放的逻辑
@implementation RHFullViewController- (UIInterfaceOrientationMask)supportedInterfaceOrientations {return UIInterfaceOrientationMaskLandscape;
}- (BOOL)shouldAutorotateToInterfaceOrientation:(UIInterfaceOrientation)toInterfaceOrientation {return YES;
}@end
- RHPlayerFailedView
处理播放失败的逻辑,这里显示提示reloadButton,点击重加载
- (UIButton *)reloadButton {if (!_reloadButton) {UIButton * button = [[UIButton alloc] init];[button setTitle:@"视频加载失败,点击重新加载" forState:UIControlStateNormal];[button addTarget:self action:@selector(clickReloadButton:) forControlEvents:UIControlEventTouchUpInside];_reloadButton = button;}return _reloadButton;
}
- RHPlayer 显示播放框
- RHPlayerLayerView 播放主界面
- RHPlayerTitleView 播放框上部,显示名字、返回键
- RHPlayerToolView 播放框下部,全屏按钮,播放暂停按钮
- RHProgressSlider 播放框的进度条
2.调用RHPlayer在主页面显示
- PlayerViewController
继承UITableView的两个类UITableViewDelegate, UITableViewDataSource来实现显示选项列表,继承RHPlayerViewDelegate来处理视频播放事件
player 播放器
tableView 页面选项
dataArr 存放选项的列表
#import "PlayViewController.h"
#import "RHPlayerView.h"@interface PlayViewController () <RHPlayerViewDelegate, UITableViewDelegate, UITableViewDataSource>@property (nonatomic, strong) RHPlayerView * player;
@property (nonatomic, strong) UITableView * tableView;@property (nonatomic, strong) NSMutableArray * dataArr;
@end

@implementation PlayViewController- (void)viewDidLoad {[super viewDidLoad];[self loadData];[self addSubviews];
}- (void)viewWillDisappear:(BOOL)animated {[super viewWillDisappear:animated];if ([self.navigationController.viewControllers indexOfObject:self] == NSNotFound) {NSLog(@"pop pop pop pop pop");[_player stop];}
}// 加载数据
- (void)loadData {NSArray * titleArr = @[@"视频一", @"视频二", @"视频三"];NSArray * urlArr = @[@"http://test.miaocaiwang.com/app/rm.mp4", @"http://test.miaocaiwang.com/app/rm.mp4", @"http://test.miaocaiwang.com/app/rm.mp4"];for (int i = 0; i < titleArr.count; i++) {RHVideoModel * model = [[RHVideoModel alloc] initWithVideoId:[NSString stringWithFormat:@"%03d", i + 1] title:titleArr[i] url:urlArr[i] currentTime:0];[self.dataArr addObject:model];}[self.player setVideoModels:self.dataArr playVideoId:@""];[self.tableView reloadData];
}// 添加视图
- (void)addSubviews {[self.view addSubview:self.player];[self.view addSubview:self.tableView];[self makeConstraintsForUI];
}// 限制UI的位置
- (void)makeConstraintsForUI {[_tableView mas_makeConstraints:^(MASConstraintMaker *make) {make.top.mas_equalTo(@(9 * Screen_Width / 16));make.left.mas_equalTo(@0);make.right.mas_equalTo(@0);make.bottom.mas_equalTo(@0);}];
}#pragma mark - player view delegate// 是否允许播放
- (BOOL)playerViewShouldPlay {return YES;
}
// 当前播放的
- (void)playerView:(RHPlayerView *)playView didPlayVideo:(RHVideoModel *)videoModel index:(NSInteger)index {}
// 当前播放结束的
- (void)playerView:(RHPlayerView *)playView didPlayEndVideo:(RHVideoModel *)videoModel index:(NSInteger)index {}
// 当前正在播放的  会调用多次  更新当前播放时间
- (void)playerView:(RHPlayerView *)playView didPlayVideo:(RHVideoModel *)videoModel playTime:(NSTimeInterval)playTime {}
// TableView的设置
#pragma mark - tableView delegate- (NSInteger)tableView:(UITableView *)tableView numberOfRowsInSection:(NSInteger)section {return _dataArr.count;
}- (UITableViewCell *)tableView:(UITableView *)tableView cellForRowAtIndexPath:(NSIndexPath *)indexPath {UITableViewCell * cell = [tableView dequeueReusableCellWithIdentifier:@"Cell_ID"];cell.selectionStyle = UITableViewCellSelectionStyleNone;if (indexPath.row < _dataArr.count) {RHVideoModel * model = _dataArr[indexPath.row];cell.textLabel.text = model.title;}return cell;
}- (void)tableView:(UITableView *)tableView didSelectRowAtIndexPath:(NSIndexPath *)indexPath {RHVideoModel * model = _dataArr[indexPath.row];[_player playVideoWithVideoId:model.videoId];
}#pragma mark - setter and getter- (UITableView *)tableView {if (!_tableView) {UITableView * tableView = [[UITableView alloc] init];tableView.dataSource = self;tableView.delegate = self;[tableView registerClass:[UITableViewCell class] forCellReuseIdentifier:@"Cell_ID"];tableView.tableFooterView = [[UIView alloc] init];_tableView = tableView;}return _tableView;
}- (RHPlayerView *)player {if (!_player) {_player = [[RHPlayerView alloc] initWithFrame:CGRectMake(0, 0, Screen_Width, 9 * Screen_Width / 16) currentVC:self];_player.delegate = self;}return _player;
}- (NSMutableArray *)dataArr {if (!_dataArr) {_dataArr = [[NSMutableArray alloc] init];}return _dataArr;
}- (void)didReceiveMemoryWarning {[super didReceiveMemoryWarning];// Dispose of any resources that can be recreated.
}
@end
到这里简单的视频播放器就完成了,主要的难点是在使用自己实现的视频显示窗口,封装了一个RHPlayerView。利用这个类后面可以非常简单的使用视频播放器,并加入了之前学过的TableView来控制播放视频的来源。
D. AVCaptureDemo的实现
简单的拍照实现,包括控制其中焦距,曝光度等系统内置参数,最后将图片保存在手机内存当中,注意错误的处理,打开照相机,写文件权限等。
1. 实现ELCameraBaseCapture
利用captureSession来进行对拍照控制,接口包括
@interface ELCameraBaseCapture : NSObject@property (nonatomic, strong) AVCaptureSession *captureSession;//输入设备
@property (nonatomic, strong) AVCaptureDevice *captureDevice;//输入流
@property (nonatomic, strong) AVCaptureDeviceInput *captureInput;//照片输出流
@property (nonatomic, strong) AVCaptureStillImageOutput *imageOutput;//配置session
- (void)sessionConfig;- (void)startSession;- (void)stopSession;- (void)takePhoto:(void(^)(UIImage *image, NSError *error))complete;
实现:
#import "ELCameraBaseCapture.h"@implementation ELCameraBaseCapture- (instancetype)init {if (self = [super init]) {[self sessionConfig];}return self;
}
// 设置session的配置
- (void)sessionConfig {[self.captureSession beginConfiguration];if ([self.captureSession canAddInput:self.captureInput]) {[self.captureSession addInput:self.captureInput];}if ([self.captureSession canAddOutput:self.imageOutput]) {[self.captureSession addOutput:self.imageOutput];}[self.captureSession commitConfiguration];
}// 开始session
- (void)startSession {if (![self.captureSession isRunning]) {dispatch_async(dispatch_get_global_queue(DISPATCH_QUEUE_PRIORITY_DEFAULT, 0), ^{[self.captureSession startRunning];});}
}// 停止session
- (void)stopSession {if ([self.captureSession isRunning]) {dispatch_async(dispatch_get_global_queue(DISPATCH_QUEUE_PRIORITY_DEFAULT, 0), ^{[self.captureSession stopRunning];});}
}
// 进行拍照
- (void)takePhoto:(void(^)(UIImage *image, NSError *error))complete {AVCaptureConnection *conntion = [self.imageOutput connectionWithMediaType:AVMediaTypeVideo];if (!conntion) {NSLog(@"拍照失败!");if (complete) {complete(nil,nil);}return;}[self.imageOutput captureStillImageAsynchronouslyFromConnection:conntion completionHandler:^(CMSampleBufferRef imageDataSampleBuffer, NSError *error) {if (error || imageDataSampleBuffer == nil) {if (complete)complete(nil,error);return;}NSData *imageData = [AVCaptureStillImageOutput jpegStillImageNSDataRepresentation:imageDataSampleBuffer];UIImage *image = [UIImage imageWithData:imageData];if (complete)complete(image,nil);}];
}#pragma mark - lazy load
// 设置session的质量,高,中还是低
- (AVCaptureSession *)captureSession {if (!_captureSession) {_captureSession = [[AVCaptureSession alloc] init];//设置session采集质量 _captureSession.sessionPreset = AVCaptureSessionPresetPhoto;}return _captureSession;
}
// 设置capture的设备
- (AVCaptureDevice *)captureDevice {if (!_captureDevice) {_captureDevice = [AVCaptureDevice defaultDeviceWithMediaType:AVMediaTypeVideo];}return _captureDevice;
}
// 设置输入
- (AVCaptureDeviceInput *)captureInput {if (!_captureInput) {NSError *error;_captureInput = [AVCaptureDeviceInput deviceInputWithDevice:self.captureDevice error:&error];}return _captureInput;
}
// 设置输出
- (AVCaptureStillImageOutput *)imageOutput {if (!_imageOutput) {_imageOutput = [[AVCaptureStillImageOutput alloc] init];// 这是输出流的设置参数AVVideoCodecJPEG参数表示以JPEG的图片格式输出图片NSDictionary *outputSettings = [[NSDictionary alloc] initWithObjectsAndKeys:AVVideoCodecJPEG, AVVideoCodecKey, nil];[_imageOutput setOutputSettings:outputSettings];}return _imageOutput;
}@end
2.实现ELCameraControlCapture
这个类在基础的capture上,加入切换摄像头,设置闪光灯,设置手电筒,调整焦距,调节曝光量,调整白平衡。
#import "ELCameraBaseCapture.h"
@interface ELCameraControlCapture : ELCameraBaseCapture#pragma mark 切换摄像头
- (BOOL)switchCamera;
- (BOOL)canSwitchCamera;
#pragma mark 设置闪光灯模式
- (BOOL)setFlashMode:(AVCaptureFlashMode)flashMode;#pragma mark 设置手电筒开关
- (BOOL)setTorchMode:(AVCaptureTorchMode)torchMode;#pragma mark 焦距调整
- (BOOL)setFocusMode:(AVCaptureFocusMode)focusMode;
- (BOOL)setFocusPoint:(CGPoint)point;#pragma mark 曝光量调节
- (BOOL)setExposureMode:(AVCaptureExposureMode)exposureMode;#pragma mark 白平衡
- (BOOL)setWhiteBalanceMode:(AVCaptureWhiteBalanceMode)whiteBalanceMode;@end
实现:
- 切换摄像头
- (BOOL)switchCamera {if (![self canSwitchCamera]) {return NO;}//获取切换的摄像头AVCaptureDevice *videoDevice = nil;if (self.captureDevice.position == AVCaptureDevicePositionBack) {videoDevice = [self cameraWithPosition:AVCaptureDevicePositionFront];}else {videoDevice = [self cameraWithPosition:AVCaptureDevicePositionBack];}if (!videoDevice) {return NO;}self.captureDevice = videoDevice;//重新定义输入流NSError *error;AVCaptureDeviceInput *videoInput =[AVCaptureDeviceInput deviceInputWithDevice:videoDevice error:&error];if (videoInput) {[self.captureSession beginConfiguration];[self.captureSession removeInput:self.captureInput];if ([self.captureSession canAddInput:videoInput]) {[self.captureSession addInput:videoInput];self.captureInput = videoInput;}else {[self.captureSession addInput:self.captureInput];}[self.captureSession commitConfiguration];return YES;}return NO;
}
// 能否切换前置后置
- (BOOL)canSwitchCamera {return [[AVCaptureDevice devicesWithMediaType:AVMediaTypeVideo] count] > 1;
}
// 通过位置定义使用哪个摄像头
- (AVCaptureDevice *)cameraWithPosition:(AVCaptureDevicePosition)position {NSArray *devices = [AVCaptureDevice devicesWithMediaType:AVMediaTypeVideo];for (AVCaptureDevice *device in devices) {if (device.position == position) {return device;}}return nil;
}
- 设置闪光灯模式
- (BOOL)setFlashMode:(AVCaptureFlashMode)flashMode {AVCaptureDevice *device = self.captureDevice;if (device.flashMode != flashMode &&[device isFlashModeSupported:flashMode]) {NSError *error;if ([device lockForConfiguration:&error]) {device.flashMode = flashMode;[device unlockForConfiguration];return YES;}}return NO;
}
- 设置手电筒开关
- (BOOL)setTorchMode:(AVCaptureTorchMode)torchMode {AVCaptureDevice *device = self.captureDevice;if (device.torchMode != torchMode &&[device isTorchModeSupported:torchMode]) {NSError *error;if ([device lockForConfiguration:&error]) {device.torchMode = torchMode;[device unlockForConfiguration];return YES;}}return NO;
}
- 焦距调整
// 调整模式
- (BOOL)setFocusMode:(AVCaptureFocusMode)focusMode {AVCaptureDevice *device = self.captureDevice;if (device.focusMode != focusMode &&[device isFocusModeSupported:focusMode]) {NSError *error;if ([device lockForConfiguration:&error]) {device.focusMode = focusMode;[device unlockForConfiguration];return YES;}}return NO;
}
// 调整焦点
- (BOOL)setFocusPoint:(CGPoint)point {AVCaptureDevice *device = self.captureDevice;if (device.isFocusPointOfInterestSupported &&[device isFocusModeSupported:AVCaptureFocusModeAutoFocus]) {NSError *error;if ([device lockForConfiguration:&error]) {device.focusPointOfInterest = point;device.focusMode = AVCaptureFocusModeAutoFocus;[device unlockForConfiguration];return YES;}}return NO;
}
- 曝光量调节
- (BOOL)setExposureMode:(AVCaptureExposureMode)exposureMode {AVCaptureDevice *device = self.captureDevice;if (device.exposureMode != exposureMode &&[device isExposureModeSupported:exposureMode]) {NSError *error;if ([device lockForConfiguration:&error]) {device.exposureMode = exposureMode;[device unlockForConfiguration];return YES;}}return NO;
}
- 白平衡
- (BOOL)setWhiteBalanceMode:(AVCaptureWhiteBalanceMode)whiteBalanceMode {AVCaptureDevice *device = self.captureDevice;if (device.whiteBalanceMode != whiteBalanceMode &&[device isWhiteBalanceModeSupported:whiteBalanceMode]) {NSError *error;if ([device lockForConfiguration:&error]) {device.whiteBalanceMode = whiteBalanceMode;[device unlockForConfiguration];return YES;}}return NO;
}
3. 使用上面定义的两个基类完成拍照事件
ELCameraViewController类
- 调用基类API
- 保存图片
- (void)viewWillAppear:(BOOL)animated {[super viewWillAppear:animated];[self.cameraCapture startSession];
}
- (void)viewWillDisappear:(BOOL)animated {[super viewWillDisappear:animated];[self.cameraCapture stopSession];
}- (void)viewDidLoad {[super viewDidLoad];// Do any additional setup after loading the view.[self setUI];
}
- (void)setUI {[self setVideoPreview];[self setCameraView];[self.cameraCapture startSession];
}// 视频前的预览图设置
- (void)setVideoPreview {AVCaptureVideoPreviewLayer *preLayer = [AVCaptureVideoPreviewLayer layerWithSession: self.cameraCapture.captureSession];preLayer.frame = self.view.bounds;preLayer.videoGravity = AVLayerVideoGravityResizeAspectFill;[self.view.layer addSublayer:preLayer];
}// 拍照前的预览图设置
- (void)setCameraView {ELCameraSettingView *view = [[ELCameraSettingView alloc] init];[self.view addSubview:view];[view mas_makeConstraints:^(MASConstraintMaker *make) {make.left.right.bottom.equalTo(self.view);make.height.equalTo(@100);}];[view.cameraBtn addTarget:self action:@selector(takePhoto) forControlEvents:UIControlEventTouchUpInside];if (!self.cameraCapture.canSwitchCamera) {view.switchBtn.hidden = YES;} else {[view.switchBtn addTarget:self action:@selector(switchCamera) forControlEvents:UIControlEventTouchUpInside];}
}
// 调用cameraCapture的takePhoto函数
- (void)takePhoto {__weak typeof(self) weakself = self;[self.cameraCapture takePhoto:^(UIImage *image, NSError *error) {if (error) {NSLog(@"拍照失败:%@",error);return;}if (image) {[weakself saveImageToPhotoAlbum:image];}}];
}
// 调用cameraCapture的switchCamera函数
- (void)switchCamera {[self.cameraCapture switchCamera];
}- (ELCameraControlCapture *)cameraCapture {if (!_cameraCapture) {_cameraCapture = [[ELCameraControlCapture alloc] init];}return _cameraCapture;
}#pragma - 保存至相册
- (void)saveImageToPhotoAlbum:(UIImage*)savedImage
{UIImageWriteToSavedPhotosAlbum(savedImage, self, @selector(image:didFinishSavingWithError:contextInfo:), NULL);}
// 指定回调方法- (void)image: (UIImage *) image didFinishSavingWithError: (NSError *) error contextInfo: (void *) contextInfo{NSString *msg = nil ;if(error != NULL){msg = @"保存图片失败" ;}else{msg = @"保存图片成功" ;}UIAlertView *alert = [[UIAlertView alloc] initWithTitle:@"保存图片结果提示"message:msgdelegate:selfcancelButtonTitle:@"确定"otherButtonTitles:nil];[alert show];
}
这样子就可以完成基本的拍照功能,除此之外我们还可以利用基类定义好的api来做各种各样自定义操作,如何调焦距或者翻转拍照等。
四、实验思考及感想
这周实验主要分成两部分,首先是上午选择课题与分组,我们小组选定了做一个IM聊天工具。经过半个多小时的讨论,基本的功能划分以及分工也已经比较明确。为什么选择做这个课题,主要是因为聊天工具比较常用,而且组内几个成员上学期安卓项目也做过类似的聊天工具,这次换到IOS平台应该比较熟悉其中的逻辑操作,一些后台的api也有复用性,只需要添加一些新的需求逻辑即可。这次课上对于老师讲的如何对消息进行重发比较感兴趣,这一点应该也会在后面开发过程中实现,通过维护一个序列号来得知当前用户是否已经接受所有信息来决定重发,同样利用这个思想,也可以做到当一个用户个人头像改变资料变更时,可以通知到通信的另一方。
下午主要是讲视频音频等多媒体的操作,由于要参加ACM比赛错过了下午的一大半课程,赶回来的时候只听到了视频剪辑压缩水印等demo的演示。通过课后视频以及自己查看demo的学习,对于其中的知识点也有了一定的了解,特别是关于手机视频的播放,这个功能在安卓课上也有学习过类似的。而手机拍照功能是我最近在弄安卓也有了解到,如何实现对焦,获取焦距等,IOS提供了很方便的统一的接口来获取。老师给的几个demo都封装好了这些类,可以自定义的选择实现什么功能来修改,这里我也学习了其中的几个demo,对于它的调用实现过程有了一定的了解。
本文来自互联网用户投稿,文章观点仅代表作者本人,不代表本站立场,不承担相关法律责任。如若转载,请注明出处。 如若内容造成侵权/违法违规/事实不符,请点击【内容举报】进行投诉反馈!