k8s认证cka专题 -k8s认证详解 k8s证书详解 2023推荐
参考链接:https://blog.csdn.net/shuoshuo132/article/details/115362867
一 开始介绍
总共17道题目,考试时间2小时,每道题目的分值不同,根据题目的难易程度。满分100分,通过分数为66分。(2021年3月)
题目均为实操题 github官方链接:https://github.com/cncf/curriculum
报名方式,登录linux foundation(有国内版:https://training.linuxfoundation.cn/ )进行报名,报名费用为300美金,当然有时候会有活动减价。购买成功后会有教程说明如何激活考试和预约考试,预约考试时,网站会提供环境检查,包括扫描你的浏览器配置,摄像头等等。购买一年内均可以预约,有一次的补考机会。
考试时浏览器会有一个tag是考试界面,这时我们只被允许再打开另外一个tag,且只能访问以下其中一个:
https://kubernetes.io/docs/home/
https://github.com/kubernetes
https://kubernetes.io/blog/
考试开始前监考官会检查你的考试环境,整体还是比较严格的,建议考试地点要找一个安静,且桌面干净的房间。如果你报名的是CKA-CN,也即系中文监考官的考试,那只需要带上身份证即可。
集群架构,安装和配置:25%
工作负载和调度:15%
服务和网络:20%
存储:10%
故障排除:30%
注意事项

20211129 练习摘要
#新命令 查看所有api 资源 解决 statefuleset 等资源不会写问题
kubectl api-resources | less
难题回顾
# ask
Create a service account name dev-sa in default namespace, dev-sa can create below components in dev namespace# ans
# 1 创建 sa 在默认命名空间# 2 创建 role 在 dev 命名空间# 3 创建 rolebinding 绑定 role 和 sa# 4 验证命令
kubectl auth can-i create deployment --as=system:serviceaccount:default:dev-sa -n dev
20211130真题训练:https://blog.csdn.net/u011127242/article/details/121388338
第一题:ImagePolicyWebhook 原理:https://www.kubernetes.org.cn/8848.html
题干:
context
A container image scanner is set up on the cluster,but It's not yet fully
integrated into the cluster's configuration When complete,the container image
scanner shall scall scan for and reject the use of vulnerable images.
task
You have to complete the entire task on the cluster master node,where all services and files have been prepared and placed
Glven an incomplete configuration in directory /etc/kubernetes/aa and a functional container image scanner with HTTPS sendpitont http://192.168.26.60:1323/image_policy1.enable the necessary plugins to create an image policy
2.validate the control configuration and chage it to an implicit deny
3.Edit the configuration to point the provied HTTPS endpoint correctiyFinally,test if the configurateion is working by trying to deploy the valnerable resource /csk/1/web1.yaml
20211202 练习记录
网址:https://blog.csdn.net/u011127242/article/details/121388338
4 AppArmor 概述:
Context
AppArmor is enabled on the cluster worker node. An AppArmor profile is prepared, but not enforced yet.
You may use your browser to open one additional tab to access theAppArmor documentation.
Task
On the cluster worker node, enforce the prepared AppArmor profile located at /etc/apparmor.d/nginx_apparmor . Edit the prepared manifest file located at /cks/4/pod1.yaml to apply the AppArmor profile.
Finally, apply the manifest file and create the pod specified in it
5 PodSecurityPolicy
题目概述
context
A PodsecurityPolicy shall prevent the creati on of privileged Pods in a specific namespace.
Task
Create a new PodSecurityPolicy named prevent-psp-policy , which prevents the creation of privileged Pods.
Create a new ClusterRole named restrict-access-role , which uses the newly created PodSecurityPolicy prevent psp-policy .
Create a new serviceAccount named psp-denial-sa in the existing namespace development .
Finally, create a new clusterRoleBinding named dany-access-bind , which binds the newlycreated ClusterRole restrict-access-role to the newly created serviceAccount
理解podsecurityPolicy:
https://blog.csdn.net/hxpjava1/article/details/103904747?ops_request_misc=%257B%2522request%255Fid%2522%253A%2522163840555916780271922165%2522%252C%2522scm%2522%253A%252220140713.130102334…%2522%257D&request_id=163840555916780271922165&biz_id=0&utm_medium=distribute.pc_search_result.none-task-blog-2allsobaiduend~default-3-103904747.first_rank_v2_pc_rank_v29&utm_term=PodSecurityPolicy&spm=1018.2226.3001.4187
推荐阅读
https://www.yii666.com/blog/478731.html?action=onAll
延申阅读
https://blog.csdn.net/wteruiycbqqvwt/article/details/102468291
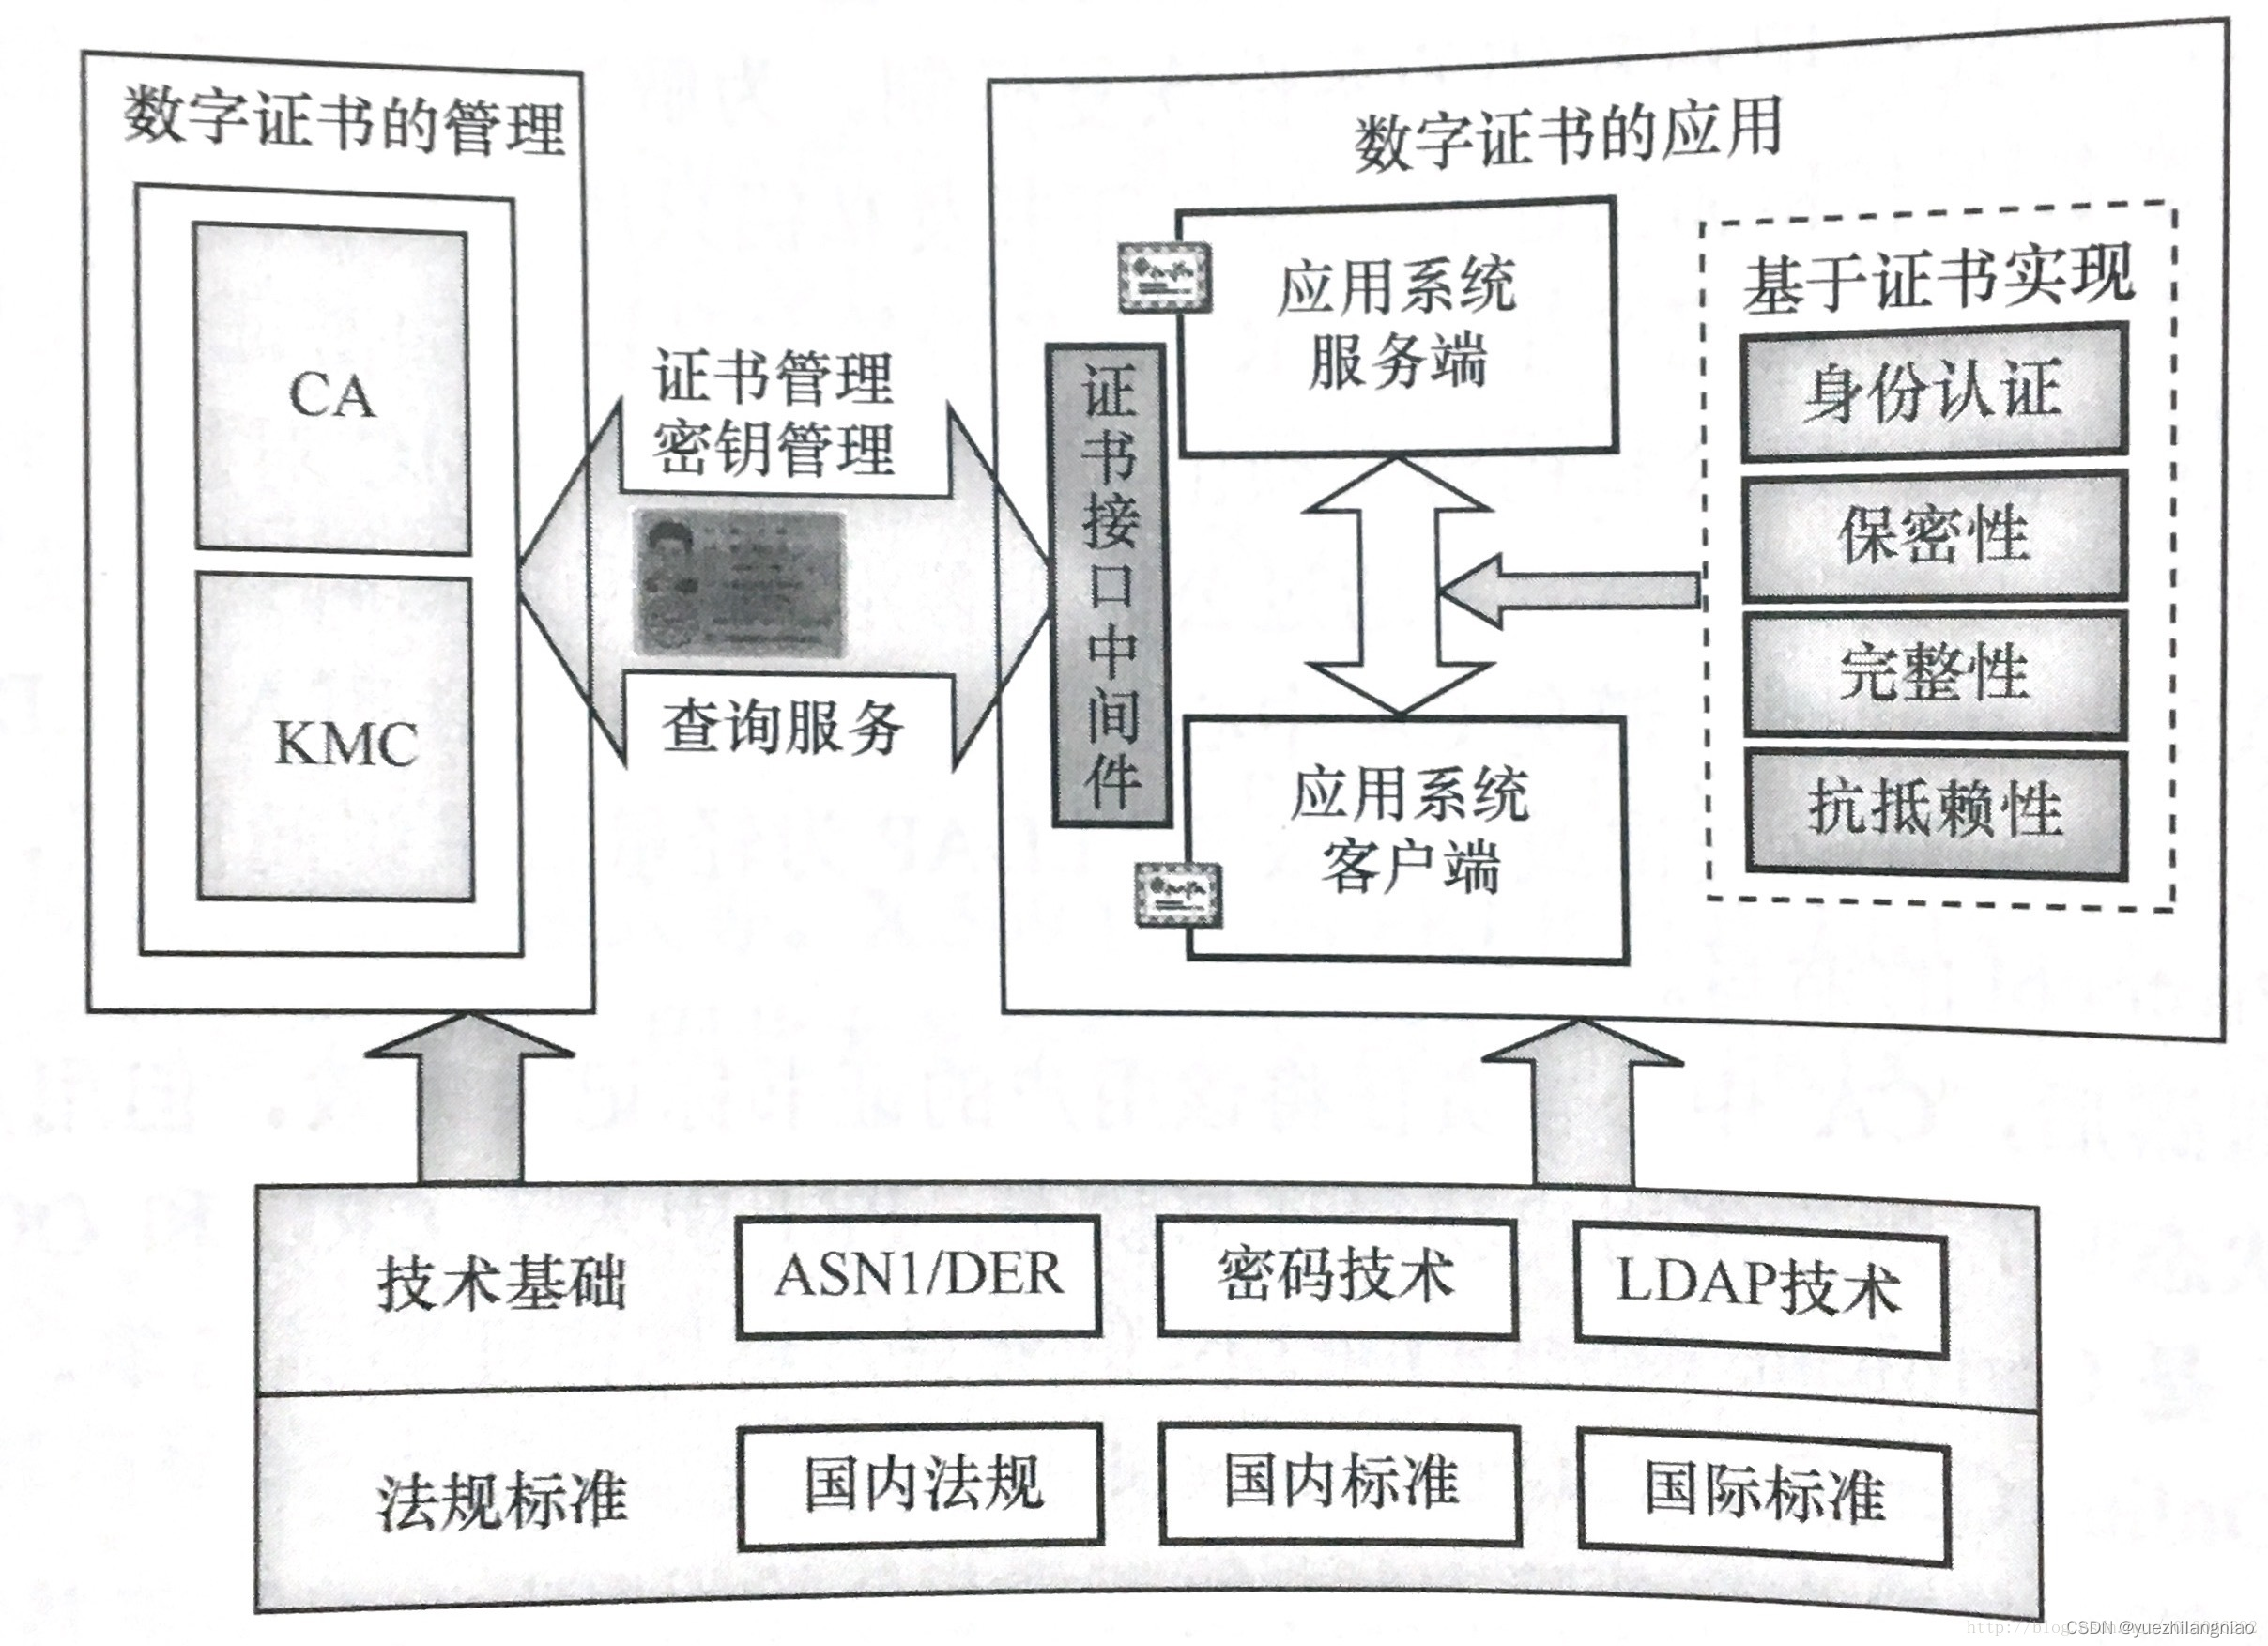
所有与数字证书相关的各种概念和技术,统称为PKI( Public Key Infrastructure 公钥基础设施)。
PKI通过引入CA,数字证书,LDAP,CRL,OCSP等技术并制定相应标准,有效地解决了公钥与用户映射关系,集中服务性能瓶颈,脱机状态查询等问题。同时为促进并提高证书应用的规范性,还制定了很多与证书应用相关的各种标准。
延申阅读
https://blog.csdn.net/bluishglc/article/details/123617558
1 生成证书的步骤与原理
要理解创建证书的每一步操作必须要先理解创建证书的流程和每一步的含义。生成证书的标准流程是这样的:
生成自己的私钥文件(.key)
基于私钥生成证书请求文件(.csr)
将证书请求文件(.csr)提交给证书颁发机构(CA),CA会对提交的证书请求中的所有信息生成一个摘要,然后使用CA根证书对应的私钥进行加密,这就是所谓的“签名”操作,完成签名后就会得到真正的签发证书(.cer或.crt)
用户拿到签发后的证书,可能需要导入到自己的密钥库中,如Java的keystore,或根据需要再进行各种格式转换(.pem .p12 .jks等等)
注意:
第1/2两步可以通过一个命令合并完成。
第3步向公认可信的CA机构申请证书是线上线下都要进行操作的一系列流程,申请的公司或组织还要提交各种资质和证明,与企业申请某种执照或办理某种手续性质类似,但企业最终拿到的就是一个CA签名的证书文件。
所以,对于企业内部应用来说,完全可以自己创建自己的根证书,自己给自己签发证书,然后通过域控手段强制用户浏览器接受来自相应CA签发的证书。
再次解释一下“签名”的含义,这个概念很关键。在CA签发的证书中,包含申请者的公钥在内,几乎所有的数据都是明文的,也都是申请者自己提供的(当然CA需要审核),签发的证书唯一多出来的信息就是基于申请者提供的所有信息生成了一份摘要,然后用CA自己的私钥对摘要进行了加密,这段加密后的密文被称之为“签名”,这部分数据是返还的签发证书(.cer或.crt)中多出来的关键数据。下图是CA签发证书的原理:

————————————————
版权声明:本文为CSDN博主「 Laurence」的原创文章,遵循CC 4.0 BY-SA版权协议,转载请附上原文出处链接及本声明。
原文链接:https://blog.csdn.net/bluishglc/article/details/123617558
软件授权 sls原理
https://blog.csdn.net/sinat_56310865/article/details/129367338
license授权机制的原理:
(1)生成密钥对,包含私钥和公钥。
(2)授权者保留私钥,使用私钥对授权信息诸如使用截止日期,mac 地址等内容生成 license 签名证书。
(3)公钥给使用者,放在代码中使用,用于验证 license 签名证书是否符合使用条件。


公钥密码的三个主要用途:
加密/解密
数字签名
密钥交换
需要实现授权。简单的授权方式有:
license文件
USB加密狗
网络授权
这些三方软件本身售价不高,采用license文件是成本最低的方式。激活码只有短短几十个字符,我们也可以认为那是license文件的方式。把这些字符放到指定的文件内不就是license文件!license授权的原理也很简单,给入一些数据,只有厂商知道哪些数据是符合的,哪些是不符合的。
————————————————
版权声明:本文为CSDN博主「带ci的玫瑰123」的原创文章,遵循CC 4.0 BY-SA版权协议,转载请附上原文出处链接及本声明。
原文链接:https://blog.csdn.net/sinat_56310865/article/details/129367338
本文来自互联网用户投稿,文章观点仅代表作者本人,不代表本站立场,不承担相关法律责任。如若转载,请注明出处。 如若内容造成侵权/违法违规/事实不符,请点击【内容举报】进行投诉反馈!