CGB2102-京淘项目day04
1.SpringMVC
1.1 SpringMVC框架介绍
Spring MVC属于SpringFrameWork的后续产品,已经融合在Spring Web Flow里面。Spring 框架提供了构建 Web 应用程序的全功能 MVC 模块。使用 Spring 可插入的 MVC 架构,从而在使用Spring进行WEB开发时,可以选择使用Spring的Spring MVC框架或集成其他MVC开发框架,如Struts1(现在一般不用),Struts 2(一般老项目使用)等等。
小结: Spring内部整合SpringMVC(web的包)
1.2 SpringMVC入门案例
1.2.1 创建项目

1.2.2 添加依赖项
1).添加热部署/lombok包

1.2.3 检查pom.xml文件
<?xml version="1.0" encoding="UTF-8"?>
<project xmlns="http://maven.apache.org/POM/4.0.0" xmlns:xsi="http://www.w3.org/2001/XMLSchema-instance"xsi:schemaLocation="http://maven.apache.org/POM/4.0.0 https://maven.apache.org/xsd/maven-4.0.0.xsd"><modelVersion>4.0.0</modelVersion><groupId>com.jt</groupId><artifactId>springboot_demo_3</artifactId><version>0.0.1-SNAPSHOT</version><name>springboot_demo_3</name><description>Demo project for Spring Boot</description><parent><groupId>org.springframework.boot</groupId><artifactId>spring-boot-starter-parent</artifactId><version>2.4.5</version><relativePath/> <!-- lookup parent from repository --></parent><properties><java.version>1.8</java.version></properties><dependencies><!--thymeleaf导入模版工具类--><dependency><groupId>org.springframework.boot</groupId><artifactId>spring-boot-starter-thymeleaf</artifactId></dependency><!--SpringMVCjar包文件--><dependency><groupId>org.springframework.boot</groupId><artifactId>spring-boot-starter-web</artifactId></dependency><!--热部署工具--><dependency><groupId>org.springframework.boot</groupId><artifactId>spring-boot-devtools</artifactId><scope>runtime</scope><optional>true</optional></dependency><!--lombok插件--><dependency><groupId>org.projectlombok</groupId><artifactId>lombok</artifactId><optional>true</optional></dependency><!--测试包--><dependency><groupId>org.springframework.boot</groupId><artifactId>spring-boot-starter-test</artifactId><scope>test</scope></dependency></dependencies><!--负责项目打包部署--><build><plugins><plugin><groupId>org.springframework.boot</groupId><artifactId>spring-boot-maven-plugin</artifactId><configuration><excludes><exclude><groupId>org.projectlombok</groupId><artifactId>lombok</artifactId></exclude></excludes></configuration></plugin></plugins></build></project>
1.2.4 编辑YML配置文件
#配置服务端口
server:port: 8090#配置模版工具类
spring:thymeleaf:#设置页面前缀prefix: classpath:/templates/#设置页面后缀suffix: .html#是否使用缓存cache: false
1.2.5 编辑Html页面
<!DOCTYPE html>
<html lang="en">
<head><meta charset="UTF-8"><title>SpringMVC入门案例</title>
</head>
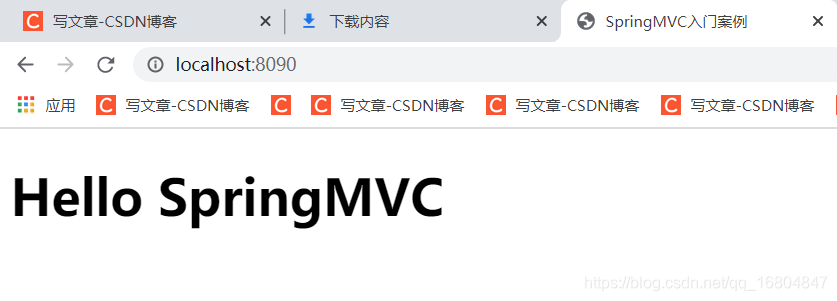
<body><h1>Hello SpringMVC</h1>
</body>
</html>
1.2.6 默认页面跳转机制
说明: SpringMVC项目启动时默认设置一个欢迎页面 并且名称必须为index.

页面效果 如图所示
1.3 @RequestMapping注解测试
说明: 使用@RequestMapping注解拦截用户请求 实现业务调用
1.3.1 编辑HelloController
@Controller //1.将该类交给Spring容器管理 2.同时开启Spring mvc机制
public class HelloController {/*** 需求: http://localhost:8090/hello 访问hello.html* 实现步骤:*      1.拦截用户请求 @RequestMapping("/hello")*      2.String 类型的返回值 表示返回页面名称*      3.根据YML配置文件中的内容 动态的拼接前缀和后缀 形成页面唯一路径*/@RequestMapping("/hello")public String hello(){//动态的拼接前缀+后缀//classpath:/templates/hello.htmlreturn "hello";}
}
1.3.2 页面请求效果
说明: 根据http://localhost:8090/hello测试网站访问是否成功

1.4 实现数据传递
1.4.1 导入头标前
<!DOCTYPE html><!--导入模板标签!!!!!--><html lang="en" xmlns:th="http://www.thymeleaf.org">
1.4.2 编辑UserController
package com.jt.controller;import org.springframework.stereotype.Controller;
import org.springframework.web.bind.annotation.RequestMapping;
import org.springframework.web.servlet.ModelAndView;@Controller
public class UserController {/***  mvc底层数据传输原则*  url: http://localhost:8090/user*  ModelAndView:*      1.model 封装数据的*      2.View  封装视图页面的*/@RequestMapping("/user")public ModelAndView toUser(){ModelAndView modelAndView = new ModelAndView();//封装数据modelAndView.addObject("id", 1001);modelAndView.addObject("name", "安琪拉");//封装页面数据modelAndView.setViewName("user");return modelAndView;}}
1.4.3 页面取值
<!DOCTYPE html>
<!--导入模板标签!!!!!-->
<html lang="en" xmlns:th="http://www.thymeleaf.org">
<head><meta charset="UTF-8"><title>SpringMVC测试案例</title>
</head>
<body><h1>用户测试代码</h1><!--从服务器中获取数据 表达式  ${从服务器中的key}--><h3 th:text="${id}"></h3><h3 th:text="${name}"></h3>
</body>
</html>
1.4 SpringMVC 原理说明(!!!)
1.4.0 Servlet作用
说明: servlet是浏览器与服务器(tomcat) 进行交互的一种机制.
核心对象: 1.Request 包含了用户的所有的请求相关信息(参数…协议…地址…)
2.Response 包含了服务器相关的信息(服务器地址,返回的数据)
1.4.1 重要组件
1).前端控制器 DispatcherServlet(内部核心机制) 接收用户所有请求
2).处理器映射器 HandlerMapping 查找用户的请求与业务处理的映射
3).处理器适配器HandlerAdapter 在众多处理器中挑选合适的处理器去执行业务.
4).视图解析器ViewResolver 实现页面的路径的拼接.
1.4.2 SpringMVC调用流程图

1.4.3 SpringMVC调用步骤
1.当用户发起请求时,被SpringMVC框架中的前端控制器拦截.
2.由于前端控制器,并不清楚哪个方法与请求对应,所以查询处理器映射器.
3.当tomcat服务器启动,则处理器映射器会加载所有的@RequestMapping注解,将其中的路径与方法进行绑定. Map,将查找到的方法信息回传给前端控制器 进行后续调用.
4.秉承着松耦合的思想,前端控制器将查询得到的方法, 请求处理器适配器(mvc针对不同的配置文件有专门的处理器(运行程序的机制))挑选合适的处理器去执行(程序内置的规则 无需人为干预)
5.当挑选合适的处理器之后,程序开始真正的执行业务方法. Controller-Service-Mapper(Dao),执行业务. 当业务执行成功之后.返回统一的ModelAndView对象.
其中包含2部分数据 1-Model(服务器数据) 2.View(页面逻辑名称)
6.当前端控制器获取ModelAndView对象之后,交给视图解析器 解析View对象的逻辑名称. 动态的拼接前缀 + 页面逻辑名称 + 后缀. 最终形成了用户展现页面的全路径.
7.将Model数据填充到页面中的过程,叫做视图渲染. 渲染之后,将数据交给前端控制器处理.
8.将得到的完整页面 响应给用户进行展现.
1.5 简单参数传递
1.5.1 服务器向页面传值
//简化数据传递@RequestMapping("/user")public String toUser(Model model){//将数据通过model进行传递model.addAttribute("id", 1003);model.addAttribute("name", "SpringMVC");return "user";}
1.5.2 编辑提交数据的页面
<tr><td>ID:</td><!--id:标签的唯一标识 不能重复name: 数据传递的必备要素. 不能省略--><td><input id="id" name="id" type="text"/></td></tr><tr><td>姓名:</td><td><input id="name" name="name" type="text"/></td></tr>
1.5.3 Request 对象接收参数
说明: 当用户点击提交按钮时,将数据进行传递. 所以必须编辑Controller的方法进行接收
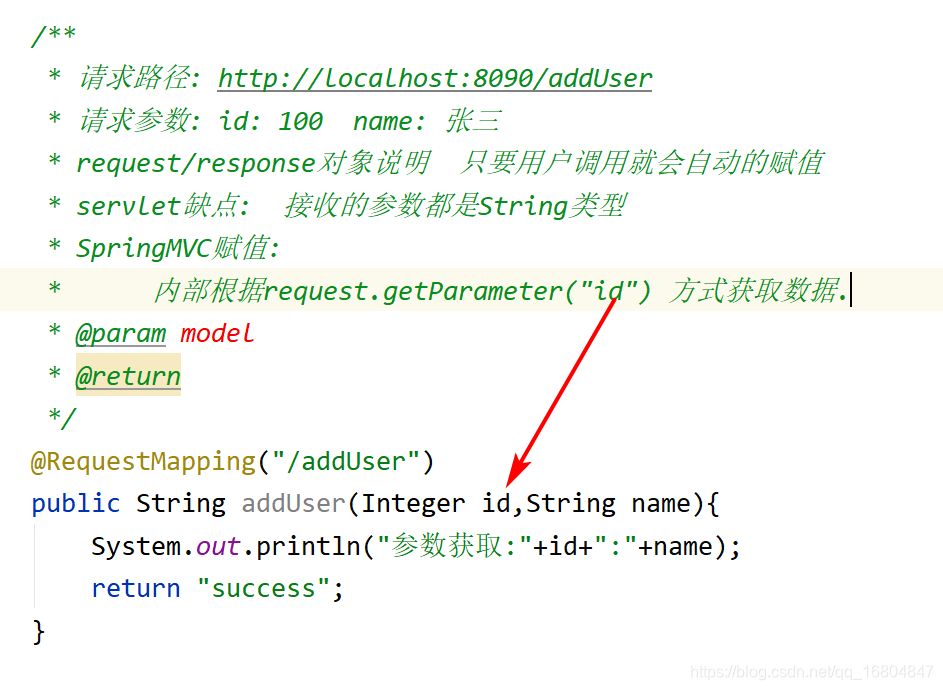
参数说明: 利用request对象进行参数的接收.
/*** 请求路径: http://localhost:8090/addUser* 请求参数: id: 100 name: 张三* request/response对象说明 只要用户调用就会自动的赋值* servlet缺点: 接收的参数都是String类型* @param model* @return*/@RequestMapping("/addUser")public String addUser(HttpServletRequest request){//利用工具API进行类型转化Integer id = Integer.parseInt(request.getParameter("id"));String name = request.getParameter("name");System.out.println("参数:"+id+":"+name);return "success";}
1.5.4 利用SpringMVC为属性赋值
2. SpringMVC 高级用法
2.1 @RequestParam
2.1.1 需求说明
有时用户的数据可能为null,如果后端服务器数据有特殊的要求,
要求:
1.数据为必填项
2.如果没有填写数据,可以为其设定默认值.
通过@RequestParam注解实现.
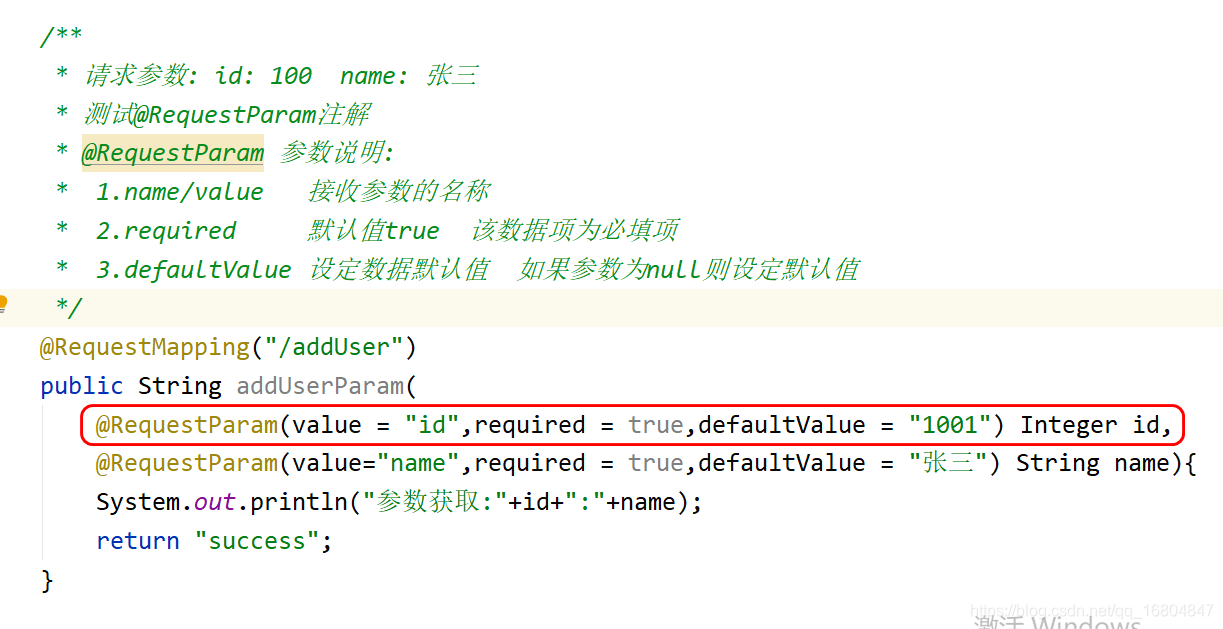
2.1.2 编辑UserController
说明: 图中演示了@RequestParam的注解用法
2.2 同名提交问题
2.2.1 业务描述
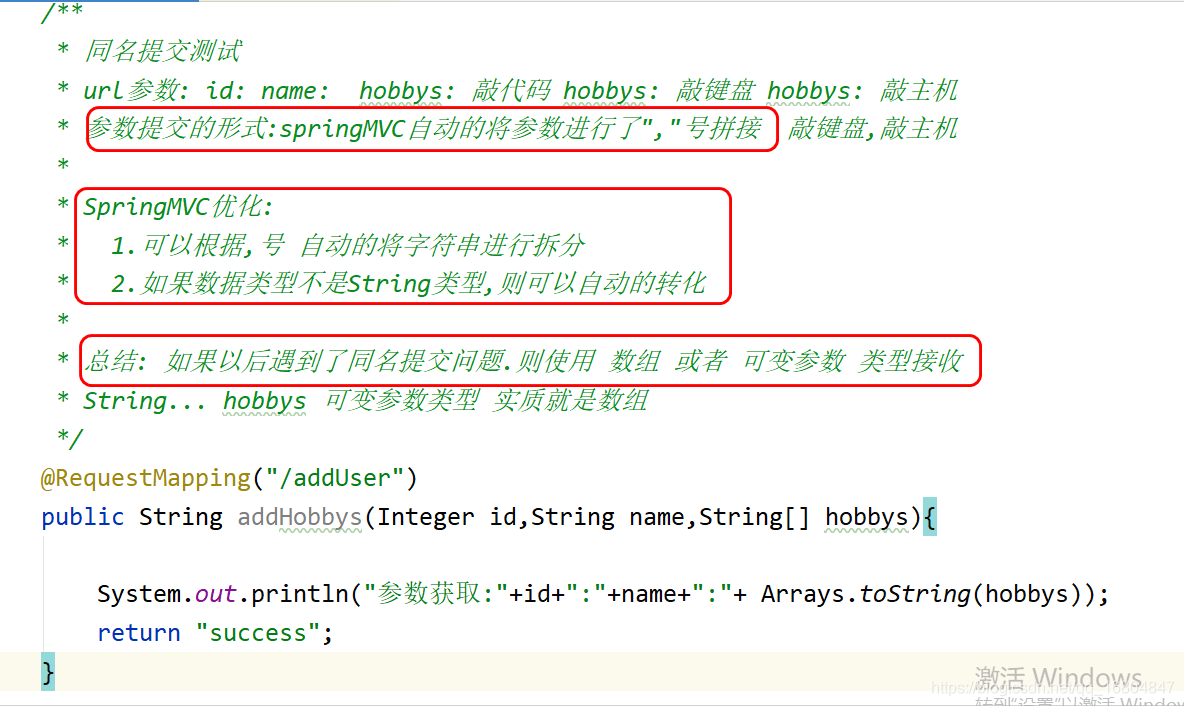
SpringMVC中对于页面要求应该保证name属性尽可能唯一.
<input id="id" name="id" type="text"/></td><input id="name" name="name" type="text"/><td><input name="hobbys" type="checkbox" value="敲代码"/>敲代码<input name="hobbys" type="checkbox" value="敲键盘"/>敲键盘<input name="hobbys" type="checkbox" value="敲主机"/>敲主机</td>
但是如果遇到复选框操作时 重名问题将不能避免,使用如下操作优化.
2.2.2 数据接收
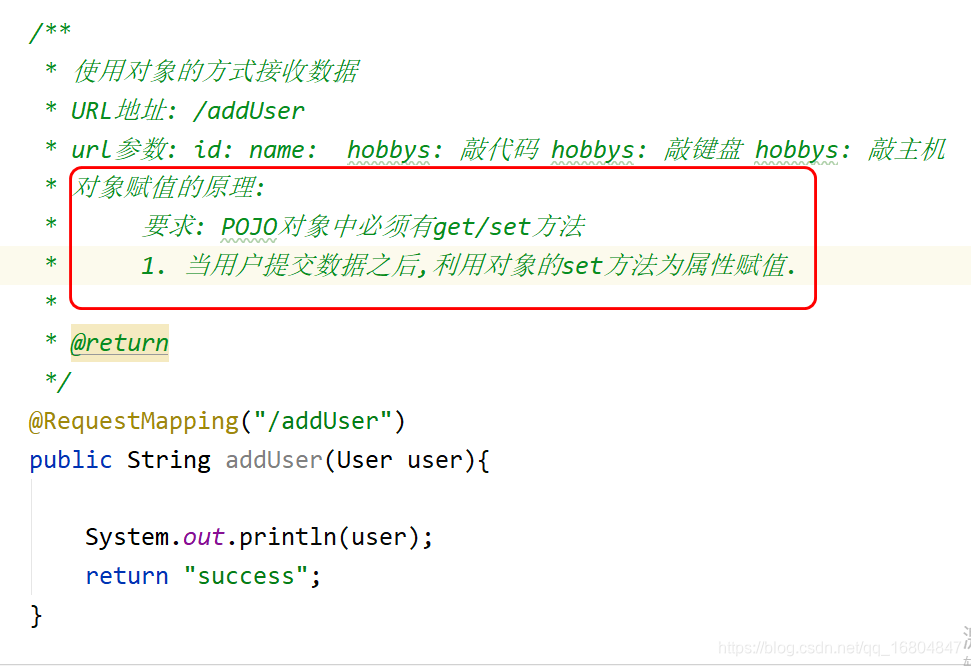
2.3 对象的方式接收参数
2.3.1 需求说明
说明: 如果有大量的页面的提交数据,如果采用单独的参数接收,必然导致Controller方法结构混乱,不便于理解.所以采用对象的方式封装.
2.3.2 封装User对象
//POJO实体对象中 "必须"  使用包装类型
//规则说明:  1.基本类型有默认值  包装类型默认值为null
//          2. 基本类型中没有多余的方法 对后续代码取值有问题
@Data
@Accessors(chain = true)    //几乎不用构造方法赋值
public class User {//页面name属性 id/name/hobbysprivate Integer id;private String name;private String[] hobbys;
}
2.3.3 编辑UserController
实现以对象的方式接收参数
2.4 为对象的引用赋值
2.4.1 业务需求
说明: 有时可能会遇到 name属性重复的问题. 由于业务需要不得不写一个重复的名称.那么这时采用对象的引入赋值.
2.4.2 封装Dog对象

2.4.3 对象引用
说明: 为了实现数据封装,必须将对象进行嵌套(引用)

2.4.4 编辑页面
说明: 通过对象.的方式 封装所属关系.

2.4.5 编辑Controller

3 作业
- 将SSM框架 试着整合到一起
- 复习Spring/SpringMVC/Mybatis用法 熟练掌握.
本文来自互联网用户投稿,文章观点仅代表作者本人,不代表本站立场,不承担相关法律责任。如若转载,请注明出处。 如若内容造成侵权/违法违规/事实不符,请点击【内容举报】进行投诉反馈!