yolov5笔记(3)——移动端部署自己的模型(随5.0更新)
一直以来学习目标检测的最终目标就是为了移动端的部署,比方说树莓派、jetson、安卓、ios等。之前因为实在对object_detection训练出来的东西效果不满意,所以当时没继续研究移动端部署。如今的yolov5s是给了我极大的动力,经过这几天的研究,发现移动端的部署有这么几条路:
(以yolov5s.pt模型为例)
- pt文件 --> onnx文件/torchscript文件 --> ncnn --> 安卓端部署(android studio编写)
- pt文件 --> onnx文件/torchscript文件 --> ML文件 --> ios端部署(需要mac系统运行xcode编写)
- pt文件 --> onnx文件 /torchscript文件/wts文件–> openvino/tensorrt 等部署平台 --> 树莓派/jetson部署(最好是在linux环境下,而且最好不要在虚拟机上,否则诸多不便)
目前yolov5的部署可以说是把onnx文件/torchscript文件作为中间模型去转换到相应的模型。
部署需要一定的c++操作水平及工具
这几天试了试openvino,一开始win10系统老是安装不上,到换ubuntu系统,玩到最后发现目前openvino还不支持yolov5的模型转换。
so sad
搞了好几天发现openvino暂时行不通。
win10下载的make疯狂报错导致我win下无法实现tensorRT转换部署,换了虚拟机没cuda搞不了,很糟糕。
记下2020·11·22,搞搞停停 我终于完整的完成tensorrt部署,过几天闲下来就更新。
记下2020·12·18,我们取得了第三届英伟达sky hackathon比赛的第一,至少证明了我这一年多的学习和认识还算正确。
此篇主要是用于部署含cuda的英伟达GPU移动设备,如果是想部署CPU设备以及ncnn的使用可以参考我的笔记四yolov5笔记(4)——CPU部署以及NCNN,但是笔记四不像笔记三那样真的一步一步操作下来,笔记四只讲思路和一些关键的代码操作,有一点阅读门槛。建议还是先把笔记三看一遍,再阅读笔记四。
1.pt转ONNX、ML、TorchScript
安装ONNX
在yolov5文件夹下运行
pip install -r requirements.txt onnx # install requirements.txt and ONNX
转换文件
在这里,我以转换官方的yolov5s.pt模型文件为例
在yolov5文件夹下运行
python models/export.py --weights weights/yolov5s.pt --img 640 --batch 1

会报错No module named "utils",原因是utils这个文件夹跟models文件夹同级,所以export.py文件找不到这个文件
解决办法:将export.py从model文件夹移到上一级yolov5文件夹中

换好后小改下命令行输入
python export.py --weights weights/yolov5s.pt --img 640 --batch 1
安装coremltools

pip install coremltools
安装pankaging

pip install packaging
安装完packaging后,似乎还会遇到一个小问题,是关于转换ML文件的问题,但忘记了具体是什么问题。大家可以自己摸索下,我记得不是很难,很简单就能解决的。
成功

应该会多出现三个文件
分别是ONNX文件、ML文件、torchscript文件

你也可以使用Netron来查看你的ONNX文件模型
使用Netron
其实netron现已支持大部分格式的模型文件,都是可以查看的。
PaddlePaddle、OpenVINO、TensorFlow 、Caffe…
安装netron
pip install netron
进入python,运行netron.start()
import netron
netron.start('[FILE]')


2.Jetson nano的部署
准备软硬件
一个Jetson nano 4GB(据说2GB和4GB会有些不同,所以我不保证2GB照我的方法能部署成功)
下载官方的jetpack_v4.4.1
64GB 的tf卡(他镜像就30G左右所以建议64GB起步)
- 下载网址https://developer.nvidia.com/embedded/jetpack
- 下载百度云 4GB的镜像,2GB的镜像就自己下一下吧
链接:https://pan.baidu.com/s/1l-1UndyjtNYeGQTpQxKDeQ
提取码:4e67
USB无线网卡(Jetson nano不自带网络,需额外购买无线网卡)
DC 5v 4A 电源(建议使用这个供电,用5v 2A 的电源接口,常常会导致功率不足而关机)
风扇(不加风扇的话散热器摸起来就贼烫,加了就冰冰凉,虽然运行上没啥明显区别,加了求个心安吧)
大屏显示器、机械键盘、鼠标
!!!有个注意事项就是使用5V 4A电源供电的话,需要在图片位置安置一个跳线帽。

配置Jetson nano
1.上传镜像
使用Jetpack 官方的NVIDIA SDK Manager安装镜像
2.常规配置
- 插上USB无线网卡连接wifi
- 安装vim(个人习惯,可安装可不安装) 代码:sudo apt-get install vim
- 换源 网上有很多可行的教程,这里就不多说了)
Jetson Nano更换软件源 - 启用cuda、安装pip3
Jetson Nano配置与使用(5)cuda测试及tensorflow gpu安装 - 安装pycuda
jetson nano安装pycuda!!!
到这一步Jetson nano的环境就基本配置好了
如果一切正常的话,你的Jetson nano里的配置应该是下面这个样子:
- NVIDIA Jetpack 4.4DP
- Ubuntu 18.04 L4T
- Python 3.6.9
- TensorRT 7.1
- CUDA 10.2
- NVIDIA Transfer Learning Toolkit 2.0
- Opencv 4.1.1
- Numpy 1.16.1
对于我的方法这些库是必须的,版本我不能说一定是我这样的吧,但你一旦出现一些奇怪的问题,请对照下我的环境。
3.下载yolov5、tensorrtx
git clone https://github.com/wang-xinyu/tensorrtx.git
git clone https://github.com/ultralytics/yolov5.git
生成trt引擎
yolov5官方教程:https://github.com/wang-xinyu/tensorrtx/tree/master/yolov5
接下去我主要是按照官方教程给大家作中文翻译示范
1.生成wts文件
这一步可以在x86系统上完成。
首先你得有yolov5的模型文件,我上一篇有讲,我这里使用yolov5s.pt训练出来的best.pt文件来进行下面的操作。
复制 tensorrtx/yolov5/gen_wts.py文件 到 yolov5 文件夹中
5.0的tensorrtx修改了这一python文件

只需要输入一次文件路径即可生成对应文件。
python3 gen_wts.py weights/yolov5s.pt
这样就会在weights文件夹中生成一个yolov5s.wts文件。
2.build
这一步是生成部署引擎,必须来到部署该引擎的硬件设备上进行。
就像我这里模型是想在Jetson nano上部署,所以这一步就必须在Jetson nano上进行build。在此之前的有关yolov5的操作都可在x86的系统上完成。
将yolov5s.wts文件放到tensorrtx/yolov5文件夹中,
来到tensorrtx/yolov5文件夹中,查看yolov5.cpp中的模型是s。
!!!在最新的4.0版本中,作者优化了这一API,不再需要这一步了!!!
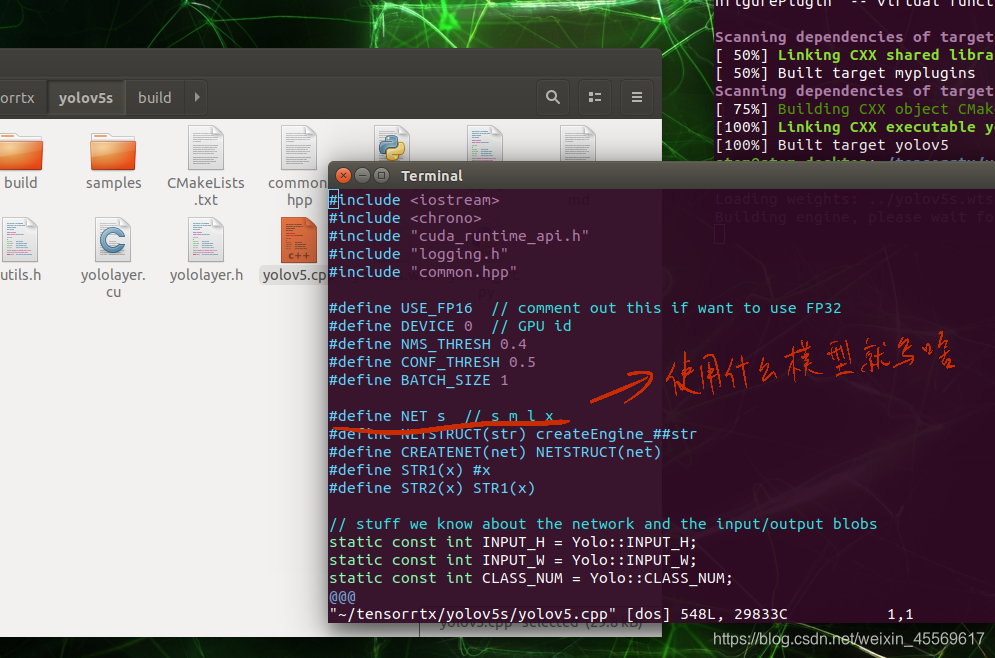
在yolov5.cpp文件中还可以修改fp16还是fp32 int8、device(选择哪一个GPU设备)、nms_thresh(nms的阈值)、conf_thresh(conf的置信度)、batch_size(批次大小)
这里我对于其他的参数全部默认
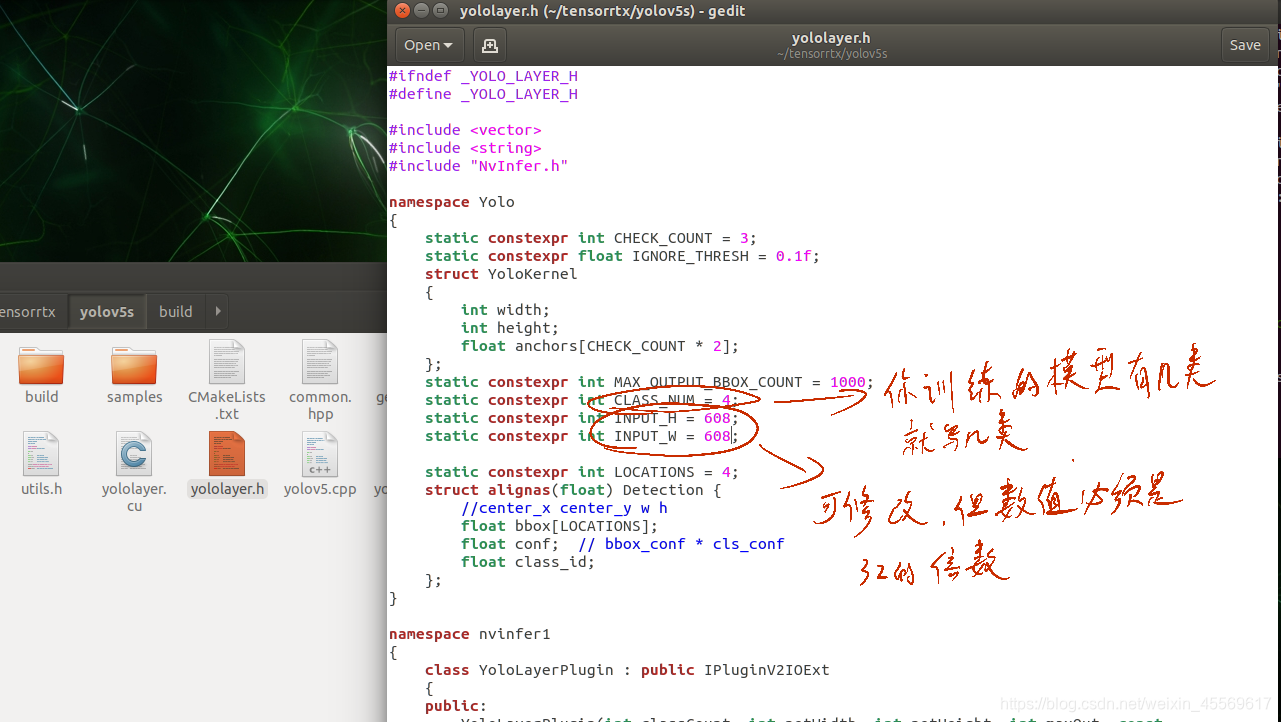
打开yololayer.h文件,修改他的num总数,根据你训练模型的类个数来,我这个best.pt训练的是四个种类的目标检测模型,所以我写四(并不是我上一篇文章中的检测红细胞模型的pt文件)
除此之外,我们还可以修改输入图片的尺寸,但必须是32的倍数。缩小输入尺寸可以一定程度上加快推理速度。
确保tensorrtx/yolov5文件下有你的wts文件,并且相应地修改了yolov5.cpp
文件和yolovlayer.h文件。
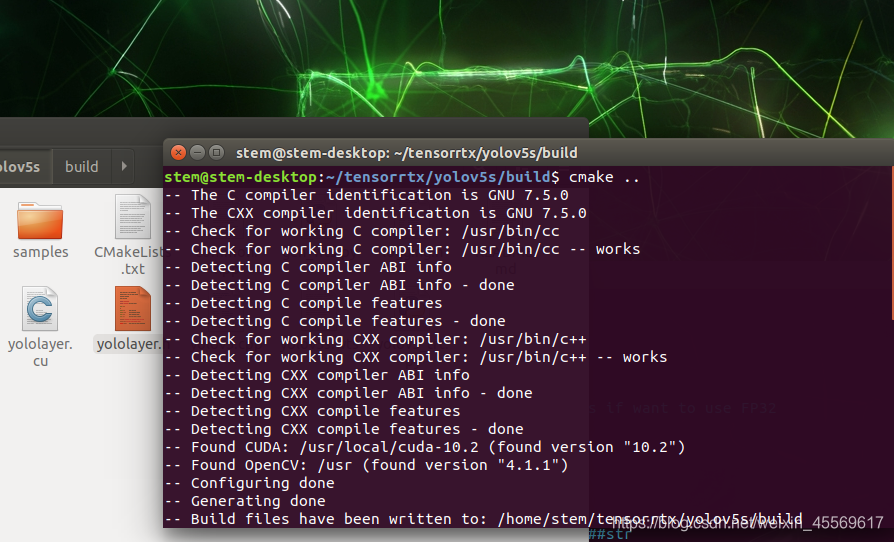
然后在tensorrtx/yolov5文件夹下依次执行下面的代码
mkdir build
cd build
cmake ..
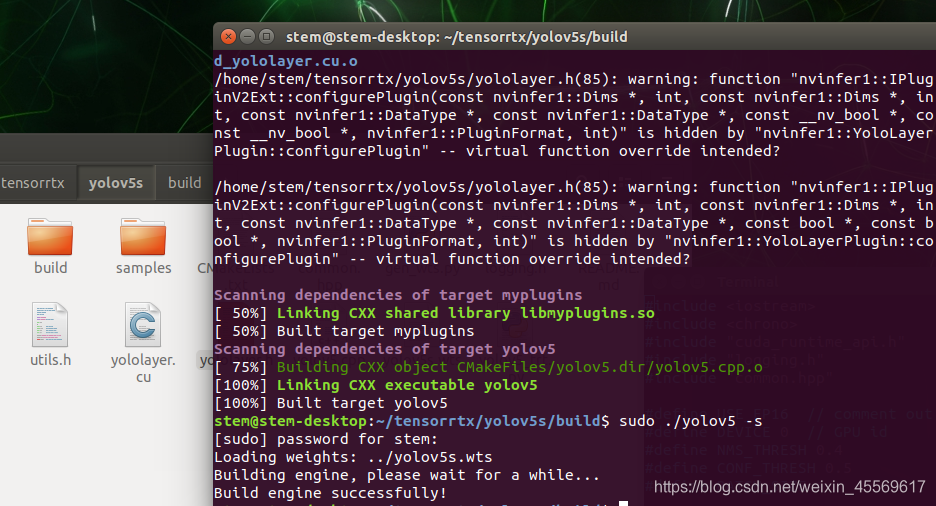
make -j6
sudo ./yolov5 -s ../yolov5s.wts yolov5s.engine s
#sudo ./yolov5 -s [.wts] [.engine] [s/m/l/x/s6/m6/l6/x6 or c/c6 gd gw]
#模型引擎生成的命令解释如上
如果你是通过修改每一层卷积的宽度和深度来达到自定义的模型的话,就可以直接使用下面的命令来达成生成引擎,这是我认为4.0的这个版本最大的升级点了!!!
sudo ./yolov5 -s yolov5_custom.wts yolov5.engine c 0.17 0.25
我一般缩小宽度和深度来达到剪裁模型,加快运行速度的作用。这一api优化让我的调试十分的方便。
v5.0的tensorrtx库更新适配了yolov5的p6模型,如果你用的是p6模型训练,可以使用下面的命令。
sudo ./yolov5 -s ../yolov5s.wts yolov5s.engine s6
sudo ./yolov5 -s yolov5_custom.wts yolov5.engine c6 0.17 0.25

到这一步,我们便通过tensorrt生成了基于C++的engine部署引擎文件
你可以放几张用来测试,将yolov5 /data文件夹中的images文件夹整个复制到tensorrtx/yolov5文件夹,在build文件夹里执行下面的代码。
sudo ./yolov5 -d yolov5s.engine ../samples
#sudo ./yolov5 -d [.engine] [image folder]
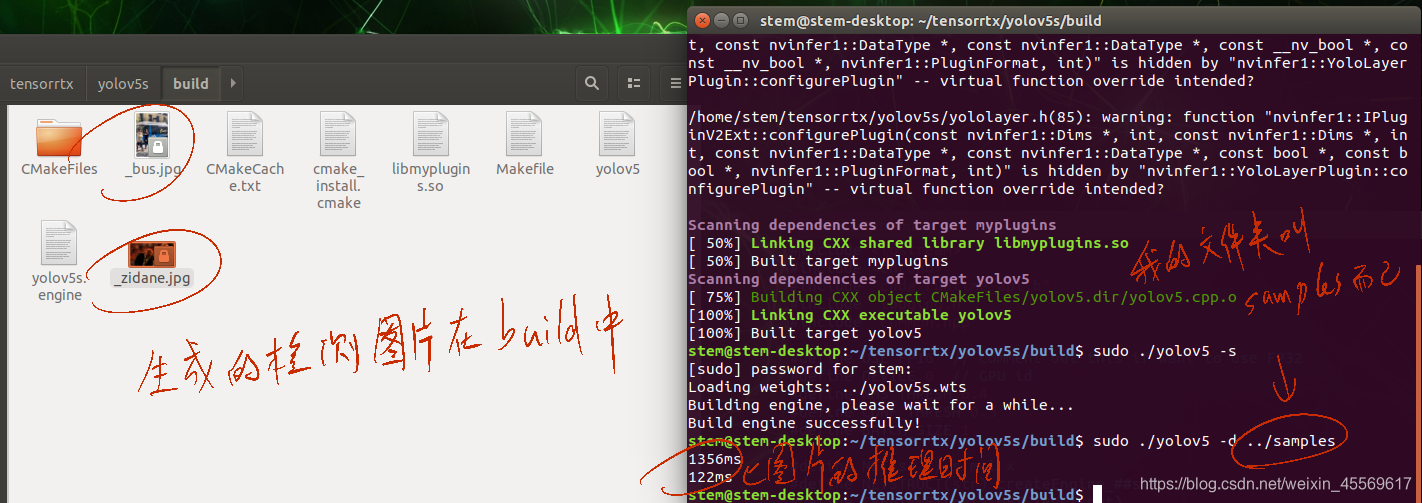
到一步我们已经算是完成了Jetson nano的部署,但你可能会发现在build中的图片几乎没有框。
这是因为s模型所产生的置信度一般在0.2-0.4之间,而我们之前在设置yolov5.cpp文件时把置信度conf_thresh设置在0.5了,也就是说低于0.5的检测框都被我们排除了,所以检测结果空空荡荡。
3.python调用
编辑yolov5_trt.py文件
这里不管在哪个系统上修改的都一样,因为此时此刻nano不在身边,所以我就直接用win来演示了。

注释掉import torch和import torchvision,因为在nano上安装这两个库是有些麻烦的特别是torchvision。
当然你也可以去试试安装这两个库,网上的一些教程我有试过是可以成功,就是麻烦。

INPUT_W和INPUT_H根据你自己之前设置的来,我build时是写608,所以这里也是608。
CONF_THRESH 与 IOU_THRESHOLD 可根据最后的显示效果返回来修改他,暂且不调整。

第223行,让y直接等于np.zeros_like(x),这里是创建一个和x形状相同的全0矩阵。因为不用torch库,所以用ndarray表示。

第258行,直接注释掉这句话,因为我们既不想用torch,numpy也不存在cuda方法。
如果你在nano上成功安装torch和torchvison这两个库并使用他们,最好要把这行的cuda方法给关掉,我尝试过很多次,在nano上使用cuda方法会使程序卡死,轻则过老久给你报错,重则需拔电重启。

第273行注释掉,因为这一行使用到了torchvision。他用torchvision库中的nms方法来完成非极大值抑制。
后面三行去掉cpu方法,因为ndarray没有这个方法。

往YoLov5TRT这个类中加入一个方法,这是用numpy的方式实现nms,注意空格对齐。
def nms(self,boxes, scores, iou_threshold=IOU_THRESHOLD):x1 = boxes[:, 0]y1 = boxes[:, 1]x2 = boxes[:, 2]y2 = boxes[:, 3]areas = (y2 - y1 + 1) * (x2 - x1 + 1)scores = scoreskeep = []index = scores.argsort()[::-1]while index.size > 0:i = index[0] # every time the first is the biggst, and add it directlykeep.append(i)x11 = np.maximum(x1[i], x1[index[1:]]) # calculate the points of overlapy11 = np.maximum(y1[i], y1[index[1:]])x22 = np.minimum(x2[i], x2[index[1:]])y22 = np.minimum(y2[i], y2[index[1:]])w = np.maximum(0, x22 - x11 + 1) # the weights of overlaph = np.maximum(0, y22 - y11 + 1) # the height of overlapoverlaps = w * hious = overlaps / (areas[i] + areas[index[1:]] - overlaps)idx = np.where(ious <= iou_threshold)[0]index = index[idx + 1] # because index start from 1return keep

现在我们把nms的结果赋值给indices变量,如下图所示改写post_process函数

来到main函数这里,修改成你build出来的引擎的相对路径

修改成你训练时相应的标签,记住一定要和你训练时的标签顺序一致,因为yolo识别出来的是0,1,2,3。他是把这个当作列表索引号来找到对应的标签名。

然后将要检测的图片一张一张地送进入就可以检测了。

到这一步,我们Ctrl+S保存代码,在命令行上运行这个python脚本,就可以得到检测结果。如果你觉得一些框的置信度太低导致识别地不对,可以去提高我上面说的CONF_THRESH。
4.视频检测
在之前python文件或c++文件上加入opencv的API即可。
接下来我将讲下python调用的流程,也可算是对官方的文件一个过程解释和重构。
导入必要的库
import time
import cv2
import pycuda.autoinit  # This is needed for initializing CUDA driver
import numpy as np
import ctypes
import tensorrt as trt
import pycuda.driver as cudaimport threading
import random
设置基本的参数和类别名称
INPUT_W = 608
INPUT_H = 608
CONF_THRESH = 0.2
IOU_THRESHOLD = 0.4categories = ['vehicle','bicyle','pedestrain','road_sign']
定义画框函数
def plot_one_box(x, img, color=None, label=None, line_thickness=None):"""description: Plots one bounding box on image img,this function comes from YoLov5 project.param:x: a box likes [x1,y1,x2,y2]img: a opencv image objectcolor: color to draw rectangle, such as (0,255,0)label: strline_thickness: intreturn:no return"""tl = (line_thickness or round(0.002 * (img.shape[0] + img.shape[1]) / 2) + 1) # line/font thicknesscolor = color or [random.randint(0, 255) for _ in range(3)]c1, c2 = (int(x[0]), int(x[1])), (int(x[2]), int(x[3]))cv2.rectangle(img, c1, c2, color, thickness=tl, lineType=cv2.LINE_AA)if label:tf = max(tl - 1, 1) # font thicknesst_size = cv2.getTextSize(label, 0, fontScale=tl / 3, thickness=tf)[0]c2 = c1[0] + t_size[0], c1[1] - t_size[1] - 3cv2.rectangle(img, c1, c2, color, -1, cv2.LINE_AA) # filledcv2.putText(img,label,(c1[0], c1[1] - 2),0,tl / 3,[225, 255, 255],thickness=tf,lineType=cv2.LINE_AA,)def draw_boxes(image_raw, result_boxes, result_scores, result_classid):for i in range(len(result_boxes)):box = result_boxes[i]plot_one_box(box,image_raw,label="{}:{:.2f}".format(categories[int(result_classid[i])], result_scores[i]),)return image_raw
定义yolov5转trt的类
class YoLov5TRT(object):"""description: A YOLOv5 class that warps TensorRT ops, preprocess and postprocess ops."""def __init__(self, engine_file_path):# Create a Context on this device,self.cfx = cuda.Device(0).make_context()stream = cuda.Stream()TRT_LOGGER = trt.Logger(trt.Logger.INFO)runtime = trt.Runtime(TRT_LOGGER)# Deserialize the engine from filewith open(engine_file_path, "rb") as f:engine = runtime.deserialize_cuda_engine(f.read())context = engine.create_execution_context()host_inputs = []cuda_inputs = []host_outputs = []cuda_outputs = []bindings = []for binding in engine:size = trt.volume(engine.get_binding_shape(binding)) * engine.max_batch_sizedtype = trt.nptype(engine.get_binding_dtype(binding))# Allocate host and device buffershost_mem = cuda.pagelocked_empty(size, dtype)cuda_mem = cuda.mem_alloc(host_mem.nbytes)# Append the device buffer to device bindings.bindings.append(int(cuda_mem))# Append to the appropriate list.if engine.binding_is_input(binding):host_inputs.append(host_mem)cuda_inputs.append(cuda_mem)else:host_outputs.append(host_mem)cuda_outputs.append(cuda_mem)# Storeself.stream = streamself.context = contextself.engine = engineself.host_inputs = host_inputsself.cuda_inputs = cuda_inputsself.host_outputs = host_outputsself.cuda_outputs = cuda_outputsself.bindings = bindings# 释放引擎,释放GPU显存,释放CUDA流def __del__(self):print("delete object to release memory")def infer(self, image_raw):threading.Thread.__init__(self)# Make self the active context, pushing it on top of the context stack.self.cfx.push()# Restorestream = self.streamcontext = self.contextengine = self.enginehost_inputs = self.host_inputscuda_inputs = self.cuda_inputshost_outputs = self.host_outputscuda_outputs = self.cuda_outputsbindings = self.bindings# Do image preprocessinput_image, image_raw, origin_h, origin_w = self.preprocess_image(image_raw)# Copy input image to host buffernp.copyto(host_inputs[0], input_image.ravel())# Transfer input data to the GPU.cuda.memcpy_htod_async(cuda_inputs[0], host_inputs[0], stream)# Run inference.context.execute_async(bindings=bindings, stream_handle=stream.handle)# Transfer predictions back from the GPU.cuda.memcpy_dtoh_async(host_outputs[0], cuda_outputs[0], stream)# Synchronize the streamstream.synchronize()# Remove any context from the top of the context stack, deactivating it.self.cfx.pop()# Here we use the first row of output in that batch_size = 1output = host_outputs[0]# Do postprocessresult_boxes, result_scores, result_classid = self.post_process(output, origin_h, origin_w)return image_raw, result_boxes, result_scores, result_classiddef destroy(self):# Remove any context from the top of the context stack, deactivating it.self.cfx.pop()def preprocess_image(self, image_raw):"""description: Read an image from image path, convert it to RGB,resize and pad it to target size, normalize to [0,1],transform to NCHW format.param:input_image_path: str, image pathreturn:image: the processed imageimage_raw: the original imageh: original heightw: original width"""h, w, c = image_raw.shapeimage = cv2.cvtColor(image_raw, cv2.COLOR_BGR2RGB)# Calculate widht and height and paddingsr_w = INPUT_W / wr_h = INPUT_H / hif r_h > r_w:tw = INPUT_Wth = int(r_w * h)tx1 = tx2 = 0ty1 = int((INPUT_H - th) / 2)ty2 = INPUT_H - th - ty1else:tw = int(r_h * w)th = INPUT_Htx1 = int((INPUT_W - tw) / 2)tx2 = INPUT_W - tw - tx1ty1 = ty2 = 0# Resize the image with long side while maintaining ratioimage = cv2.resize(image, (tw, th))# Pad the short side with (128,128,128)image = cv2.copyMakeBorder(image, ty1, ty2, tx1, tx2, cv2.BORDER_CONSTANT, (128, 128, 128))image = image.astype(np.float32)# Normalize to [0,1]image /= 255.0# HWC to CHW format:image = np.transpose(image, [2, 0, 1])# CHW to NCHW formatimage = np.expand_dims(image, axis=0)# Convert the image to row-major order, also known as "C order":image = np.ascontiguousarray(image)return image, image_raw, h, wdef xywh2xyxy(self, origin_h, origin_w, x):"""description: Convert nx4 boxes from [x, y, w, h] to [x1, y1, x2, y2] where xy1=top-left, xy2=bottom-rightparam:origin_h: height of original imageorigin_w: width of original imagex: A boxes tensor, each row is a box [center_x, center_y, w, h]return:y: A boxes tensor, each row is a box [x1, y1, x2, y2]"""# y = torch.zeros_like(x) if isinstance(x, torch.Tensor) else np.zeros_like(x)y = np.zeros_like(x)r_w = INPUT_W / origin_wr_h = INPUT_H / origin_hif r_h > r_w:y[:, 0] = x[:, 0] - x[:, 2] / 2y[:, 2] = x[:, 0] + x[:, 2] / 2y[:, 1] = x[:, 1] - x[:, 3] / 2 - (INPUT_H - r_w * origin_h) / 2y[:, 3] = x[:, 1] + x[:, 3] / 2 - (INPUT_H - r_w * origin_h) / 2y /= r_welse:y[:, 0] = x[:, 0] - x[:, 2] / 2 - (INPUT_W - r_h * origin_w) / 2y[:, 2] = x[:, 0] + x[:, 2] / 2 - (INPUT_W - r_h * origin_w) / 2y[:, 1] = x[:, 1] - x[:, 3] / 2y[:, 3] = x[:, 1] + x[:, 3] / 2y /= r_hreturn ydef nms(self, boxes, scores, iou_threshold=IOU_THRESHOLD):x1 = boxes[:, 0]y1 = boxes[:, 1]x2 = boxes[:, 2]y2 = boxes[:, 3]areas = (y2 - y1 + 1) * (x2 - x1 + 1)scores = scoreskeep = []index = scores.argsort()[::-1]while index.size > 0:i = index[0] # every time the first is the biggst, and add it directlykeep.append(i)x11 = np.maximum(x1[i], x1[index[1:]]) # calculate the points of overlapy11 = np.maximum(y1[i], y1[index[1:]])x22 = np.minimum(x2[i], x2[index[1:]])y22 = np.minimum(y2[i], y2[index[1:]])w = np.maximum(0, x22 - x11 + 1) # the weights of overlaph = np.maximum(0, y22 - y11 + 1) # the height of overlapoverlaps = w * hious = overlaps / (areas[i] + areas[index[1:]] - overlaps)idx = np.where(ious <= iou_threshold)[0]index = index[idx + 1] # because index start from 1return keepdef post_process(self, output, origin_h, origin_w):"""description: postprocess the predictionparam:output: A tensor likes [num_boxes,cx,cy,w,h,conf,cls_id, cx,cy,w,h,conf,cls_id, ...]origin_h: height of original imageorigin_w: width of original imagereturn:result_boxes: finally boxes, a boxes tensor, each row is a box [x1, y1, x2, y2]result_scores: finally scores, a tensor, each element is the score correspoing to boxresult_classid: finally classid, a tensor, each element is the classid correspoing to box"""# Get the num of boxes detectednum = int(output[0])# Reshape to a two dimentional ndarraypred = np.reshape(output[1:], (-1, 6))[:num, :]# to a torch Tensor# pred = torch.Tensor(pred).cuda()# Get the boxesboxes = pred[:, :4]# Get the scoresscores = pred[:, 4]# Get the classidclassid = pred[:, 5]# Choose those boxes that score > CONF_THRESHsi = scores > CONF_THRESHboxes = boxes[si, :]scores = scores[si]classid = classid[si]# Trandform bbox from [center_x, center_y, w, h] to [x1, y1, x2, y2]boxes = self.xywh2xyxy(origin_h, origin_w, boxes)# Do nms# indices = torchvision.ops.nms(boxes, scores, iou_threshold=IOU_THRESHOLD).cpu()# result_boxes = boxes[indices, :].cpu()# result_scores = scores[indices].cpu()# result_classid = classid[indices].cpu()# return result_boxes, result_scores, result_classidindices = self.nms(boxes, scores, IOU_THRESHOLD)result_boxes = boxes[indices, :]result_scores = scores[indices]result_classid = classid[indices]return result_boxes, result_scores, result_classid
定义检测图片的函数,它接收一张图片和编译好的trt文件,推理出框的坐标(中心点x,y,长,宽)、置信度、类别名称,并使用前面的画框函数在此图片上画出这个框。
def detect_one(img, yolov5_wrapper):full_scrn = Falsetic = time.clock()##开始检测,并将结果写到result.jpg中img, result_boxes, result_scores, result_classid = yolov5_wrapper.infer(img)toc = time.clock()curr_fps = (toc - tic)print("boxes: "+str(result_boxes))print("clss: "+str(result_classid))print("confs: "+str(result_scores))img = draw_boxes(img, result_boxes, result_scores, result_classid)cv2.imwrite("result.jpg",img)print("time: "+str(curr_fps)+"(sec)")
检测图片,filename改为相对路径,引擎的相对路径,可放在main里直接运行
def main_one():filename = "1.jpg" img = cv2.imread(filename)# load custom pluginsPLUGIN_LIBRARY = "yolov5s/libmyplugins.so"ctypes.CDLL(PLUGIN_LIBRARY)engine_file_path = "yolov5s/yolov5s.engine"# a YoLov5TRT instanceyolov5_wrapper = YoLov5TRT(engine_file_path)print("start detection!")detect_one(img, yolov5_wrapper)cv2.destroyAllWindows()print("finish!")
显示图片结果
from IPython.display import Image
main_one()
Image("result.jpg")
定义检测视频的函数,它接收一个视频和编译好的trt文件,按帧推理出框的坐标(中心点x,y,长,宽)、置信度、类别名称,并使用前面的画框函数在此图片上画出这个框。
def detect_video(video, yolov5_wrapper):full_scrn = Falsefps = 0.0tic = time.time()frame_width = int(video.get(cv2.CAP_PROP_FRAME_WIDTH))frame_height = int(video.get(cv2.CAP_PROP_FRAME_HEIGHT))fps = video.get(cv2.CAP_PROP_FPS)#print(str(frame_width)+str(frame_height))##定义输入编码fourcc = cv2.VideoWriter_fourcc('M', 'P', '4', 'V')videoWriter = cv2.VideoWriter('result.AVI', fourcc, fps, (frame_width,frame_height))##开始循环检测,并将结果写到result.mp4中while True:ret,img = video.read()if img is not None:img, result_boxes, result_scores, result_classid = yolov5_wrapper.infer(img)img = draw_boxes(img, result_boxes, result_scores, result_classid)videoWriter.write(img)toc = time.time()curr_fps = 1.0 / (toc - tic)fps = curr_fps if fps == 0.0 else (fps*0.95 + curr_fps*0.05)tic = tocprint("\rfps: "+str(fps),end="")else:break
检测视频,filename改为相对路径,引擎的相对路径,可放在main里直接运行
def main_loop():filename = "video2.mp4"video = cv2.VideoCapture(filename)# load custom pluginsPLUGIN_LIBRARY = "yolov5x/libmyplugins.so"ctypes.CDLL(PLUGIN_LIBRARY)engine_file_path = "yolov5x/yolov5x.engine"# a YoLov5TRT instanceyolov5_wrapper = YoLov5TRT(engine_file_path)print("start detection!")detect_video(video, yolov5_wrapper)video.release()cv2.destroyAllWindows()print("\nfinish!")
显示视频,先运行main_loop()函数,然后在命令行中转码,最后在python中显示,或者可以直接打开。
main_loop()
# 下面两行代码是在命令行中运行
rm result-ffmpeg4.mp4
ffmpeg -i result.AVI -vcodec libx264 -f mp4 result-ffmpeg4.mp4 from IPython.display import Video
Video("result-ffmpeg4.mp4")
OK,我终于有空更新摄像头检测了,由于现在更新时手上只有CSI摄像头,所以我的摄像头代码以使用CSI摄像头为止,usb摄像头可以自己改一改。
def detect_camera(camera, yolov5_wrapper):##开始循环检测,并将结果写到result.mp4中while True:#ret,img = camera.read() # usb摄像头用这个img = camera.read()img, result_boxes, result_scores, result_classid = yolov5_wrapper.infer(img)img = draw_boxes(img, result_boxes, result_scores, result_classid)cv2.namedWindow("result", 0)cv2.resizeWindow("result", 640, 480)cv2.imshow("result", img)if cv2.waitKey(1) == ord('q'):break
from jetcam.csi_camera import CSICamera
def main_camera():# camera = cv2.VideoCapture(0)  # usb摄像头用这个,也可以用jetcam中的usb接口camera = CSICamera(capture_device=0, width=224, height=224)# load custom pluginsPLUGIN_LIBRARY = "yolov5x/libmyplugins.so"ctypes.CDLL(PLUGIN_LIBRARY)engine_file_path = "yolov5x/yolov5x.engine"# YoLov5TRT instanceyolov5_wrapper = YoLov5TRT(engine_file_path)print("start detection!")detect_camera(camera, yolov5_wrapper)# camera.release()  使用cv方法打开摄像头才需要这句cv2.destroyAllWindows()print("\nfinish!")
定义好摄像头检测的函数后便可直接使用
main_camera()
至此,写写停停快半年,我算是完整地更新完嵌入式边缘设备的yolov5部署了。之后并不会更新安卓和IOS设备的部署,一来我没有这种需求,二是网上此类教程我感觉还蛮多的。最初写这个教程的一个原因就是网上找不到好的详细的移动设备部署,怕自己以后忘记怎么操作才写的这个教程。
感谢各位的阅读点赞收藏提问和解答,这是我最近几次更新的全部动力,有问题可以底下留言或者私信。
yolov5笔记(1)——安装pytorch_GPU(win10+anaconda3)
yolov5笔记(2)——训练自己的数据模型(随6.0更新)
yolov5笔记(3)——移动端部署自己的模型(随5.0更新)
yolov5笔记(4)——CPU部署以及NCNN
本文来自互联网用户投稿,文章观点仅代表作者本人,不代表本站立场,不承担相关法律责任。如若转载,请注明出处。 如若内容造成侵权/违法违规/事实不符,请点击【内容举报】进行投诉反馈!