PX4读取串口消息,并通过MAVLINK发送给地面站
参考:(131条消息) PX4飞控读取UART串口信息通过Mavlink传给QGC地面站显示_XXX_UUU_XXX的博客-CSDN博客_px4串口2
PX4版本:1.12.1-3
QGC版本: 4.2.0
Ubuntu版本:20.04
一,PX4篇
1.添加m s g消息
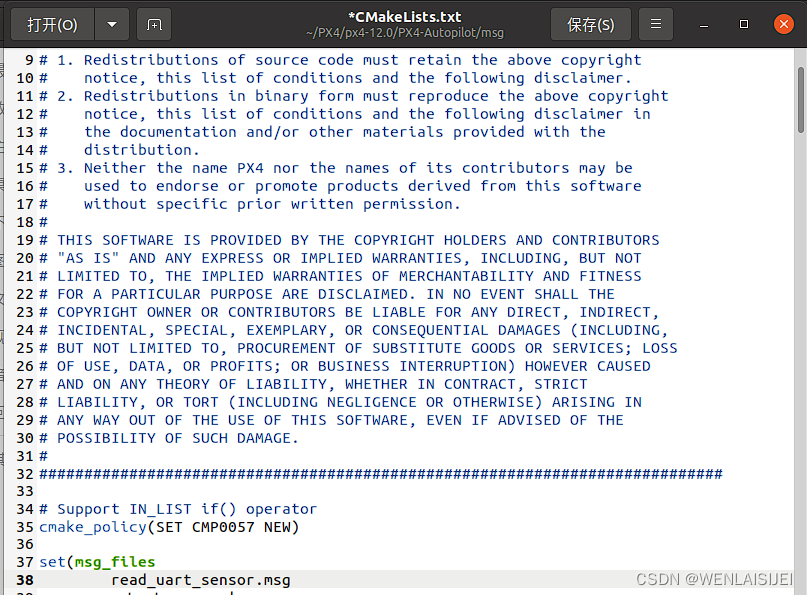
1.位置PX4-Autopilot/msg
在该文件夹下创建read_uart_sensor.msg
uint64 timestamp		# time since system start (microseconds)
char[10] datastr
char[10] data1str
float32 data
float32 data1# TOPICS read_uart_sensor
将创建的文件添加到编译脚本 CMakeLists.txt
2.添加串口读取程序
1.位置PX4-Autopilot/src/modules
在该文件夹下创建read_uart_sensor文件夹,进入该文件夹
1.创建CMakeLists.txt编译脚本
set(MODULE_CFLAGS)
px4_add_module(MODULE modules_read_uart_sensorMAIN read_uart_sensorCOMPILE_FLAGS-OsSRCSread_uart_sensor.cDEPENDS
)
2.创建串口读取程序read_uart_sensor.c 注意:该程序需要将串口设备接在串口3上,并且波特率设置为115200,你也可以修改代码中的串口输入,以及波特率。修改位置请查看代码中的注释。
/******************************************************************************   Copyright (c) 2013-2015 PX4 Development Team. All rights reserved.** Redistribution and use in source and binary forms, with or without* modification, are permitted provided that the following conditions* are met:** 1. Redistributions of source code must retain the above copyright*    notice, this list of conditions and the following disclaimer.* 2. Redistributions in binary form must reproduce the above copyright*    notice, this list of conditions and the following disclaimer in*    the documentation and/or other materials provided with the*    distribution.* 3. Neither the name PX4 nor the names of its contributors may be*    used to endorse or promote products derived from this software*    without specific prior written permission.** THIS SOFTWARE IS PROVIDED BY THE COPYRIGHT HOLDERS AND CONTRIBUTORS* "AS IS" AND ANY EXPRESS OR IMPLIED WARRANTIES, INCLUDING, BUT NOT* LIMITED TO, THE IMPLIED WARRANTIES OF MERCHANTABILITY AND FITNESS* FOR A PARTICULAR PURPOSE ARE DISCLAIMED. IN NO EVENT SHALL THE* COPYRIGHT OWNER OR CONTRIBUTORS BE LIABLE FOR ANY DIRECT, INDIRECT,* INCIDENTAL, SPECIAL, EXEMPLARY, OR CONSEQUENTIAL DAMAGES (INCLUDING,* BUT NOT LIMITED TO, PROCUREMENT OF SUBSTITUTE GOODS OR SERVICES; LOSS* OF USE, DATA, OR PROFITS; OR BUSINESS INTERRUPTION) HOWEVER CAUSED* AND ON ANY THEORY OF LIABILITY, WHETHER IN CONTRACT, STRICT* LIABILITY, OR TORT (INCLUDING NEGLIGENCE OR OTHERWISE) ARISING IN* ANY WAY OUT OF THE USE OF THIS SOFTWARE, EVEN IF ADVISED OF THE* POSSIBILITY OF SUCH DAMAGE.*****************************************************************************/
/** read_uart_sensor.c** read sensor through uart*/#include
#include
#include
#include
#include
#include
#include
#include
//#include
#include
#include
#include
#include
#include __EXPORT int read_uart_sensor_main(int argc, char *argv[]);static bool thread_should_exit = false; /*Ddemon exit flag*/
static bool thread_running = false;  /*Daemon status flag*/
static int daemon_task;/*** Main loop*/
int read_uart_thread_main(int argc, char *argv[]);static int uart_init(const char * uart_name);
static int set_uart_baudrate(const int fd, unsigned int baud);
static void usage(const char *reason);int set_uart_baudrate(const int fd, unsigned int baud)
{int speed;switch (baud) {case 9600:   speed = B9600;   break;case 19200:  speed = B19200;  break;case 38400:  speed = B38400;  break;case 57600:  speed = B57600;  break;case 115200: speed = B115200; break;default:warnx("ERR: baudrate: %d\n", baud);return -EINVAL;}struct termios uart_config;int termios_state;/* 以新的配置填充结构体 *//* 设置某个选项,那么就使用"|="运算,* 如果关闭某个选项就使用"&="和"~"运算* *//* fill the struct for the new configuration */tcgetattr(fd, &uart_config);// 获取终端参数/* clear ONLCR flag (which appends a CR for every LF) */uart_config.c_oflag &= ~ONLCR;// 将NL转换成CR(回车)-NL后输出/* no parity, one stop bit *//* 无偶校验,一个停止位 */uart_config.c_cflag &= ~(CSTOPB | PARENB);// CSTOPB 使用两个停止位,PARENB 表示偶校验/* set baud rate *//* 设置波特率 */if ((termios_state = cfsetispeed(&uart_config, speed)) < 0) {warnx("ERR: %d (cfsetispeed)\n", termios_state);return false;}if ((termios_state = cfsetospeed(&uart_config, speed)) < 0) {warnx("ERR: %d (cfsetospeed)\n", termios_state);return false;}// 设置与终端相关的参数,TCSANOW 立即改变参数if ((termios_state = tcsetattr(fd, TCSANOW, &uart_config)) < 0) {warnx("ERR: %d (tcsetattr)\n", termios_state);return false;}return true;
}int uart_init(const char * uart_name)
{int serial_fd = open(uart_name, O_RDWR | O_NOCTTY);/*Linux中,万物皆文件,打开串口设备和打开普通文件一样,使用的是open()系统调用*/// 选项 O_NOCTTY 表示不能把本串口当成控制终端,否则用户的键盘输入信息将影响程序的执行if (serial_fd < 0) {err(1, "failed to open port: %s", uart_name);return false;}return serial_fd;
}//进程提示函数,用来提示可输入的操作
static void usage(const char *reason)
{if (reason) {fprintf(stderr, "%s\n", reason);}fprintf(stderr, "usage: read_uart_sensor {start|stop|status} [param]\n\n");exit(1);
}//主函数入口
int read_uart_sensor_main(int argc, char *argv[])
{if (argc < 2) {usage("[Fantasy]missing command");}//输入为startif (!strcmp(argv[1], "start")) {if (thread_running) {//进程在运行warnx("[Fantasy]already running\n");//打印提示已经在运行return 0;;//跳出代码}//如果是第一次运行thread_should_exit = false;//定义一个守护进程//建立名为read_uart_sensor进程SCHED_PRIORITY_MAX - 55,daemon_task = px4_task_spawn_cmd("read_uart_sensor",SCHED_DEFAULT,SCHED_PRIORITY_DEFAULT,//调度优先级//SCHED_PRIORITY_MAX - 1,2000,//堆栈分配大小read_uart_thread_main,(argv) ? (char * const *)&argv[2] : (char * const *)NULL);return 0;}if (!strcmp(argv[1], "stop")) {thread_should_exit = true;//进程标志变量置truereturn 0;}if (!strcmp(argv[1], "status")) {if (thread_running) {warnx("[Fantasy]running");return 0;} else {warnx("[Fantasy]stopped");return 1;}return 0;}//若果是其他,则打印不支持该类型usage("unrecognized command");return 1;
}int read_uart_thread_main(int argc, char *argv[])
{int index = 0;char data1 = '0';char buffer[10] = "0";const char douhao[2] = ","; //逗号char *result = NULL;// const char douhao[2] = ","; //逗号//char *result = NULL;// int index = 0;/** TELEM1 : /dev/ttyS1* TELEM2 : /dev/ttyS2* GPS    : /dev/ttyS3* NSH    : /dev/ttyS5* SERIAL4: /dev/ttyS6* N/A    : /dev/ttyS4* IO DEBUG (RX only):/dev/ttyS0*//*配置串口*/int uart_read = uart_init("/dev/ttyS3");//初始化串口设备if(false == uart_read)return -1;if(false == set_uart_baudrate(uart_read,115200)){     //设置波特率printf("[Fantasy]set_uart_baudrate is failed\n");return -1;}printf("[Fantasy]uart init is successful\n");/*进程标志变量*/thread_running = true;/*初始化数据结构体 */struct read_uart_sensor_s sensordata;//实例化read_uart_sensor变量,该变量是自己定义的变量memset(&sensordata, 0, sizeof(sensordata));//初始化sensordata变量/* 公告主题 */orb_advert_t read_uart_sensor_pub = orb_advertise(ORB_ID(read_uart_sensor), &sensordata);while(!thread_should_exit){read(uart_read,&data1,1);if(data1 == 'r'){for(int i = 0;i <10;++i){read(uart_read,&data1,1);buffer[i] = data1;data1 = '0';}//逗号分割,返回下一个分割后的字符串指针,如果没有可检索的字符串,则返回一个空指针。result = strtok(buffer, douhao);while(result != NULL) {index++;switch(index){case 1:strncpy(sensordata.datastr,result,4);break;case 2:strncpy(sensordata.data1str,result,4);break;}result = strtok(NULL, douhao);}index = 0;//atoi()把字符串转换成整型数// atof()把字符串转换成浮点数,默认为6位小数sensordata.data = atof(sensordata.datastr);sensordata.data1 = atof(sensordata.data1str);orb_publish(ORB_ID(read_uart_sensor), read_uart_sensor_pub, &sensordata);}}warnx("[YCM]exiting");thread_running = false;close(uart_read);fflush(stdout);return 0;
}
3.设置uorb上电自启动
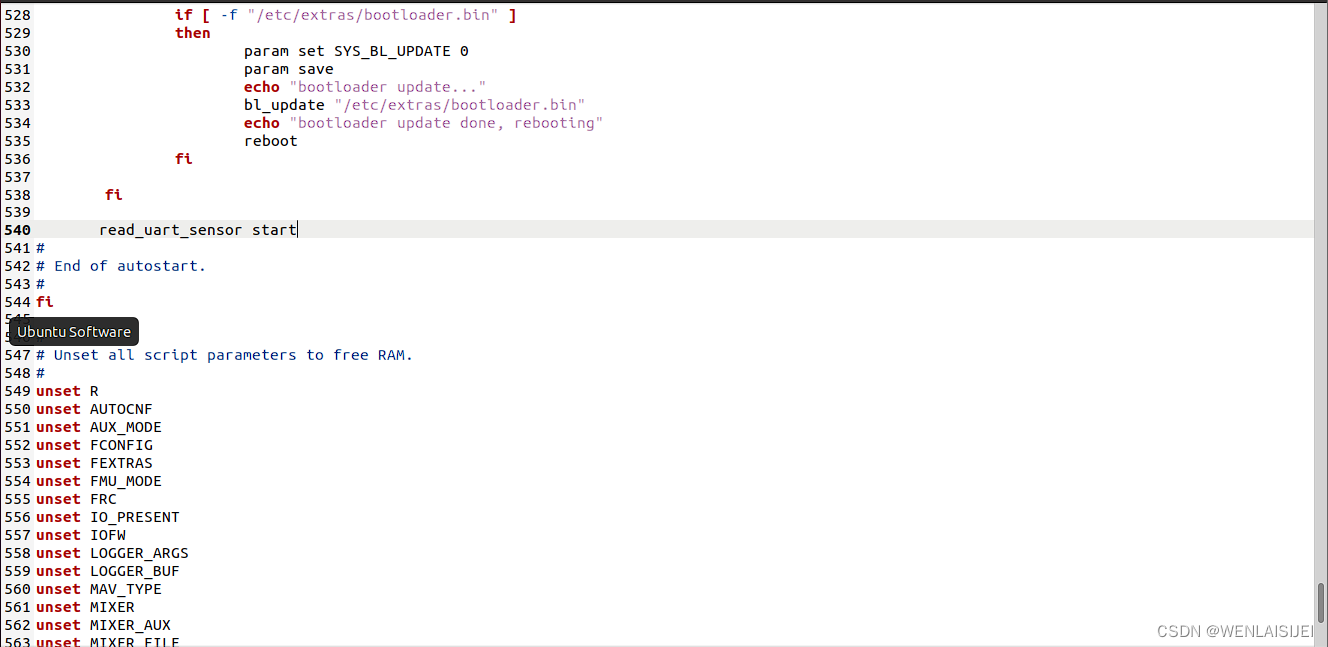
位置:PX4-Autopilot/ROMFS/px4fmu_common/init.d/rcS
在该文件下添加 read_uart_sensor start启动命令(注意:实际添加位置要根据代码位置得到,PX4的每个版本代码都会有一定的不同)
4.添加应用程序,打印串口消息,到MAVLINK终端
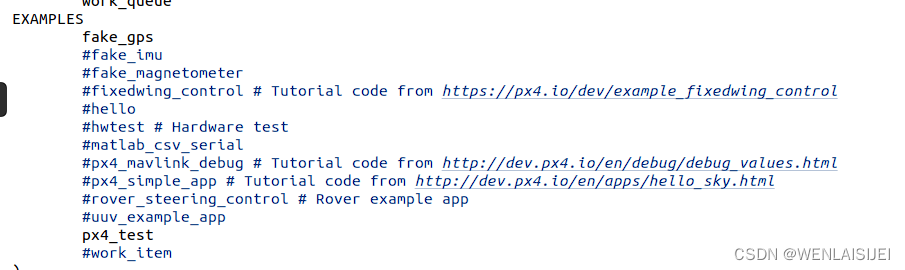
位置:PX4-Autopilot/src/examples(可以参考px4_simple_app的内容)
1.在该文件夹下创建px4_test文件夹
2.进入创建的文件夹,创建 CMakeLists.txt
px4_add_module(MODULE examples__px4_testMAIN px4_testSRCSpx4_test.cDEPENDS)3.创建应用代码 px4_test.c
/******************************************************************************   Copyright (c) 2012-2019 PX4 Development Team. All rights reserved.** Redistribution and use in source and binary forms, with or without* modification, are permitted provided that the following conditions* are met:** 1. Redistributions of source code must retain the above copyright*    notice, this list of conditions and the following disclaimer.* 2. Redistributions in binary form must reproduce the above copyright*    notice, this list of conditions and the following disclaimer in*    the documentation and/or other materials provided with the*    distribution.* 3. Neither the name PX4 nor the names of its contributors may be*    used to endorse or promote products derived from this software*    without specific prior written permission.** THIS SOFTWARE IS PROVIDED BY THE COPYRIGHT HOLDERS AND CONTRIBUTORS* "AS IS" AND ANY EXPRESS OR IMPLIED WARRANTIES, INCLUDING, BUT NOT* LIMITED TO, THE IMPLIED WARRANTIES OF MERCHANTABILITY AND FITNESS* FOR A PARTICULAR PURPOSE ARE DISCLAIMED. IN NO EVENT SHALL THE* COPYRIGHT OWNER OR CONTRIBUTORS BE LIABLE FOR ANY DIRECT, INDIRECT,* INCIDENTAL, SPECIAL, EXEMPLARY, OR CONSEQUENTIAL DAMAGES (INCLUDING,* BUT NOT LIMITED TO, PROCUREMENT OF SUBSTITUTE GOODS OR SERVICES; LOSS* OF USE, DATA, OR PROFITS; OR BUSINESS INTERRUPTION) HOWEVER CAUSED* AND ON ANY THEORY OF LIABILITY, WHETHER IN CONTRACT, STRICT* LIABILITY, OR TORT (INCLUDING NEGLIGENCE OR OTHERWISE) ARISING IN* ANY WAY OUT OF THE USE OF THIS SOFTWARE, EVEN IF ADVISED OF THE* POSSIBILITY OF SUCH DAMAGE.*****************************************************************************/
/** px4_test.c** test the uart sensor app*/
#include
#include
#include
#include
#include
#include
#include
#include #include
#include __EXPORT int px4_test_main(int argc, char *argv[]);int px4_test_main(int argc, char *argv[])
{printf("Hello Sky!\n");/* subscribe to rw_uart_sensor topic */int sensor_sub_fd = orb_subscribe(ORB_ID(read_uart_sensor));/*设置以一秒钟接收一次,并打印出数据*/orb_set_interval(sensor_sub_fd, 1000);//  bool updated;//   struct read_uart_sensor_data_s sensordata;/* one could wait for multiple topics with this technique, just using one here */// px4_pollfd_struct_tstruct pollfd fds[] = {{ .fd = sensor_sub_fd,   .events = POLLIN },/* there could be more file descriptors here, in the form like:* { .fd = other_sub_fd,   .events = POLLIN },*/};int error_counter = 0;for (int i = 0;i<20 ; i++) { // infinite loop/* wait for sensor update of 1 file descriptor for 1000 ms (1 second) */int poll_ret = poll(fds, 1, 1000);/* handle the poll result */if (poll_ret == 0) {/* this means none of our providers is giving us data */printf("[px4_test] Got no data within a second\n");} else if (poll_ret < 0) {/* this is seriously bad - should be an emergency */if (error_counter < 10 || error_counter % 50 == 0) {/* use a counter to prevent flooding (and slowing us down) */printf("[px4_test] ERROR return value from poll(): %d\n", poll_ret);}error_counter++;} else {if (fds[0].revents & POLLIN) {/* obtained data for the first file descriptor */struct read_uart_sensor_s sensordata;/* copy sensors raw data into local buffer */orb_copy(ORB_ID(read_uart_sensor), sensor_sub_fd, &sensordata);printf("[px4_test] sensor datastr:\t%s\t%d\n",sensordata.datastr,(double)sensordata.data,sensordata.data1str,(double)sensordata.data1);// printf("[px4_test] sensor data:\t%s\t%d\n",(int)sensordata.data);}/* there could be more file descriptors here, in the form like:* if (fds[1..n].revents & POLLIN) {}*/}}//   PX4_INFO("exiting");return 0;
}
5.将添加的代码,添加到对应的机型编译文件里
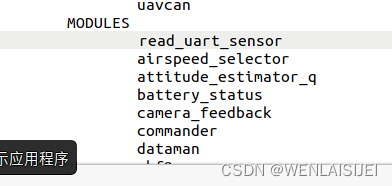
位置:PX4-Autopilot/boards/px4(在boards文件夹中,对应品牌的文件夹下有对应品牌的编译的文件)找到你飞控对应的品牌以及型号在其余文件夹下找到 default.cmake
1.将之前创建的文件夹添加到该脚本里面
注意,区分
三.MAVLINK 发送部分
1.从github上面克隆MAVLINK生成器
git clone https://github.com/mavlink/mavlink.git
2.进入克隆目录,执行以下命令
git submodule update --init --recursivesudo apt-get install python3-tksudo pip3 install future3.进入mavlink/message_definitions/v1.0
在该目录下创建read_uart_sensor.xml
3 READ_UART_SENSOR Timestamp in milliseconds since system boot float float 4.在mavlink根目录

1.右键单击打开终端,执行
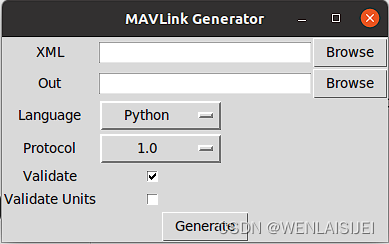
python3 -m mavgenerate2. 通常情况下弹出:3
如果遇到了错误请检查创建的文件,以及克隆的完整性.
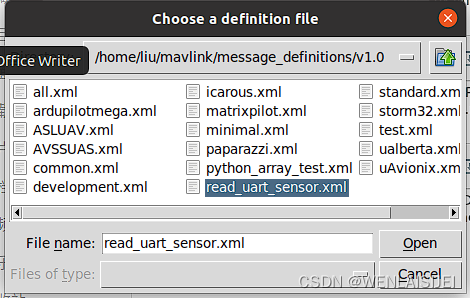
3.单击第一个Browse选择目标源文件,进入message_definitions/v1.0,选中之前创建的文件点击open
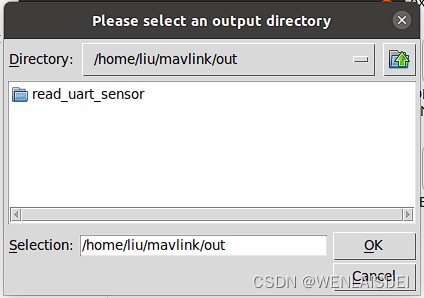
4.班级第二个Browse选择输出文件夹,可以在根目录创建一个out文件夹,选中目标文件夹后点击ok
5.Language选择c,Protocol选择2.0
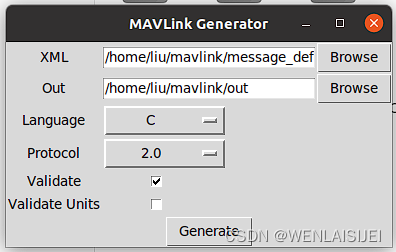
6.最后点击Generate
正常情况下会在选择的存放文件夹out文件夹内,生成一个read_uart_sensor文件夹,如果遇到了报错,请检查创建的文件read_uart_sensor.xml
2.PX4飞控部分
1.进入刚才生存的read_uart_sensor/mavlink_msg_read_uart_sensor.h,选中生成的mavlink_msg_read_uart_sensor.h文件,将其放入PX4-Autopilot/mavlink/include/mavlink/v2.0/common
2.在common文件夹里,打开common.h文件, 将mavlink_msg_read_uart_sensor.h文件添加到里面
3.
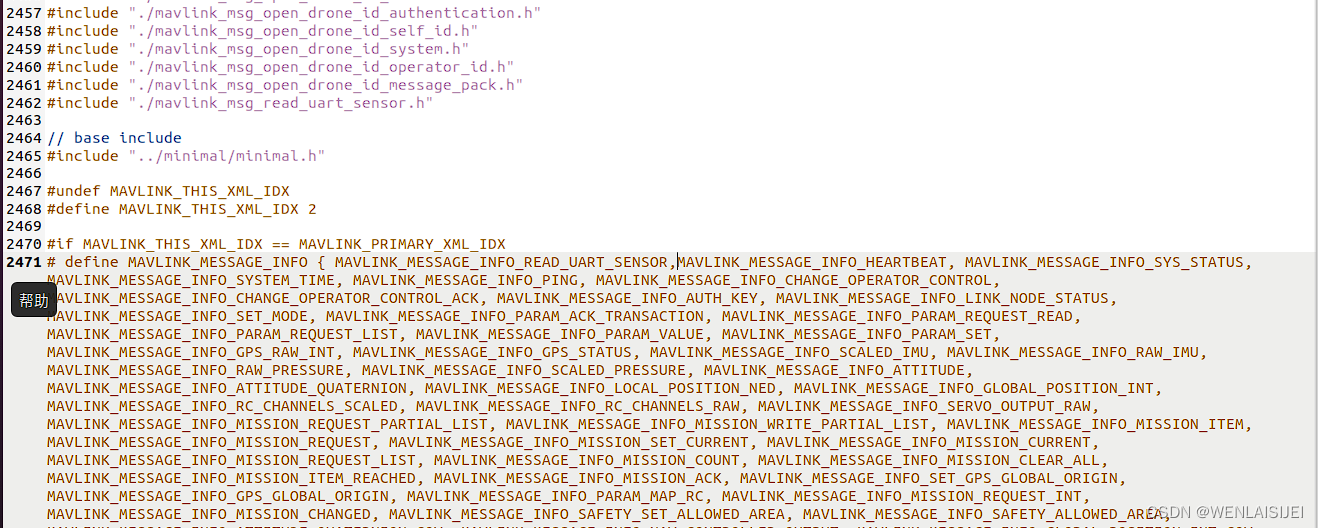
在后面的 # define MAVLINK_MESSAGE_INFO {里面添加MAVLINK_MESSAGE_INFO_READ_UART_SENSOR.....}
4.在后继的# define MAVLINK_MESSAGE_NAMES { { "REAR_UART_SENSOR", 166 } } ,需要注意的是,这个需要按字母顺序排序。REAR_UART_SENSOR是ID名称,166是mavlink的消息ID.建议使用166作为消息ID。其他的,不知道是什么原因,可能会出现接收不到。

5.
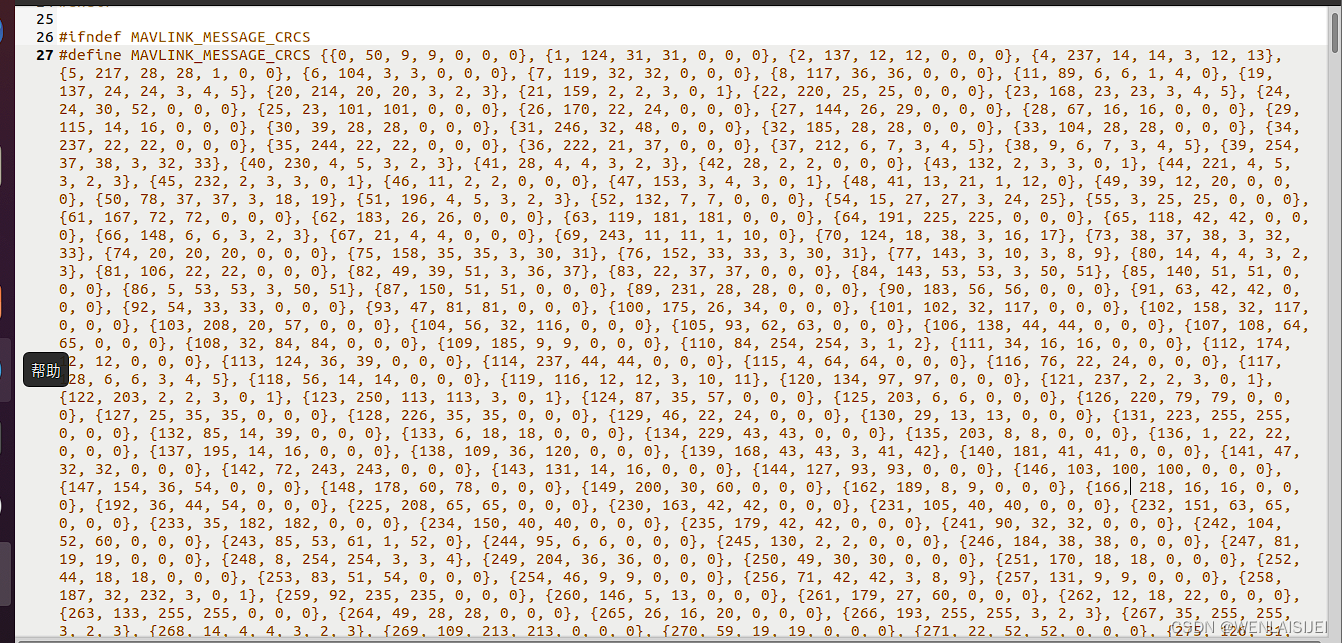
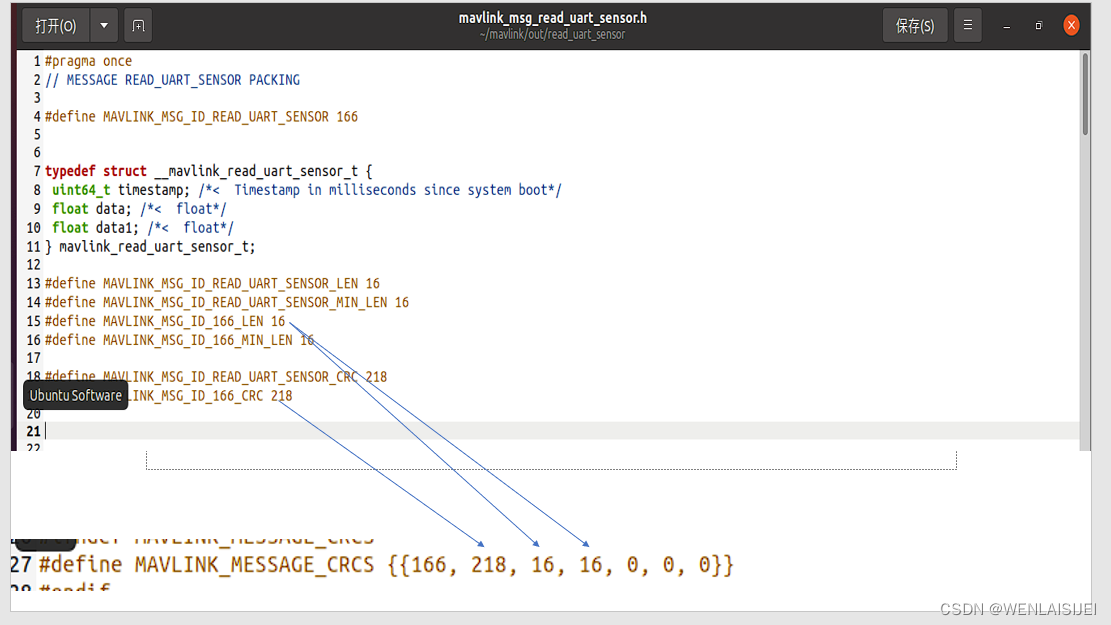
在 #define MAVLINK_MESSAGE_CRCS {里面添加{166, 218, 16, 16, 0, 0, 0}, ......}
需要注意的是,这几个数值根据mavlink生成出来的而确定,在你通过mavlink生成器生成出来的目录里有一个read_uart_sensor.h文件,打开后可以看到一个#define MAVLINK_MESSAGE_CRCS....
将后面的一串数字复制到common.h里面就好了。
如果你在这个文件里面没有找到这串数字,打开mavlink_msg_read_uart_sensor.h里面的,第一个数字是你的mavlink消息ID,最后三个数字默认为零。
6.进入PX4-Autopilot/src/modules/mavlink/streams 在该文件夹下创建READ_UART_SENSOR.hpp
/******************************************************************************   Copyright (c) 2020 PX4 Development Team. All rights reserved.** Redistribution and use in source and binary forms, with or without* modification, are permitted provided that the following conditions* are met:** 1. Redistributions of source code must retain the above copyright*    notice, this list of conditions and the following disclaimer.* 2. Redistributions in binary form must reproduce the above copyright*    notice, this list of conditions and the following disclaimer in*    the documentation and/or other materials provided with the*    distribution.* 3. Neither the name PX4 nor the names of its contributors may be*    used to endorse or promote products derived from this software*    without specific prior written permission.** THIS SOFTWARE IS PROVIDED BY THE COPYRIGHT HOLDERS AND CONTRIBUTORS* "AS IS" AND ANY EXPRESS OR IMPLIED WARRANTIES, INCLUDING, BUT NOT* LIMITED TO, THE IMPLIED WARRANTIES OF MERCHANTABILITY AND FITNESS* FOR A PARTICULAR PURPOSE ARE DISCLAIMED. IN NO EVENT SHALL THE* COPYRIGHT OWNER OR CONTRIBUTORS BE LIABLE FOR ANY DIRECT, INDIRECT,* INCIDENTAL, SPECIAL, EXEMPLARY, OR CONSEQUENTIAL DAMAGES (INCLUDING,* BUT NOT LIMITED TO, PROCUREMENT OF SUBSTITUTE GOODS OR SERVICES; LOSS* OF USE, DATA, OR PROFITS; OR BUSINESS INTERRUPTION) HOWEVER CAUSED* AND ON ANY THEORY OF LIABILITY, WHETHER IN CONTRACT, STRICT* LIABILITY, OR TORT (INCLUDING NEGLIGENCE OR OTHERWISE) ARISING IN* ANY WAY OUT OF THE USE OF THIS SOFTWARE, EVEN IF ADVISED OF THE* POSSIBILITY OF SUCH DAMAGE.*****************************************************************************/#ifndef READ_UART_SENSOR_HPP
#define READ_UART_SENSOR_HPP//#include
#include //包含uorb消息结构体的头文件
#include  //包含生成器生成的头文件
#include  //自定义类继承与MavlinkStream,所以要包含
//#include
//#include
//#include class MavlinkStreamReadUartSensor : public MavlinkStream
{
public://explicit MavlinkStreamReadUartSensor(Mavlink *mavlink) : MavlinkStream(mavlink) {}static MavlinkStream *new_instance(Mavlink *mavlink){ return new MavlinkStreamReadUartSensor(mavlink); }//void update(orb_advert_t *mavlink_log_pub);static constexpr const char *get_name_static(){return "READ_UART_SENSOR";}static constexpr uint16_t get_id_static(){return MAVLINK_MSG_ID_READ_UART_SENSOR;}const char *get_name() const override{return get_name_static();//return MavlinkStreamReadUartSensor::get_name_static();}uint16_t get_id() override{return get_id_static();}unsigned get_size() override{return _read_uart_sensor_sub.advertised() ? (MAVLINK_MSG_ID_READ_UART_SENSOR_LEN + MAVLINK_NUM_NON_PAYLOAD_BYTES): 0 ;}//private://uORB::Subscription _read_uart_sensor_sub{ORB_ID(read_uart_sensor)};//uint64_t _read_uart_sensor_time;/* do not allow top copying this class *///  MavlinkStreamread_uart_sensor(MavlinkStreamread_uart_sensor &) = delete;//   MavlinkStreamread_uart_sensor &operator = (const MavlinkStreamread_uart_sensor &) = delete;private:explicit MavlinkStreamReadUartSensor(Mavlink *mavlink) : MavlinkStream(mavlink) {}//uORB::Subscription _read_uart_sensor_sub{ORB_ID(read_uart_sensor)};//订阅//_read_uart_sensor.copy(&_read_uart_sensor);//获取消息数据//~MavlinkStreamReadUartSensor();uORB::Subscription _read_uart_sensor_sub{ORB_ID(read_uart_sensor)};bool send() override //用于PX4真正发送的函数{read_uart_sensor_s orbtest;//read_uart_sensor_s orbtest = {};//struct read_uart_sensort_s;    //定义uorb消息结构体// mavlink_read_uart_sensor_t msg{};//_read_uart_sensor_sub.copy(&read_uart_sensor);// orb_copy(ORB_ID(read_uart_sensor), orbtest_sub_fd, &orbtest);//if (true)if(_read_uart_sensor_sub.update(&orbtest)){//int sensor_sub_fd = orb_subscribe(ORB_ID(read_uart_sensor));//订阅//orb_copy(ORB_ID(read_uart_sensor), sensor_sub_fd, &_read_uart_sensor);//获取消息数据mavlink_read_uart_sensor_t msg{};//uORB::Subscription _read_uart_sensor{ORB_ID(read_uart_sensor)};//订阅//_read_uart_sensor.copy(&_read_uart_sensor);//获取消息数据//mavlink_read_uart_sensor_t msg;//定义mavlink消息结构体msg.timestamp = orbtest.timestamp;   //这里uorb数据赋值到mavlink结构体上//msg.datastr = orbtest.datastr;msg.data = orbtest.data;msg.data1 = orbtest.data1;////msg.ll_sensor = orbtest.ll_sensor;mavlink_msg_read_uart_sensor_send_struct(_mavlink->get_channel(), &msg);//利用生成器生成的mavlink_msg_read_uart_sensor.h头文件里面的这个函数将msg(mavlink结构体)封装成mavlink消息帧并发送;printf("[Fantasy]uart init is successful\n");return true;}return false;}
};
#endif
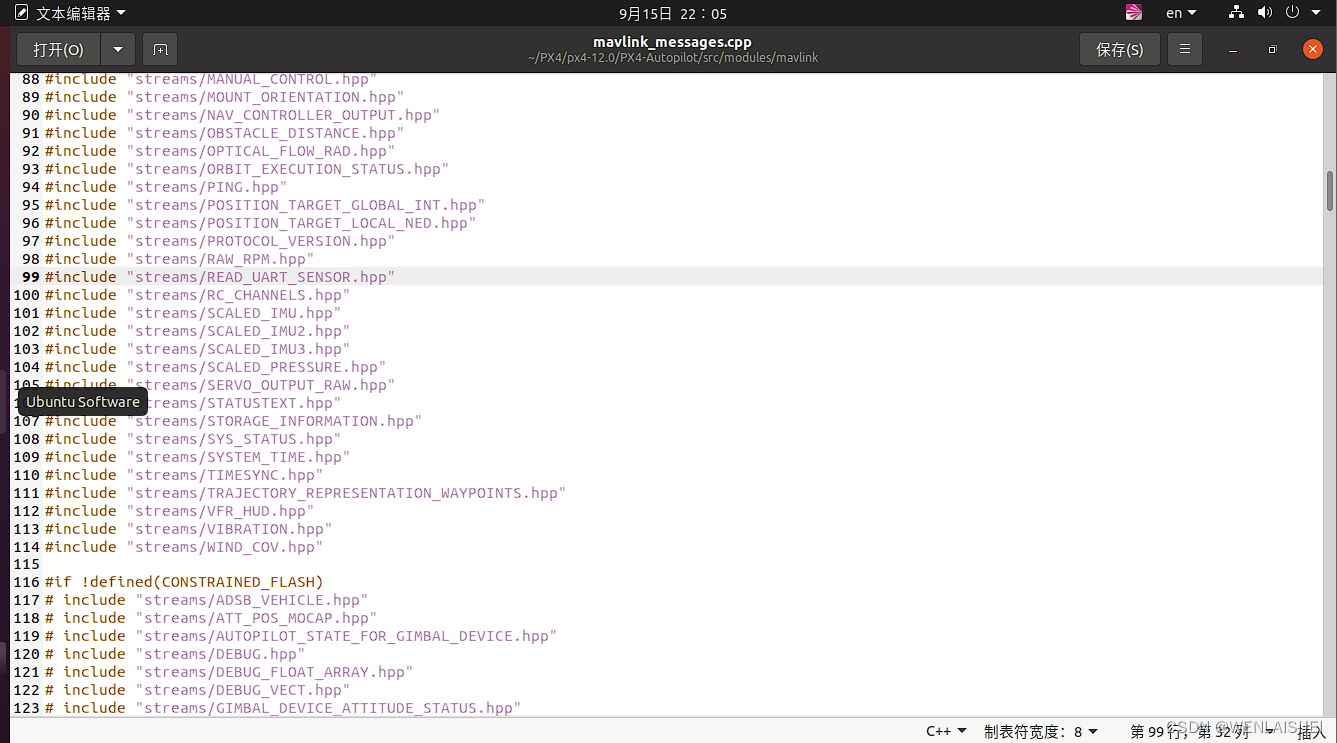
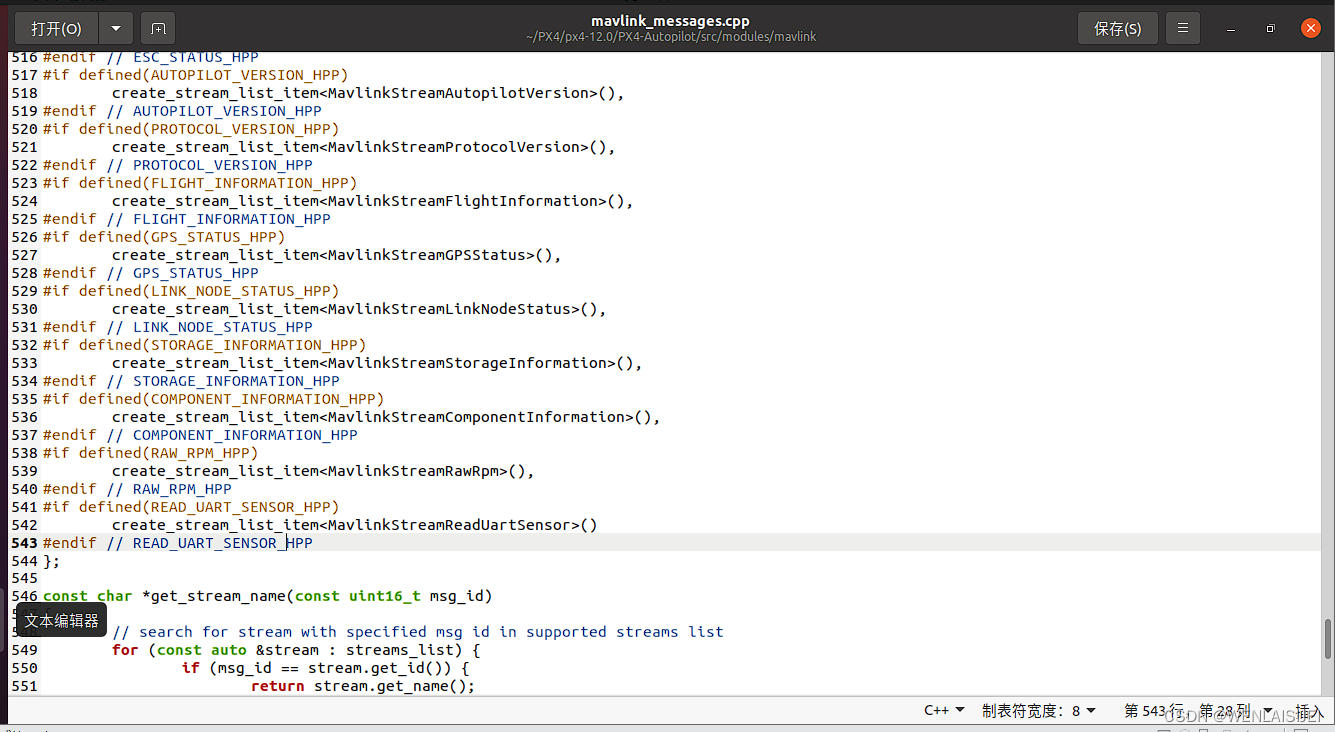
7.进入PX4-Autopilot/src/modules/mavlink 打开mavlink_messages.cpp
在前面引用刚才添加的.hpp文件
8.接下来在static const StreamListItem streams_list[] = {后面仿照添加
9.进入PX4-Autopilot/src/modules/mavlink 打开mavlink_main.cpp
设置发送频率 ,configure_stream_local("READ_UART_SENSOR", 30.0f); 注意放置的位置

四.编译生成固件
到PX4代码主文件夹下,右键单击打开终端
输入对应的编译脚本,命令 例如:雷迅x7 pro make cuav_x7pro_default
编译完成后到 位置:PX4-Autopilot/build/对应飞控版本的文件夹里(雷迅x7 pro)/后缀名为.px4的文件 将该文件通过地面站烧录到飞控后即可
作为一个初学者,还有许多不懂的地方,如有什么地方存在错误,还请见谅。大家一起相互学习。
本文来自互联网用户投稿,文章观点仅代表作者本人,不代表本站立场,不承担相关法律责任。如若转载,请注明出处。 如若内容造成侵权/违法违规/事实不符,请点击【内容举报】进行投诉反馈!