自制小强机器人,能看能听能说能画
1 概述
首先可以先看下小强机器人上个版本:
自己制作智能语音机器人(基于jetson nano)自己制作智能语音机器人(基于jetson nano)_智能语音机器人开发_AI强仔的博客-CSDN博客
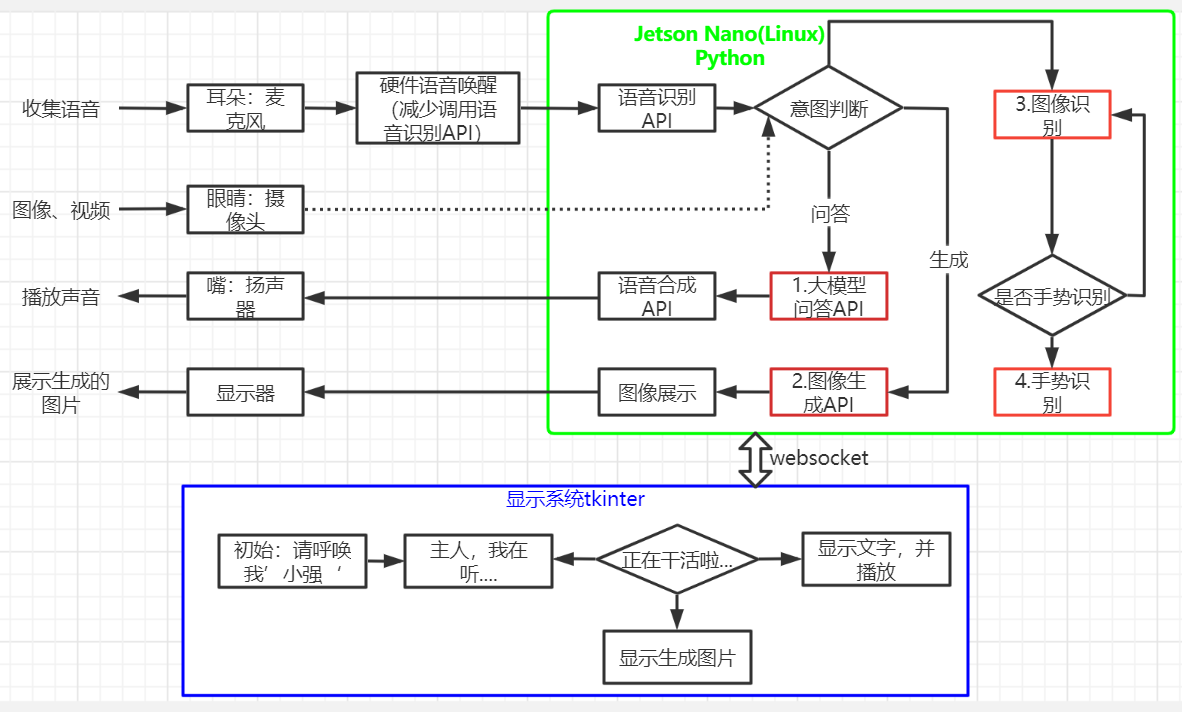
这个在上面版本基础上增加了图像显示系统、图像识别、手势识别、图像生成。所以硬件增加了显示屏、摄像头。
B站视频:【给小强机器人增加了眼睛(深度相机),能看能听能说能画了-哔哩哔哩】 给小强机器人增加了眼睛(深度相机),能看能听能说能画了_哔哩哔哩_bilibili
1.1硬件:
- jetson nano:linux
- 科大讯飞麦克风硬件:AIUI R818麦克阵列开发套件+6麦阵列,支持离线语音唤醒
- USB免驱声卡+喇叭
- 摄像头:采用的奥比中光深度摄像头,方便后期增加动作导航功能;
- 显示屏:IPS触摸屏
1.2软件:
- 科大讯飞在线语音识别API
- 科大讯飞在线语音合成API
- 语言大模型API
- 图像生成模型API
- 自己编写图形界面,采用的python tkinter编写的;
- 图像识别:采用opencv +yolov4
- 手势识别:采用opencv +openpose
- websocket通信:在语音、图像、显示模块间采用websocket通信。暂时没有使用ros。
2 部分代码
2.1图像识别和手势识别代码
#!/usr/bin/env python3
# -*-coding: utf-8 -*-
""""""
import time
import cv2 as cv
import numpy as npclass CameraApp:def __init__(self):######################### Detection ########################### load the COCO class nameswith open('camera/object_detection_coco.txt', 'r',encoding="utf-8") as f:self.class_names = f.read().split('\n')with open('camera/coco.names', 'rt') as f:self.names = f.read().rstrip('\n').split('\n')# get a different color array for each of the classes,np.random.uniform()作用于从一个均匀分布的区域中随机采样,返回对象:ndarray类型,形状和size中的数值一样self.COLORS = np.random.uniform(0, 255, size=(len(self.class_names), 3))# load the DNN modelimage#self.model = cv.dnn.readNet(model='camera/frozen_inference_graph.pb', config='camera/ssd_mobilenet_v2_coco.txt', framework='TensorFlow')######################### openpose ##########################self.BODY_PARTS = {"Nose": 0, "Neck": 1, "RShoulder": 2, "RElbow": 3, "RWrist": 4,"LShoulder": 5, "LElbow": 6, "LWrist": 7, "RHip": 8, "RKnee": 9,"RAnkle": 10, "LHip": 11, "LKnee": 12, "LAnkle": 13, "REye": 14,"LEye": 15, "REar": 16, "LEar": 17, "Background": 18}self.POSE_PAIRS = [["Neck", "RShoulder"], ["Neck", "LShoulder"], ["RShoulder", "RElbow"],["RElbow", "RWrist"], ["LShoulder", "LElbow"], ["LElbow", "LWrist"],["Neck", "RHip"], ["RHip", "RKnee"], ["RKnee", "RAnkle"], ["Neck", "LHip"],["LHip", "LKnee"], ["LKnee", "LAnkle"], ["Neck", "Nose"], ["Nose", "REye"],["REye", "REar"], ["Nose", "LEye"], ["LEye", "LEar"]]self.HAND_POSE_PAIRS = [[0, 1], [1, 2], [2, 3], [3, 4], [0, 5], [5, 6], [6, 7], [7, 8], [0, 9], [9, 10], [10, 11],[11, 12], [0, 13], [13, 14], [14, 15], [15, 16], [0, 17], [17, 18], [18, 19], [19, 20]]#self.net = cv.dnn.readNetFromTensorflow("camera/graph_opt.pb")self.hand_net=cv.dnn.readNetFromCaffe('camera/pose_deploy.prototxt','camera/pose_iter_102000.caffemodel')self.yolo4_net= cv.dnn_DetectionModel('camera/yolov4-tiny.cfg', 'camera/yolov4-tiny.weights')self.yolo4_net.setInputSize(320, 320)self.yolo4_net.setInputScale(1.0 / 255)self.yolo4_net.setInputSwapRB(True)def YOLO_Target_Detection(self,frame):# if image is None:#     time.sleep(0.5)#     return None# image_height, image_width, _ = image.shape# # blobFromImage主要是用来对图片进行预处理,1.整体像素值减去平均值(mean),2.通过缩放系数(scalefactor)对图片像素值进行缩放# blob = cv.dnn.blobFromImage(image=image, size=(320, 320), mean=(0, 0, 0), swapRB=True)# self.yolo4_net.setInput(blob)classes, confidences, boxes = self.yolo4_net.detect(frame, confThreshold=0.1, nmsThreshold=0.4)#output = self.model.forward()# loop over each of the detectionsif len(classes)>0:for classId, confidence, box in zip(classes.flatten(), confidences.flatten(), boxes):if confidence > 0.5:left, top, w, h = boxcv.rectangle(frame, (left, top), (left + w, top + h), (0, 255, 0), 2)cv.putText(frame, self.names[classId], (left, top), cv.FONT_HERSHEY_SIMPLEX, 0.5, (0, 0, 255))return framedef Target_Detection(self,image):# if image is None:#     time.sleep(0.5)#     return Noneimage_height, image_width, _ = image.shape# blobFromImage主要是用来对图片进行预处理,1.整体像素值减去平均值(mean),2.通过缩放系数(scalefactor)对图片像素值进行缩放blob = cv.dnn.blobFromImage(image=image, size=(300, 300), mean=(104, 117, 123), swapRB=True)self.model.setInput(blob)output = self.model.forward()# loop over each of the detectionsfor detection in output[0, 0, :, :]:# extract the confidence of the detectionconfidence = detection[2]# draw bounding boxes only if the detection confidence is above...# ... a certain threshold, else skipif confidence > .4:# get the class idclass_id = detection[1]# map the class id to the classclass_name = self.class_names[int(class_id) - 1]color = self.COLORS[int(class_id)]# get the bounding box coordinatesbox_x = detection[3] * image_widthbox_y = detection[4] * image_height# get the bounding box width and heightbox_width = detection[5] * image_widthbox_height = detection[6] * image_height# draw a rectangle around each detected objectcv.rectangle(image, (int(box_x), int(box_y)), (int(box_width), int(box_height)), color, thickness=2)# put the class name text on the detected objectcv.putText(image, class_name, (int(box_x), int(box_y - 5)), cv.FONT_HERSHEY_SIMPLEX, 1, color, 2)return imagedef openpose_hand(self, frame):nPoints = 22frameHeight, frameWidth = frame.shape[:2]aspect_ratio = frameWidth / frameHeight# self.hand_net.setInput(#     cv.dnn.blobFromImage(frame, 1.0, (368, 368), (127.5, 127.5, 127.5), swapRB=True, crop=False))#inWidth = int(((aspect_ratio * 368) * 8) // 8)inpBlob = cv.dnn.blobFromImage(frame, 1.0 / 255, (inWidth, 368), (0, 0, 0), swapRB=False,crop=False)self.hand_net.setInput(inpBlob)out = self.hand_net.forward()# out = out[:, :19, :, :]  # MobileNet output [1, 57, -1, -1], we only need the first 19 elementspoints = []for i in range(nPoints):# confidence map of corresponding body's part.probMap = out[0, i, :, :]probMap = cv.resize(probMap, (frameWidth, frameHeight))# Find global maxima of the probMap.minVal, prob, minLoc, point = cv.minMaxLoc(probMap)if prob > 0.1:cv.circle(frame, (int(point[0]), int(point[1])), 8, (0, 255, 255), thickness=-1,lineType=cv.FILLED)cv.putText(frame, "{}".format(i), (int(point[0]), int(point[1])), cv.FONT_HERSHEY_SIMPLEX, 1,(0, 0, 255), 2, lineType=cv.LINE_AA)# Add the point to the list if the probability is greater than the thresholdpoints.append((int(point[0]), int(point[1])))else:points.append(None)# cv.imshow('Output-Keypoints', frame)for pair in self.HAND_POSE_PAIRS:partA = pair[0]partB = pair[1]if points[partA] and points[partB]:cv.line(frame, points[partA], points[partB], (0, 255, 255), 2)cv.circle(frame, points[partA], 8, (0, 0, 255), thickness=-1, lineType=cv.FILLED)# cv2.imshow('Output-Skeleton', frame)return framedef openpose(self,frame):frameHeight, frameWidth = frame.shape[:2]self.net.setInput(cv.dnn.blobFromImage(frame, 1.0, (368, 368), (127.5, 127.5, 127.5), swapRB=True, crop=False))out = self.net.forward()out = out[:, :19, :, :]  # MobileNet output [1, 57, -1, -1], we only need the first 19 elementsassert (len(self.BODY_PARTS) == out.shape[1])points = []for i in range(len(self.BODY_PARTS)):# Slice heatmap of corresponging body's part.heatMap = out[0, i, :, :]# Originally, we try to find all the local maximums. To simplify a sample# we just find a global one. However only a single pose at the same time# could be detected this way.函数cv::minMaxLoc找出最大和最小元素的值和他们的位置.minVal, maxVal, minLoc, maxLoc=cv.minMaxLoc(src[, mask])_, conf, _, point = cv.minMaxLoc(heatMap)x = (frameWidth * point[0]) / out.shape[3]y = (frameHeight * point[1]) / out.shape[2]# Add a point if it's confidence is higher than threshold.points.append((int(x), int(y)) if conf > 0.2 else None)for pair in self.POSE_PAIRS:partFrom = pair[0]partTo = pair[1]assert (partFrom in self.BODY_PARTS)assert (partTo in self.BODY_PARTS)idFrom = self.BODY_PARTS[partFrom]idTo = self.BODY_PARTS[partTo]if points[idFrom] and points[idTo]:cv.line(frame, points[idFrom], points[idTo], (0, 255, 0), 3)cv.ellipse(frame, points[idFrom], (3, 3), 0, 0, 360, (0, 0, 255), cv.FILLED)#ellipse()函数可以画扇形,也可以画椭圆cv.ellipse(frame, points[idTo], (3, 3), 0, 0, 360, (0, 0, 255), cv.FILLED)return frameif __name__ == '__main__':capture = cv.VideoCapture(0)cv_edition = cv.__version__#CAP_PROP_FOURCC:4个字符表示的视频编码器格式#Xvid是一个开放源代码的MPEG-4视频编解码器if cv_edition[0] == '3': capture.set(cv.CAP_PROP_FOURCC, cv.VideoWriter_fourcc(*'XVID'))else: capture.set(cv.CAP_PROP_FOURCC, cv.VideoWriter.fourcc('M', 'J', 'P', 'G'))capture.set(cv.CAP_PROP_FRAME_WIDTH, 640)capture.set(cv.CAP_PROP_FRAME_HEIGHT, 480)c_app=CameraApp()state=Truewhile capture.isOpened():start = time.time()ret, frame = capture.read()action = cv.waitKey(10) & 0xFF#waitKey其中参数k单位是毫秒.返回值为k毫秒内键盘按键的ASCII码值if state==True: frame = c_app.Target_Detection(frame)else: frame = c_app.openpose(frame)end = time.time()fps = 1 / (end - start)text = "FPS : " + str(int(fps))#FONT_HERSHEY_SIMPLEX:正常大小无衬线字体cv.putText(frame, text, (20, 30), cv.FONT_HERSHEY_SIMPLEX, 0.9, (100, 200, 200), 1)cv.imshow('frame', frame)# 将OpenCV帧转换为PIL图像#image = Image.fromarray(cv.cvtColor(frame, cv.COLOR_BGR2RGB))# 将PIL图像转换为Tkinter图像#photo = ImageTk.PhotoImage(image=image)if action == ord('q') or action == 113: breakif action == ord('f'):state = not statecapture.release()cv.destroyAllWindows()
本文来自互联网用户投稿,文章观点仅代表作者本人,不代表本站立场,不承担相关法律责任。如若转载,请注明出处。 如若内容造成侵权/违法违规/事实不符,请点击【内容举报】进行投诉反馈!