nginx虚拟主机(基于域名虚拟主机、基于IP地址虚拟主机、基于端口虚拟主机设置)
文章目录
- Nginx支持的虚拟主机有三种
- 配置环境
- 配置DNS域名
- 安装环境
- 安装nginx
- 制作管理脚本
- 基于域名
- 基于端口
- 基于IP
- 基于用IP地址访问域名
Nginx支持的虚拟主机有三种
●基于域名的虚拟主机
●基于IP的虚拟主机
●基于端口的虚拟主机
每一种虚拟主机均可通过“server{}" 配置段实现各自的功能
配置环境
配置DNS域名
root@localhost ~]# yum -y install bind
[root@localhost ~]# vim /etc/named.conf options {listen-on port 53 { any; };listen-on-v6 port 53 { ::1; };directory       "/var/named";dump-file       "/var/named/data/cache_dump.db";statistics-file "/var/named/data/named_stats.txt";memstatistics-file "/var/named/data/named_mem_stats.txt";recursing-file  "/var/named/data/named.recursing";secroots-file   "/var/named/data/named.secroots";allow-query     { any; };[root@localhost ~]# vim /etc/named.rfc1912.zones
zone "benet.com" IN {type master;file "benet.com.zone";allow-update { none; };
};
zone "kgc.com" IN {type master;file "kgc.com.zone";allow-update { none; };
};[root@localhost ~]# cd /var/named/
[root@localhost named]# cp -p named.localhost benet.com.zone
[root@localhost named]# vim benet.com.zone
www  IN A      192.168.136.10
[root@localhost named]# setenforce 0
[root@localhost named]# iptables -F
[root@localhost named]# systemctl stop firewalld
[root@localhost named]# systemctl start named
安装环境
[root@localhost named]# yum -y install gcc gcc-c++ pcre-devel zlib-devel
安装nginx
[root@localhost named]# tar zxvf nginx-1.12.2.tar.gz -C /opt/
[root@localhost opt]# cd nginx-1.12.2/
[root@localhost ~]# useradd -M -s /sbin/nologin nginx   编译需要指定相关用户 -M 创建家目录
[root@localhost nginx-1.12.2]# ./configure \
--prefix=/usr/local/nginx \
--user=nginx \
--group=nginx \
--with-http_stub_status_module
[root@localhost nginx-1.12.2]# make && make install
[root@localhost nginx-1.12.2]# ln -s /usr/local/nginx/sbin/* /usr/local/sbin/
[root@localhost nginx-1.12.2]# ln -s /usr/local/nginx/conf/nginx.conf /etc/
[root@localhost nginx-1.12.2]# nginx -t
nginx: the configuration file /usr/local/nginx/conf/nginx.conf syntax is ok
nginx: configuration file /usr/local/nginx/conf/nginx.conf test is successful
制作管理脚本
 [root@localhost nginx]# cd /etc/init.d/   重建服务
[root@localhost init.d]# vim nginx    创建管理脚本
#!/bin/bash
# chkconfig: - 99 20
#description: nginx service Control Script
PROG="/usr/local/nginx/sbin/nginx"
PIDF="/usr/local/nginx/logs/nginx.pid"
case "$1" instart)$PROG;;stop)kill -s QUIT $(cat $PIDF);;restart)$0 stop$0 start;;reload)kill -s HUP $(cat $PIDF);;*)echo "Usage: $0 {start|stop|restart|reload}"exit 1esac
exit 0
[root@localhost init.d]# chmod +x nginx
[root@localhost init.d]# chkconfig --add nginx   便于servers管理
[root@promote init.d]# service nginx start
[root@localhost init.d]# netstat -ntap | grep 80
tcp        0      0 0.0.0.0:80              0.0.0.0:*               LISTEN      25954/nginx: master
tcp        0      0 192.168.136.10:22       192.168.136.2:59246     ESTABLISHED 8049/sshd: root@pts
tcp        0      0 192.168.136.10:48214    59.111.0.251:80         TIME_WAIT   -
基于域名
创建虚拟主机
[root@localhost sbin]# vim /usr/local/nginx/conf/nginx.conf在末尾添加
server {server_name www.kgc.com;location / {root /var/www/kgc;index index.html index.php;}}server {server_name www.benet.com;location / {root /var/www/benet;index index.html index.php;}}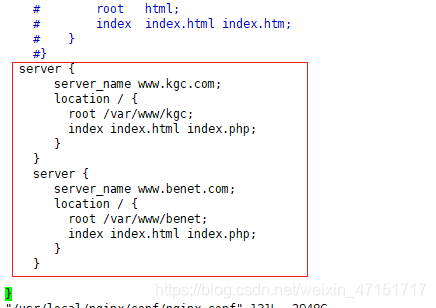
开启服务
[root@localhost conf]# nginx -t
nginx: the configuration file /usr/local/nginx/conf/nginx.conf syntax is ok
nginx: configuration file /usr/local/nginx/conf/nginx.conf test is successful
写入网页
[root@localhost ~]# mkdir -p /var/www/html/kgc
[root@localhost ~]# mkdir -p /var/www/html/benet
[root@localhost html]# echo "this is kgc web" > kgc/index.html
[root@localhost html]# echo "this is benet web" > benet/index.html
[root@localhost conf]#  service nginx restart
基于端口
[root@localhost html]# cd /usr/local/nginx/conf/
[root@localhost conf]# vim nginx.confvim /etc/nginx.confserver {listen 192.168.60.60:80;server_name www.kgc.com;location / {root /var/www/html/kgc;index  index.html index.htm; }
}server {listen 192.168.60.60:8080;server_name www.kgc.com;location / {root /var/www/html/benet8080;index  index.html index.htm; }
}
写入网页
[root@localhost conf]# cd /var/www//html/
[root@localhost html]# mkdir benet8080
[root@localhost html]# echo "this is benet8080 web" > benet8080/index.html
[root@localhost conf]# nginx -t
nginx: the configuration file /usr/local/nginx/conf/nginx.conf syntax is ok
nginx: configuration file /usr/local/nginx/conf/nginx.conf test is successful
基于IP
添加一个网卡 左边是IP地址查看是否可以通信
配置DNS区域配置文件
[root@localhost named]# vim kgc.com.zone
www  IN A     192.168.136.136
[root@localhost named]# systemctl restart named
在win10中查看一下解析地址
修改一下kgc的ip地址
[root@localhost named]# cd /usr/local/nginx/conf/
[root@localhost conf]# vim nginx.conf
vim /etc/nginx.confserver {listen 192.168.136.136:80;server_name www.kgc.com;location / {root /var/www/html/kgc;index  index.html index.htm; }
}server {listen 192.168.136.10:80;server_name www.benet.com;location / {root /var/www/html/benet;index  index.html index.htm;}
}
验证一下是否成功并开启
[root@localhost conf]# nginx -t
nginx: the configuration file /usr/local/nginx/conf/nginx.conf syntax is ok
nginx: configuration file /usr/local/nginx/conf/nginx.conf test is successful
[root@localhost conf]# service nginx restart
基于用IP地址访问域名
[root@localhost conf]# vim nginx.conf
开启服务
[root@localhost conf]# service nginx restart
开一台win7的服务器
解析一下地址
网页查看一下
win10的网页查看
结论:当我们配置没有问题时候可以找别的方法去解决,比如换一台客户终端测试(可能是客户端的问题)
本文来自互联网用户投稿,文章观点仅代表作者本人,不代表本站立场,不承担相关法律责任。如若转载,请注明出处。 如若内容造成侵权/违法违规/事实不符,请点击【内容举报】进行投诉反馈!