Small Tools(3) 集成Knife4j3.0.3接口文档
文章目录
- 一、前言
- 二、swagger公共模块抽取
- 1、引入依赖
- 2、Knife4j配置类
- 3、application-swagger.yml
- 三、各微服务接口文档
- 1、引入swagger公共模块
- 2、服务模块`bootstrap.yml`
- 3、公共基础配置`bootstrap.yaml`
- 四、Gateway聚合接口文档
- 1、引入依赖
- 2、动态聚合各个服务的swagger接口
- 五、swagger集成oauth2密码模式进行授权认证
- 六、源码
一、前言
本文将集成knife4j-spring-boot-starter3.0.3接口文档 & gateway聚合各服务接口文档 & 集成oauth2的密码模式进行授权认证登录
<spring-boot.version>2.6.7spring-boot.version>
<spring-cloud.version>2021.0.1spring-cloud.version>
<spring-cloud-alibaba.version>2021.0.1.0spring-cloud-alibaba.version>
这里将swagger文档单独抽取了一个公共模块统一管理
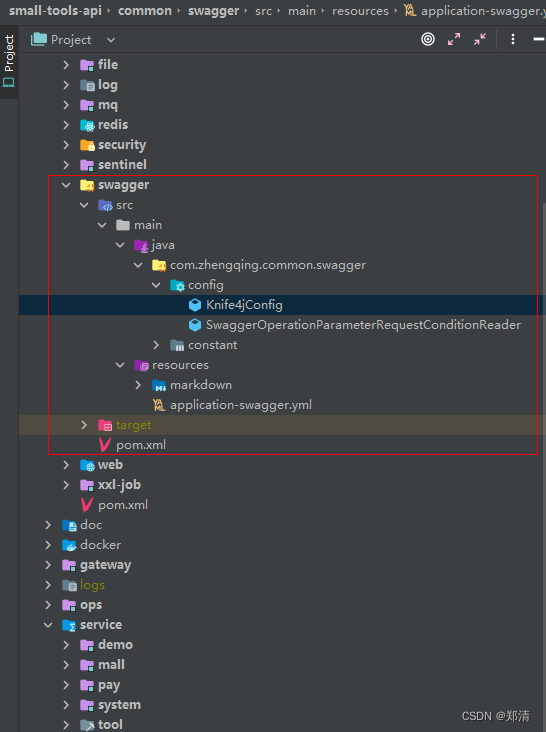
二、swagger公共模块抽取
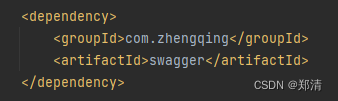
1、引入依赖
<dependency><groupId>com.github.xiaoymingroupId><artifactId>knife4j-spring-boot-starterartifactId><version>3.0.3version>
dependency>
2、Knife4j配置类
tips: 这里使用的是swagger2.0的api文档方式,因为在3里面集成oauth2认证发现没有表单认证登录了,不太友好,也没看见官方文档有说明,如果之后有发现,再更新到小编的demo源码中吧
^_^

@Slf4j
@Configuration
@EnableSwagger2WebMvc
// 对JSR303提供支持
@Import(BeanValidatorPluginsConfiguration.class)
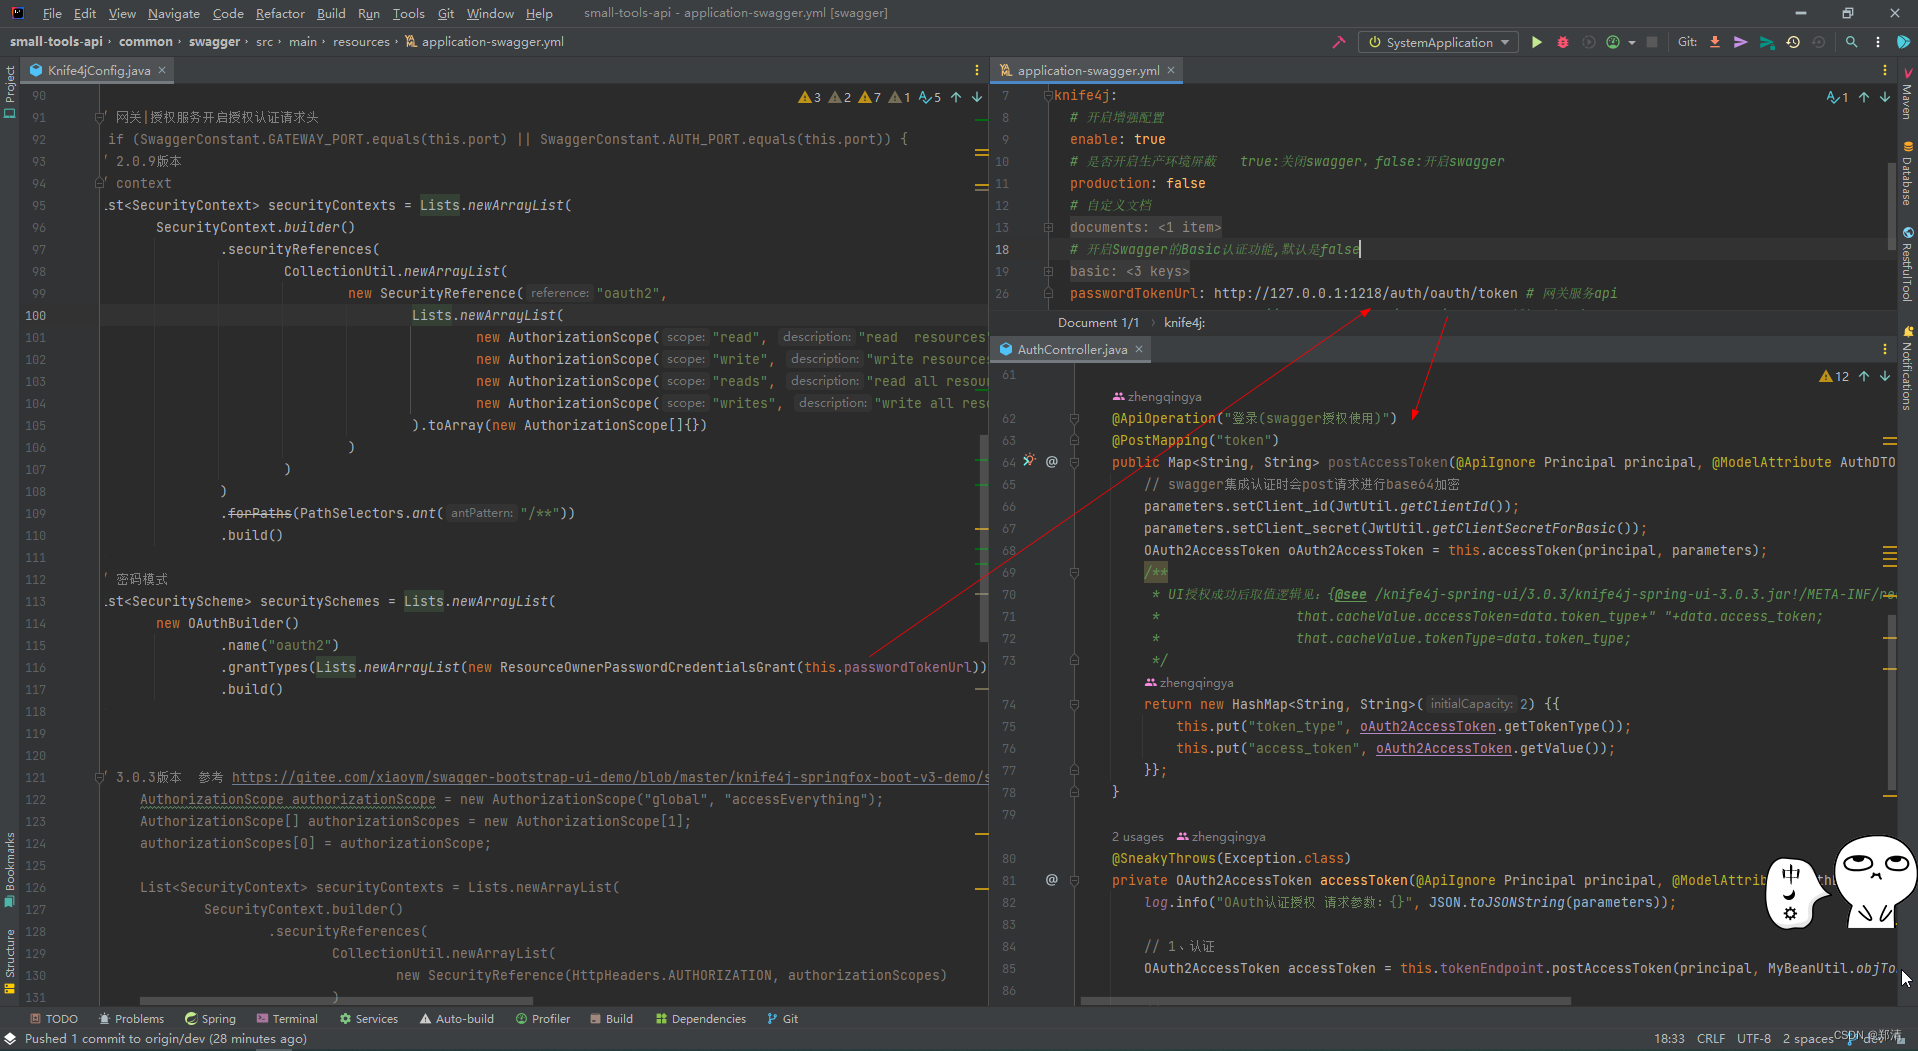
public class Knife4jConfig {@Value("${spring.application.name}")private String applicationName;@Value("${small-tools.ip}")private String ip;@Value("${server.port}")private String port;@Value("${knife4j.passwordTokenUrl}")private String passwordTokenUrl;@Resourceprivate OpenApiExtensionResolver openApiExtensionResolver;@Beanpublic Docket defaultApi() {Docket docket = new Docket(DocumentationType.SWAGGER_2).apiInfo(this.apiInfo()).groupName(this.applicationName).select()// 添加@Api注解才显示.apis(RequestHandlerSelectors.withClassAnnotation(Api.class))
// .apis(RequestHandlerSelectors.basePackage("com.zhengqing")).paths(PathSelectors.any()).build()// 插件扩展 -- ex:自定义md文档.extensions(this.openApiExtensionResolver.buildExtensions(this.applicationName))// 默认全局参数.globalRequestParameters(Lists.newArrayList(new RequestParameterBuilder().name(SwaggerConstant.TENANT_ID).description("租户ID").in(ParameterType.HEADER).required(true).build()));// contextList<SecurityContext> securityContexts = Lists.newArrayList(SecurityContext.builder().securityReferences(CollectionUtil.newArrayList(new SecurityReference("oauth2",Lists.newArrayList(new AuthorizationScope("read", "read resources"),new AuthorizationScope("write", "write resources"),new AuthorizationScope("reads", "read all resources"),new AuthorizationScope("writes", "write all resources")).toArray(new AuthorizationScope[]{})))).forPaths(PathSelectors.ant("/**")).build());// 密码模式List<SecurityScheme> securitySchemes = Lists.newArrayList(new OAuthBuilder().name("oauth2").grantTypes(Lists.newArrayList(new ResourceOwnerPasswordCredentialsGrant(this.passwordTokenUrl))).build());docket.securityContexts(securityContexts).securitySchemes(securitySchemes);return docket;}/*** swagger-api接口描述信息*/private ApiInfo apiInfo() {return new ApiInfoBuilder().title("API文档").description("API文档").termsOfServiceUrl(String.format("%s:%s/", this.ip, this.port)).contact(new Contact("zhengqingya","https://gitee.com/zhengqingya","960869719@qq.com")).version("1.0.0").build();}/*** 解决Spring Boot 2.6.x以上 与 Swagger 3.0.0 不兼容问题* 参考 https://github.com/springfox/springfox/issues/3462*/@Beanpublic WebMvcEndpointHandlerMapping webEndpointServletHandlerMapping(WebEndpointsSupplier webEndpointsSupplier,ServletEndpointsSupplier servletEndpointsSupplier,ControllerEndpointsSupplier controllerEndpointsSupplier,EndpointMediaTypes endpointMediaTypes,CorsEndpointProperties corsProperties,WebEndpointProperties webEndpointProperties,Environment environment) {List<ExposableEndpoint<?>> allEndpoints = new ArrayList();Collection<ExposableWebEndpoint> webEndpoints = webEndpointsSupplier.getEndpoints();allEndpoints.addAll(webEndpoints);allEndpoints.addAll(servletEndpointsSupplier.getEndpoints());allEndpoints.addAll(controllerEndpointsSupplier.getEndpoints());String basePath = webEndpointProperties.getBasePath();EndpointMapping endpointMapping = new EndpointMapping(basePath);boolean shouldRegisterLinksMapping = this.shouldRegisterLinksMapping(webEndpointProperties, environment, basePath);return new WebMvcEndpointHandlerMapping(endpointMapping, webEndpoints, endpointMediaTypes, corsProperties.toCorsConfiguration(), new EndpointLinksResolver(allEndpoints, basePath), shouldRegisterLinksMapping, null);}private boolean shouldRegisterLinksMapping(WebEndpointProperties webEndpointProperties, Environment environment, String basePath) {return webEndpointProperties.getDiscovery().isEnabled() && (StringUtils.hasText(basePath) || ManagementPortType.get(environment).equals(ManagementPortType.DIFFERENT));}}
3、application-swagger.yml
spring:mvc:pathmatch:matching-strategy: ANT_PATH_MATCHER # 解决springboot高版本Knife4j报错问题# https://doc.xiaominfo.com/knife4j
knife4j:# 开启增强配置enable: true# 是否开启生产环境屏蔽   true:关闭swagger,false:开启swaggerproduction: false# 自定义文档documents:- group: demoname: 测试自定义标题分组# 某一个文件夹下所有的.md文件locations: classpath:markdown/*# 开启Swagger的Basic认证功能,默认是falsebasic:# 是否开启认证enable: false# Basic认证用户名username: admin# Basic认证密码password: 123456passwordTokenUrl: http://127.0.0.1:1218/auth/oauth/token # 网关服务api
#  passwordTokenUrl: http://127.0.0.1:1219/oauth/token # 授权服务api
三、各微服务接口文档
1、引入swagger公共模块
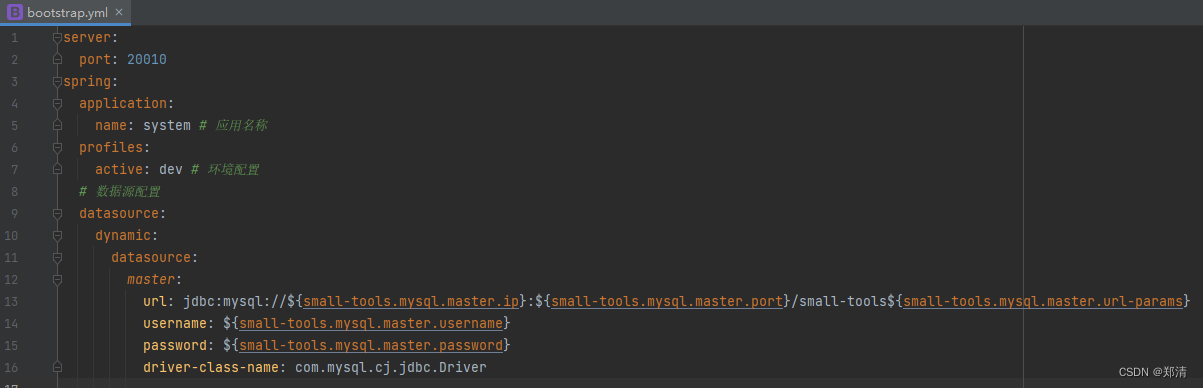
2、服务模块bootstrap.yml
填写各服务的基本信息即可(端口、应用名…)
3、公共基础配置bootstrap.yaml
这里小编将各服务所需的公共配置都抽取到bootstrap.yaml方便之后统一管理各微服务配置
tips: yml配置文件优先级从高到低
bootstrap.yml>bootstrap.yaml>application.yml
在本项目中
基础公共配置:small-tools-api/common/web/src/main/resources/bootstrap.yaml=> 基础组件配置
其它模块配置:small-tools-api/service/system/src/main/resources/bootstrap.yml=> 各模块端口、应用名称等

四、Gateway聚合接口文档
1、引入依赖
<dependency><groupId>com.github.xiaoymingroupId><artifactId>knife4j-spring-boot-starterartifactId><version>3.0.3version>
dependency>
2、动态聚合各个服务的swagger接口
@Primary
@Component
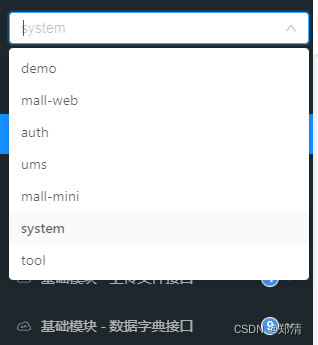
public class MySwaggerResourcesProvider implements SwaggerResourcesProvider {/*** swagger默认的url后缀* {@link com.zhengqing.common.swagger.config.Knife4jConfig}*/private static final String SWAGGER_URL = "/v2/api-docs?group=";/*** nacos注册中心*/@Resourceprivate DiscoveryClient discoveryClient;/*** 网关应用名称*/@Value("${spring.application.name}")private String gatewayServiceName;@Overridepublic List<SwaggerResource> get() {// swagger下拉列表服务资源List<SwaggerResource> resourceList = new ArrayList<>();// 动态获取nacos注册中心上的服务实例名List<String> nacosServiceNameList = this.discoveryClient.getServices();for (String instance : nacosServiceNameList) {String instanceName = instance.toLowerCase();if (this.gatewayServiceName.equals(instanceName)) {continue;}// 拼接swagger访问url,样式为`/demo/v2/api-info?group=demo`,当网关调用这个接口时,会自动通过负载均衡寻找对应的主机String url = "/" + instanceName + SWAGGER_URL + instanceName;SwaggerResource swaggerResource = new SwaggerResource();swaggerResource.setUrl(url);swaggerResource.setName(instance);resourceList.add(swaggerResource);}return resourceList;}}
swagger-ui.html需要访问的接口
@RestController
@RequiredArgsConstructor
@RequestMapping("/swagger-resources")
public class SwaggerHandler {private final MySwaggerResourcesProvider mySwaggerResourcesProvider;/*** 权限处理器*/@GetMapping("/configuration/security")public ResponseEntity<SecurityConfiguration> securityConfiguration() {return new ResponseEntity<>(SecurityConfigurationBuilder.builder().build(), HttpStatus.OK);}/*** UI处理器*/@GetMapping("/configuration/ui")public ResponseEntity<UiConfiguration> uiConfiguration() {return new ResponseEntity<>(UiConfigurationBuilder.builder().build(), HttpStatus.OK);}/*** 聚合各个服务的swagger接口*/@GetMapping("")public ResponseEntity swaggerResources() {return new ResponseEntity<>(mySwaggerResourcesProvider.get(), HttpStatus.OK);}}
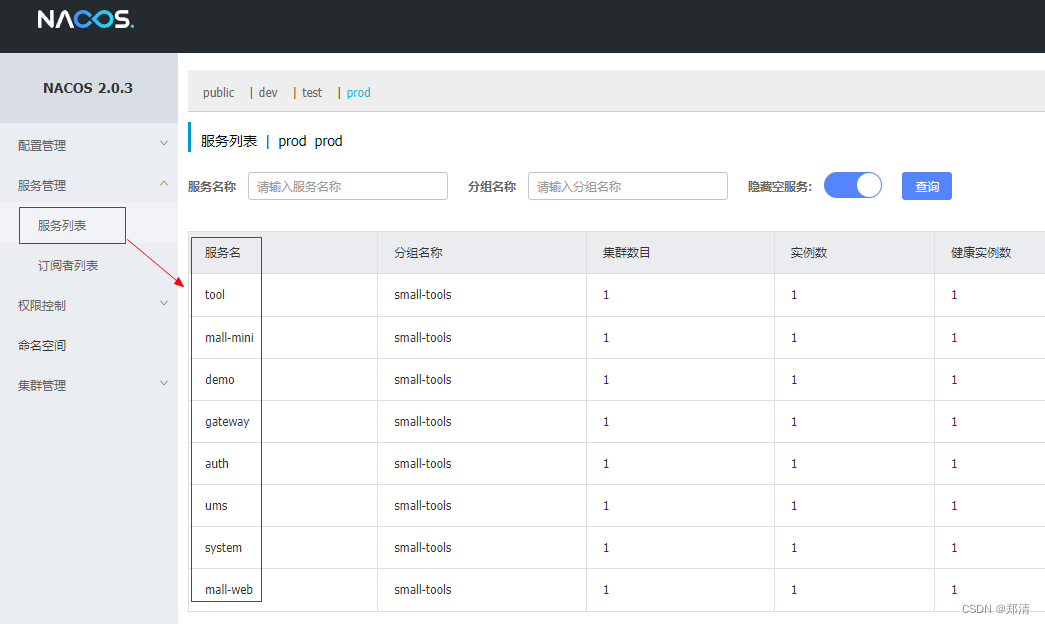
此方式会动态拉取我们nacos上面已注册的服务名进行拼接访问我们各微服务的接口文档
ex:/demo/v2/api-info?group=demo
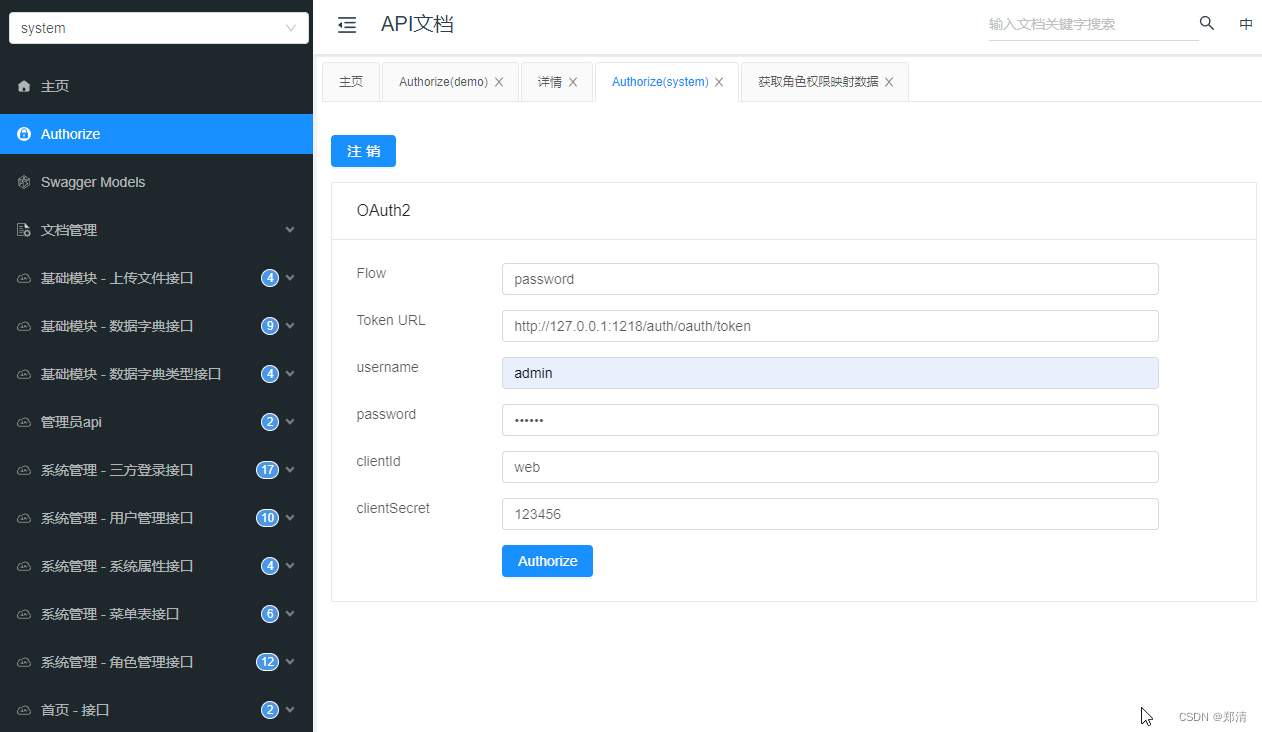
五、swagger集成oauth2密码模式进行授权认证
在swagger公共模块中已经引入了oauth2的认证
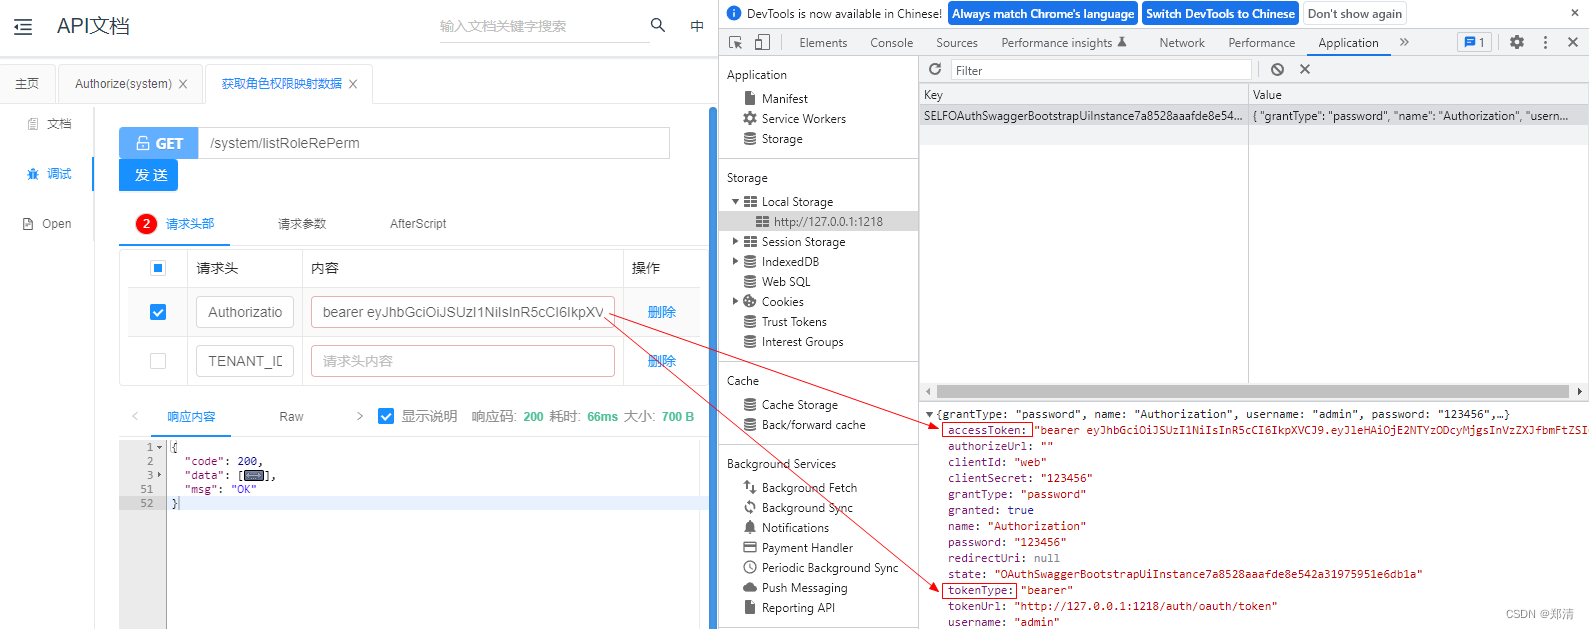
一旦认证成功后,刷新页面会自动刷新Authorization的值方便我们去测试api
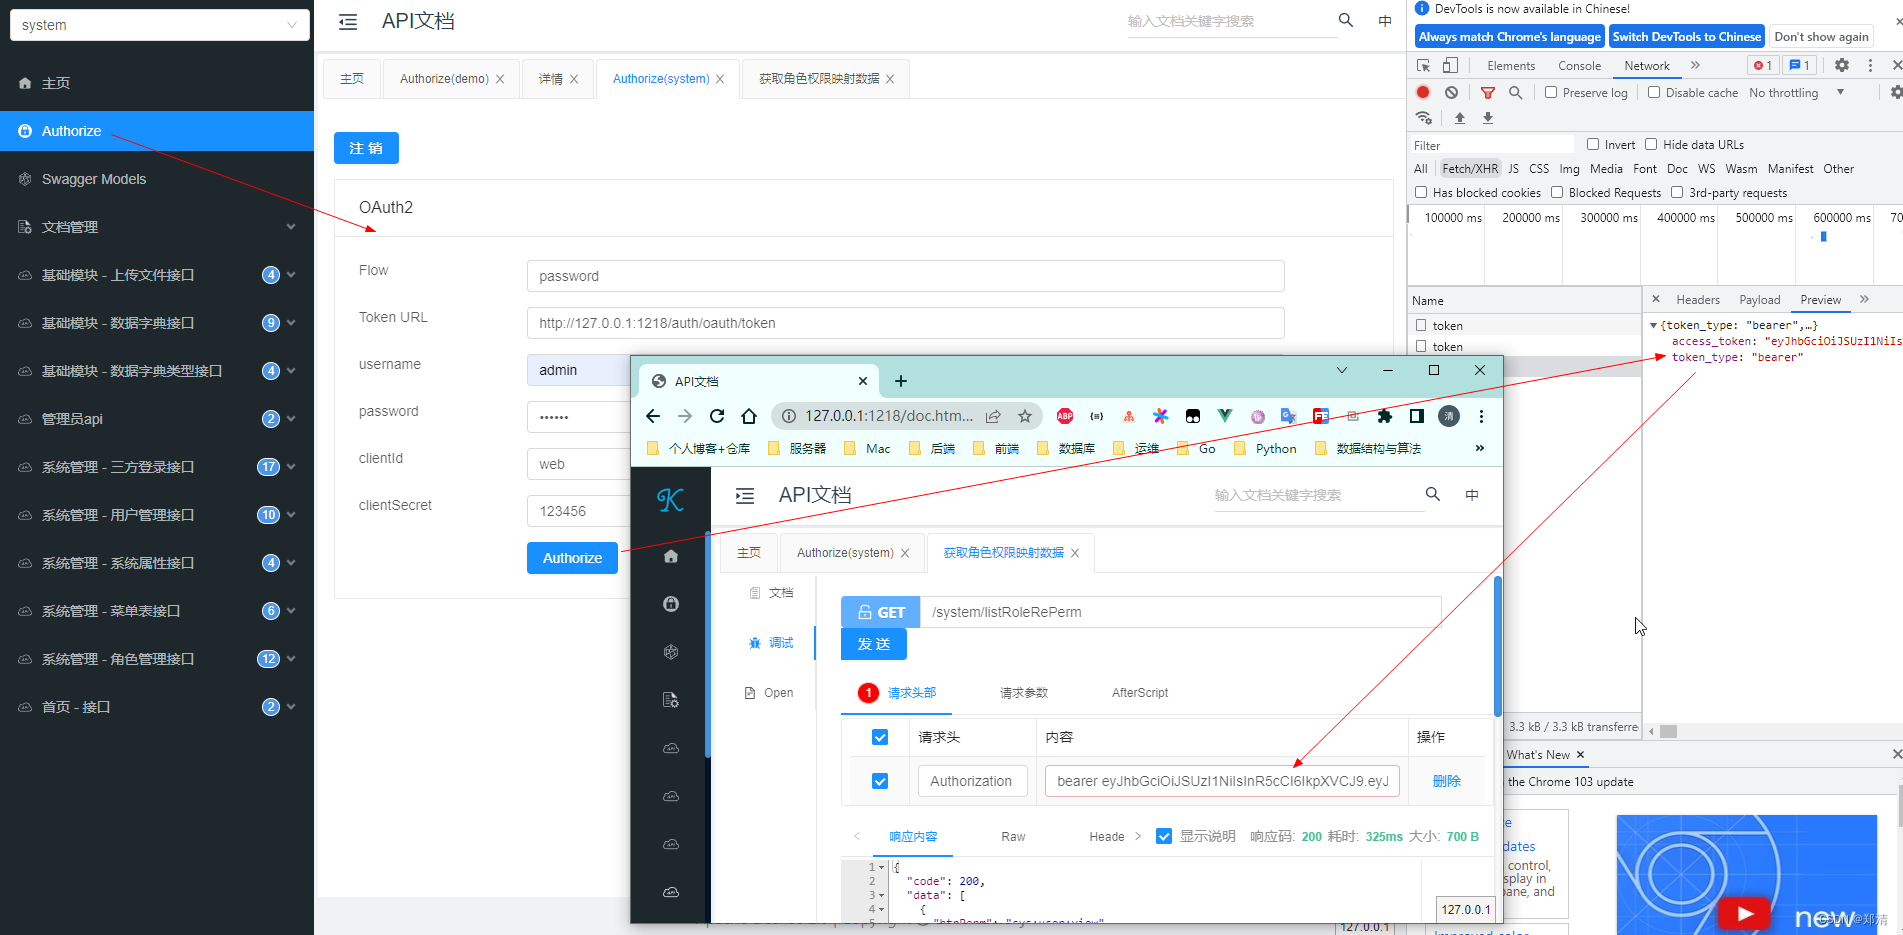
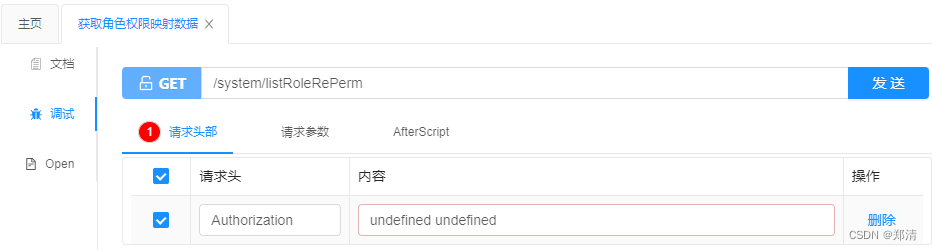
这里需要说明的是认证接口授权成功后Authorization取值问题
一般后端都会有统一响应体
{"code": 200,"data": [],"msg": "OK"
}
当我们有了统一响应体之后Authorization值便会出现undefined undefined的问题
我们可以打开浏览器查看前端UI缓存值发现取值tokenType &accessToken
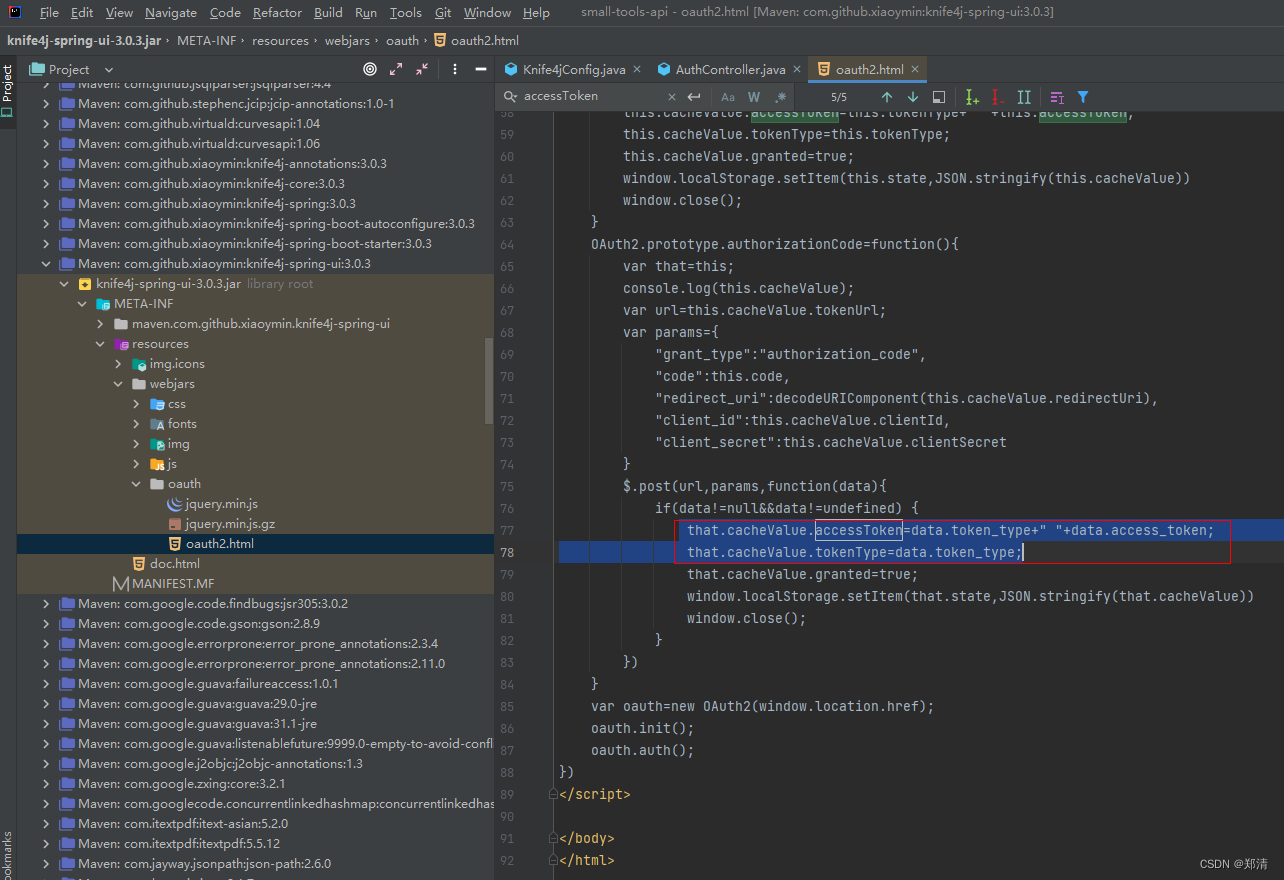
再去Knife4j的前端UI源码中搜索相关值,可以看见取值逻辑为
$.post(url,params,function(data){if(data!=null&&data!=undefined) {that.cacheValue.accessToken=data.token_type+" "+data.access_token;that.cacheValue.tokenType=data.token_type;that.cacheValue.granted=true;window.localStorage.setItem(that.state,JSON.stringify(that.cacheValue))window.close();}
})
于是乎在我们的授权认证成功后修改返回所需字段
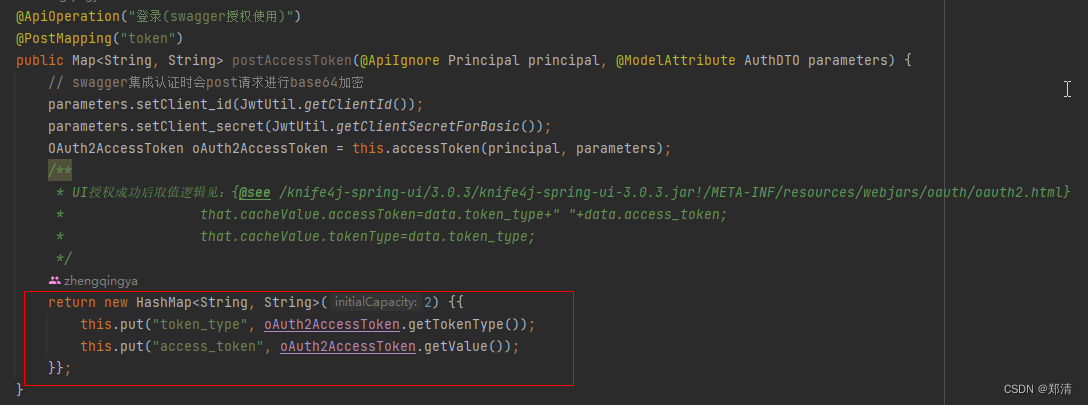
再次认证后Authorization取值恢复正常^_^

六、源码
tips: 最近项目在重构,最新代码放在dev分支上了
https://gitee.com/zhengqingya/small-tools
今日分享语句:
无论何时,不管怎样,我也绝不允许自己有一点点心丧气。
本文来自互联网用户投稿,文章观点仅代表作者本人,不代表本站立场,不承担相关法律责任。如若转载,请注明出处。 如若内容造成侵权/违法违规/事实不符,请点击【内容举报】进行投诉反馈!