openstack_stein搭建
Openstack stein搭建
- 环境
- 我的规划
- 安全
- 主机名,yum源等
- NTP(可选)
- chrony部署
- 数据库(controller)
- 消息队列(controller)
- 安装Etcd(controller)
- 认证服务(controller)
- 数据库
- 安装和配置
- 镜像服务(glance controller)
- 数据库
- openstack添加服务
- 安装和配置
- 验证
- Placement服务安装
- 数据库
- openstack添加服务
- 安装和配置
- 验证:
- nova(controller)
- 数据库
- openstack配置
- 安装和配置
- nova(compute)
- 安装和配置
- 验证(controller)
- 网络服务neutron(controller)
- 数据库
- openstack服务
- 设置网络
- 配置下面的部分
- 计算节点的neutron(compute)
- 安装和配置
- 配置网络
- 剩下的部分
- 验证:
- web界面horizon(controller)
- 问题集合
- placement出错
- keystone出错
- glance出错
- dashboard出错
- 还有一个错误是因为驱动的问题
- 创建实例出错
- 1、Host 'compute' is not mapped to any cell
- 2、4336 ERROR nova.compute.manager [req-7c1bc64e-74da-4152-84fd-45eff53ed5ee 25b99096b60849e9b5a66dde8ce879cb dba851953a1446cfb651022214d6d486 - default default] [instance: ee763bf9-25ae-48e2-8a52-524695e9b4f1] Failed to allocate network(s): VirtualInterfaceCreateException: Virtual Interface creation failed
- 3、There are not enough hosts available.
- 4、oslo.messaging._drivers.impl_rabbit [-] Unexpected error during heartbeat thread processing, retrying...错误
环境
我的规划
注意: 我的教程有很多错误,如果发现了错误请麻烦给我留个言
controller IP: 192.168.3.104(管理IP),192.168.101.131(提供者IP)
compute IP:192.168.3.103(管理IP),192.168.101.130(提供者IP)
密码全为: 123456
官方文档的配置:
comtroller IP: 10.0.0.11
compute IP: 10.0.0.31
技巧:
可以使用grep过滤要配置的文件,很多文件都是没有内容的,只有一个标签
grep -vE ‘^#|^$’ 文件路径
##配置进度
controller: glance节点已经配完
compute:配置以及全部配完
安全
controoler: openssl rand -hex 10 > rand.pass
官方文档建议admin使用这个命令生成的的字符串当密码
主机名,yum源等
所有节点:
hostnamectl set-hostname controller
hostnamectl set-hostname compute
yum -y install epel-release centos-release-openstack-stein
yum -y install python-openstackclient openstack-selinux
yum  -y  upgrade
配置hosts文件
删除网卡配置文件中关于UUID和HWADDR的内容
检查时间是否一致date
NTP(可选)
chrony部署
(阿里的ntp服务器)
ntp1.aliyun.com
ntp2.aliyun.com
ntp3.aliyun.com
ntp4.aliyun.com
ntp5.aliyun.com
controller节点
yum install chrony -y
vim /etc/chrony.conf
server 127.0.0.1 iburst
allow 0.0.0.0/0
other节点
yum -y install chrony
vim /etc/chrony.conf
server controller iburst
验证
systemctl restart chronyd
systemctl enable chronyd
chronyc sources
数据库(controller)
yum -y install mariadb mariadb-server python2-PyMySQLvim  /etc/my.cnf.d/openstack.cnf[mysqld]
bind-address = 192.168.3.104default-storage-engine = innodb
innodb_file_per_table = on
max_connections = 4096
collation-server = utf8_general_ci
character-set-server = utf8systemctl enable mariadb.service
systemctl start mariadb.service运行 mysql_secure_installation设置密码
消息队列(controller)
yum install rabbitmq-server  -y
systemctl enable rabbitmq-server.service
systemctl start rabbitmq-server.servicerabbitmqctl add_user openstack 123456
rabbitmqctl set_permissions openstack ".*" ".*" ".*"
(显示:Setting permissions for user "openstack" in vhost "/" 表示成功)
安装Memcached(controller)
yum install memcached python-memcached -y
vim /etc/sysconfig/memcached(修改)
OPTIONS="-l 127.0.0.1,::1,controller"systemctl enable memcached.service
systemctl start memcached.service
安装Etcd(controller)
yum -y install etcd
编辑:vim  /etc/etcd/etcd.conf 修改: ETCD_INITIAL_CLUSTER, ETCD_INITIAL_ADVERTISE_PEER_URLS, ETCD_ADVERTISE_CLIENT_URLS, ETCD_LISTEN_CLIENT_URLS 类似下面的:#[Member]ETCD_DATA_DIR="/var/lib/etcd/default.etcd"ETCD_LISTEN_PEER_URLS="http://192.168.3.104:2380"ETCD_LISTEN_CLIENT_URLS="http://192.168.3.104:2379"ETCD_NAME="controller"#[Clustering]ETCD_INITIAL_ADVERTISE_PEER_URLS="http://192.168.3.104:2380"ETCD_ADVERTISE_CLIENT_URLS="http://192.168.3.104:2379"ETCD_INITIAL_CLUSTER="controller=http://192.168.3.104:2380"ETCD_INITIAL_CLUSTER_TOKEN="etcd-cluster-01"ETCD_INITIAL_CLUSTER_STATE="new"systemctl enable etcd
systemctl start etcd
认证服务(controller)
数据库
mysql -uroot -p123456CREATE DATABASE keystone;
GRANT ALL PRIVILEGES ON keystone.* TO 'keystone'@'localhost'  IDENTIFIED BY '123456';
GRANT ALL PRIVILEGES ON keystone.* TO 'keystone'@'%'  IDENTIFIED BY  '123456';
安装和配置
yum install openstack-keystone httpd mod_wsgi -y
vim /etc/keystone/keystone.conf
[database]
connection = mysql+pymysql://keystone:123456@controller/keystone
[token]
provider = fernet回到命令界面su -s /bin/sh -c "keystone-manage db_sync" keystonekeystone-manage fernet_setup --keystone-user keystone --keystone-group keystonekeystone-manage credential_setup --keystone-user keystone --keystone-group keystonekeystone-manage bootstrap --bootstrap-password 123456 \--bootstrap-admin-url http://controller:5000/v3/ \--bootstrap-internal-url http://controller:5000/v3/ \--bootstrap-public-url http://controller:5000/v3/ \--bootstrap-region-id RegionOne配置apache服务器vim /etc/httpd/conf/httpd.confServerName controllerln -s /usr/share/keystone/wsgi-keystone.conf /etc/httpd/conf.d/systemctl enable httpd.service
systemctl start httpd.service配置管理用户:
export OS_USERNAME=admin
export OS_PASSWORD=123456
export OS_PROJECT_NAME=admin
export OS_USER_DOMAIN_NAME=Default
export OS_PROJECT_DOMAIN_NAME=Default
export OS_AUTH_URL=http://controller:5000/v3
export OS_IDENTITY_API_VERSION=3
验证:openstack token issue创建域和用户:
openstack domain create --description "An Example Domain" example
openstack project create --domain default \--description "Service Project" service
openstack project create --domain default \--description "Demo Project" myproject
openstack user create --domain default \--password-prompt myuser
openstack role create myrole
openstack role add --project myproject --user myuser myrole
验证:
unset OS_AUTH_URL OS_PASSWORD
openstack --os-auth-url http://controller:5000/v3 \--os-project-domain-name Default --os-user-domain-name Default \--os-project-name admin --os-username admin token issueopenstack --os-auth-url http://controller:5000/v3 \--os-project-domain-name Default --os-user-domain-name Default \--os-project-name myproject --os-username myuser token issue
让你输入密码,然后有正确的显示为正常
镜像服务(glance controller)
数据库
CREATE DATABASE glance;GRANT ALL PRIVILEGES ON glance.* TO 'glance'@'localhost' IDENTIFIED BY '123456';GRANT ALL PRIVILEGES ON glance.* TO 'glance'@'%' IDENTIFIED BY '123456';
openstack添加服务
openstack user create --domain default --password-prompt glance
openstack role add --project service --user glance admin
openstack service create --name glance  --description "OpenStack Image" image创建glance API端点:openstack endpoint create --region RegionOne \image public http://controller:9292openstack endpoint create --region RegionOne \image internal http://controller:9292openstack endpoint create --region RegionOne \image admin http://controller:9292
安装和配置
yum install openstack-glance -y
vim /etc/glance/glance-api.conf
[database]connection = mysql+pymysql://glance:123456@controller/glance[keystone_authtoken]www_authenticate_uri = http://controller:5000auth_url = http://controller:5000memcached_servers = controller:11211auth_type = passwordproject_domain_name = Defaultuser_domain_name = Defaultproject_name = serviceusername = glancepassword = 123456[paste_deploy]flavor = keystone[glance_store]stores = file,httpdefault_store = filefilesystem_store_datadir = /var/lib/glance/images/
vim /etc/glance/glance-registry.conf
[database]
connection = mysql+pymysql://glance:123456@controller/glance
[keystone_authtoken]
www_authenticate_uri = http://controller:5000
auth_url = http://controller:5000
memcached_servers = controller:11211
auth_type = password
project_domain_name = Default
user_domain_name = Default
project_name = service
username = glance
password = 123456[paste_deploy]
flavor = keystonesu -s /bin/sh -c "glance-manage db_sync" glance
systemctl enable openstack-glance-api.service  openstack-glance-registry.service
systemctl start openstack-glance-api.service    openstack-glance-registry.service
验证
wget http://download.cirros-cloud.net/0.4.0/cirros-0.4.0-x86_64-disk.img
openstack image create "cirros"   --file cirros-0.4.0-x86_64-disk.img   --disk-format qcow2 --container-format bare   --public
openstack image list
Placement服务安装
数据库
CREATE DATABASE placement;
GRANT ALL PRIVILEGES ON placement.* TO 'placement'@'localhost'    IDENTIFIED BY '123456';
GRANT ALL PRIVILEGES ON placement.* TO 'placement'@'%'    IDENTIFIED BY '123456';
openstack添加服务
openstack user create --domain default --password-prompt placement
openstack role add --project service --user placement admin
添加目录API 端点
openstack service create --name placement \--description "Placement API" placement服务端点
openstack endpoint create --region RegionOne \placement public http://controller:8778
openstack endpoint create --region RegionOne \placement internal http://controller:8778
openstack endpoint create --region RegionOne \placement admin http://controller:8778
安装和配置
yum install openstack-placement-api -y
vim /etc/placement/placement.conf[placement_database]connection = mysql+pymysql://placement:123456@controller/placement[api]auth_strategy = keystone[keystone_authtoken]auth_url = http://controller:5000/v3memcached_servers = controller:11211auth_type = passwordproject_domain_name = Defaultuser_domain_name = Defaultproject_name = serviceusername = placementpassword = 123456
su -s /bin/sh -c "placement-manage db sync" placement
systemctl restart httpd
验证:
placement-status upgrade check
pip install osc-placement
openstack resource provider list
openstack --os-placement-api-version 1.2 resource class list --sort-column name
openstack --os-placement-api-version 1.6 trait list --sort-column namepip配置安装pipyum -y install python-pipvim /root/.pip/pip.conf[global]index-url = http://mirrors.aliyun.com/pypi/simple/[install]trusted-host=mirrors.aliyun.com
pip install --upgrade pip
nova(controller)
数据库
CREATE DATABASE nova_api;
CREATE DATABASE nova;
CREATE DATABASE nova_cell0;
GRANT ALL PRIVILEGES ON nova_api.* TO 'nova'@'localhost' \IDENTIFIED BY '123456';
GRANT ALL PRIVILEGES ON nova_api.* TO 'nova'@'%' \IDENTIFIED BY '123456';GRANT ALL PRIVILEGES ON nova.* TO 'nova'@'localhost' \IDENTIFIED BY '123456';
GRANT ALL PRIVILEGES ON nova.* TO 'nova'@'%' \IDENTIFIED BY '123456';GRANT ALL PRIVILEGES ON nova_cell0.* TO 'nova'@'localhost' \IDENTIFIED BY '123456';
GRANT ALL PRIVILEGES ON nova_cell0.* TO 'nova'@'%' \IDENTIFIED BY '123456';
openstack配置
openstack user create --domain default --password-prompt nova
openstack role add --project service --user nova admin创建服务实体:
openstack service create --name nova \--description "OpenStack Compute" compute
创建计算API服务点:
openstack endpoint create --region RegionOne \compute public http://controller:8774/v2.1openstack endpoint create --region RegionOne \compute internal http://controller:8774/v2.1openstack endpoint create --region RegionOne \compute admin http://controller:8774/v2.1
安装和配置
yum install openstack-nova-api openstack-nova-conductor \openstack-nova-novncproxy openstack-nova-scheduler -yvim /etc/nova/nova.conf[DEFAULT]enabled_apis = osapi_compute,metadatatransport_url = rabbit://openstack:123456@controllermy_ip = 192.168.3.104use_neutron = truefirewall_driver = nova.virt.firewall.NoopFirewallDriver[api_database]# ...connection = mysql+pymysql://nova:123456@controller/nova_api[database]# ...connection = mysql+pymysql://nova:123456@controller/nova[api]# ...auth_strategy = keystone[keystone_authtoken]# ...auth_url = http://controller:5000/v3memcached_servers = controller:11211auth_type = passwordproject_domain_name = Defaultuser_domain_name = Defaultproject_name = serviceusername = novapassword = 123456vim /etc/nova/nova.conf[neutron][vnc]enabled = true# ...server_listen = $my_ipserver_proxyclient_address = $my_ip[glance]# ...api_servers = http://controller:9292[oslo_concurrency]# ...lock_path = /var/lib/nova/tmp[placement]# ...region_name = RegionOneproject_domain_name = Defaultproject_name = serviceauth_type = passworduser_domain_name = Defaultauth_url = http://controller:5000/v3username = placementpassword = 123456填充数据库
su -s /bin/sh -c "nova-manage api_db sync" nova
su -s /bin/sh -c "nova-manage cell_v2 map_cell0" nova
su -s /bin/sh -c "nova-manage cell_v2 create_cell --name=cell1 --verbose" nova
su -s /bin/sh -c "nova-manage db sync" nova验证是否注册正确:
su -s /bin/sh -c "nova-manage cell_v2 list_cells" nova完全安装:
systemctl enable openstack-nova-api.service \openstack-nova-consoleauth openstack-nova-scheduler.service \openstack-nova-conductor.service openstack-nova-novncproxy.servicesystemctl start openstack-nova-api.service \openstack-nova-consoleauth openstack-nova-scheduler.service \openstack-nova-conductor.service openstack-nova-novncproxy.service这里需要注意:openstack-nova-consoleauth貌似已经不支持了,所以启动这个会报错,把consoleauth删除就行
nova(compute)
安装和配置
yum install openstack-nova-compute -y vim /etc/nova/nova.conf[DEFAULT]# ...enabled_apis = osapi_compute,metadatatransport_url = rabbit://openstack:123456@controllermy_ip = 192.168.3.103use_neutron = truefirewall_driver = nova.virt.firewall.NoopFirewallDriver[api]# ...auth_strategy = keystone[keystone_authtoken]# ...auth_url = http://controller:5000/v3memcached_servers = controller:11211auth_type = passwordproject_domain_name = Defaultuser_domain_name = Defaultproject_name = serviceusername = novapassword = 123456vim /etc/nova/nova.conf[neutron][vnc]enabled = trueserver_listen = 0.0.0.0server_proxyclient_address = $my_ipnovncproxy_base_url = http://controller:6080/vnc_auto.html[glance]api_servers = http://controller:9292[oslo_concurrency]lock_path = /var/lib/nova/tmp[placement]region_name = RegionOneproject_domain_name = Defaultproject_name = serviceauth_type = passworduser_domain_name = Defaultauth_url = http://controller:5000/v3username = placementpassword = 123456[libvirt]virt_type = qemu启动服务
systemctl enable libvirtd.service openstack-nova-compute.service
systemctl start libvirtd.service openstack-nova-compute.service*将计算节点添加到数据库(controller配置)*openstack compute service list --service nova-compute发现主机su -s /bin/sh -c "nova-manage cell_v2 discover_hosts --verbose" nova定期查找计算节点(可选)vim /etc/nova/nova.conf[scheduler]discover_hosts_in_cells_interval = 300
验证(controller)
openstack compute service list
or nova-manage cell_v2 discover_hosts --verbose
openstack catalog list
openstack image list
nova-status upgrade check
网络服务neutron(controller)
数据库
CREATE DATABASE neutron;
GRANT ALL PRIVILEGES ON neutron.* TO 'neutron'@'localhost' \IDENTIFIED BY '123456';
GRANT ALL PRIVILEGES ON neutron.* TO 'neutron'@'%' \IDENTIFIED BY '123456';
openstack服务
openstack user create --domain default --password-prompt neutron
openstack role add --project service --user neutron admin创建openstack服务实体:
openstack service create --name neutron \--description "OpenStack Networking" network创建opesntackAPI 端点:
openstack endpoint create --region RegionOne \network public http://controller:9696
openstack endpoint create --region RegionOne \network internal http://controller:9696
openstack endpoint create --region RegionOne \network admin http://controller:9696
设置网络
yum install openstack-neutron openstack-neutron-ml2 \openstack-neutron-linuxbridge ebtables -yvim /etc/neutron/neutron.conf[database]# ...connection = mysql+pymysql://neutron:123456@controller/neutron[DEFAULT]# ...core_plugin = ml2service_plugins = routerallow_overlapping_ips = truetransport_url = rabbit://openstack:123456@controllerauth_strategy = keystonenotify_nova_on_port_status_changes = truenotify_nova_on_port_data_changes = true[keystone_authtoken]# ...www_authenticate_uri = http://controller:5000auth_url = http://controller:5000memcached_servers = controller:11211auth_type = passwordproject_domain_name = defaultuser_domain_name = defaultproject_name = serviceusername = neutronpassword = 123456[nova]# ...auth_url = http://controller:5000auth_type = passwordproject_domain_name = defaultuser_domain_name = defaultregion_name = RegionOneproject_name = serviceusername = novapassword = 123456[oslo_concurrency]# ...lock_path = /var/lib/neutron/tmpvim /etc/neutron/plugins/ml2/ml2_conf.ini[ml2]# ...type_drivers = flat,vlan,vxlantenant_network_types = vxlanmechanism_drivers = linuxbridge,l2populationextension_drivers = port_security[ml2_type_flat]# ...flat_networks = provider[ml2_type_vxlan]# ...vni_ranges = 1:1000[securitygroup]# ...enable_ipset = truevim /etc/neutron/plugins/ml2/linuxbridge_agent.ini[linux_bridge]physical_interface_mappings = provider:eth1            (提供者网络)[vxlan]enable_vxlan = truelocal_ip = 192.168.3.104        (管理者IP)l2_population = true[securitygroup]# ...enable_security_group = truefirewall_driver = neutron.agent.linux.iptables_firewall.IptablesFirewallDriver开启net.bridge.brideg-nf-call-iptables
modprobe bridge
modprobe br_netfilter
vim /etc/sysctl.conf
net.bridge.bridge-nf-call-iptables=1
net.bridge.bridge-nf-call-ip6tables=1
sysctl -p 配置第三层代理
vim /etc/neutron/l3_agent.ini[DEFAULT]# ...interface_driver = linuxbridge配置DHCP代理
vim /etc/neutron/dhcp_agent.ini[DEFAULT]# ...interface_driver = linuxbridgedhcp_driver = neutron.agent.linux.dhcp.Dnsmasqenable_isolated_metadata = true
配置下面的部分
vim /etc/neutron/metadata_agent.ini[DEFAULT]nova_metadata_host = controllermetadata_proxy_shared_secret = METADATA_SECRET      (这里可以改,不过我就不改了)vim /etc/nova/nova.conf[neutron]url = http://controller:9696auth_url = http://controller:5000auth_type = passwordproject_domain_name = defaultuser_domain_name = defaultregion_name = RegionOneproject_name = serviceusername = neutronpassword = 123456service_metadata_proxy = truemetadata_proxy_shared_secret = METADATA_SECRET          (这里和上面对应)完成安装ln -s /etc/neutron/plugins/ml2/ml2_conf.ini /etc/neutron/plugin.ini
填充数据库su -s /bin/sh -c "neutron-db-manage --config-file /etc/neutron/neutron.conf \--config-file /etc/neutron/plugins/ml2/ml2_conf.ini upgrade head" neutron重启网络
systemctl restart openstack-nova-api.servicesystemctl enable neutron-server.service \neutron-linuxbridge-agent.service neutron-dhcp-agent.service \neutron-metadata-agent.service  neutron-l3-agent.servicesystemctl start neutron-server.service \neutron-linuxbridge-agent.service neutron-dhcp-agent.service \neutron-metadata-agent.service neutron-l3-agent.service
计算节点的neutron(compute)
安装和配置
yum install openstack-neutron-linuxbridge ebtables ipset -yvim /etc/neutron/neutron.conf[DEFAULT]# ...transport_url = rabbit://openstack:123456@controllerauth_strategy = keystone[keystone_authtoken]# ...www_authenticate_uri = http://controller:5000auth_url = http://controller:5000memcached_servers = controller:11211auth_type = passwordproject_domain_name = defaultuser_domain_name = defaultproject_name = serviceusername = neutronpassword = 123456[oslo_concurrency]# ...lock_path = /var/lib/neutron/tmp配置网络
vim /etc/neutron/plugins/ml2/linuxbridge_agent.ini[linux_bridge]physical_interface_mappings = provider:eth1       (提供者网络)[vxlan]enable_vxlan = truelocal_ip = 192.168.3.103l2_population = true[securitygroup]# ...enable_security_group = truefirewall_driver = neutron.agent.linux.iptables_firewall.IptablesFirewallDriver开启net.bridge.brideg-nf-call-iptables
modprobe bridge
modprobe br_netfilter
vim /etc/sysctl.conf
net.bridge.bridge-nf-call-iptables=1
net.bridge.bridge-nf-call-ip6tables=1
sysctl -p
剩下的部分
vim /etc/nova/nova.conf[neutron]# ...url = http://controller:9696auth_url = http://controller:5000auth_type = passwordproject_domain_name = defaultuser_domain_name = defaultregion_name = RegionOneproject_name = serviceusername = neutronpassword = 123456完成安装
systemctl restart openstack-nova-compute.service
systemctl enable neutron-linuxbridge-agent.service
systemctl start neutron-linuxbridge-agent.service
验证:
openstack extension list --network
openstack network agent list
(会显示l3和dhcp agent说明成功了)
web界面horizon(controller)
horizon好像先要安装django
yum install openstack-dashboard -y
vim  /etc/openstack-dashboard/local_settingsOPENSTACK_HOST = "controller"ALLOWED_HOSTS = ['*',]配置memcached和存储服务SESSION_ENGINE = 'django.contrib.sessions.backends.cache'CACHES = {'default': {'BACKEND': 'django.core.cache.backends.memcached.MemcachedCache','LOCATION': 'controller:11211',}}OPENSTACK_KEYSTONE_URL = "http://%s:5000/v3" % OPENSTACK_HOSTOPENSTACK_KEYSTONE_MULTIDOMAIN_SUPPORT = TrueOPENSTACK_API_VERSIONS = {"identity": 3,"image": 2,"volume": 3,}OPENSTACK_KEYSTONE_DEFAULT_DOMAIN = "Default"OPENSTACK_KEYSTONE_DEFAULT_ROLE = "user"OPENSTACK_NEUTRON_NETWORK = {...'enable_router': False,'enable_quotas': False,'enable_distributed_router': False,'enable_ha_router': False,'enable_lb': False,'enable_firewall': False,'enable_vpn': False,'enable_fip_topology_check': False,}vim /etc/httpd/conf.d/openstack-dashboard.conf
添加:WSGIApplicationGroup %{GLOBAL}完成安装
systemctl restart httpd.service memcached.service
访问:http://controller/dashboard
问题集合
placement出错
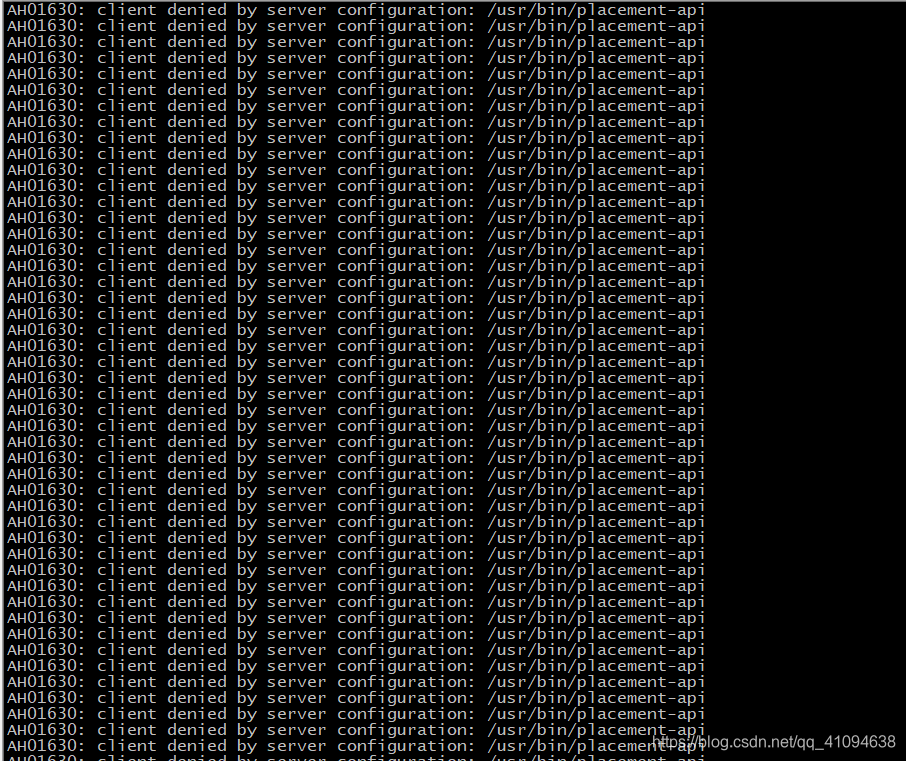
openstack resource provider list 没有结果显示
解决:
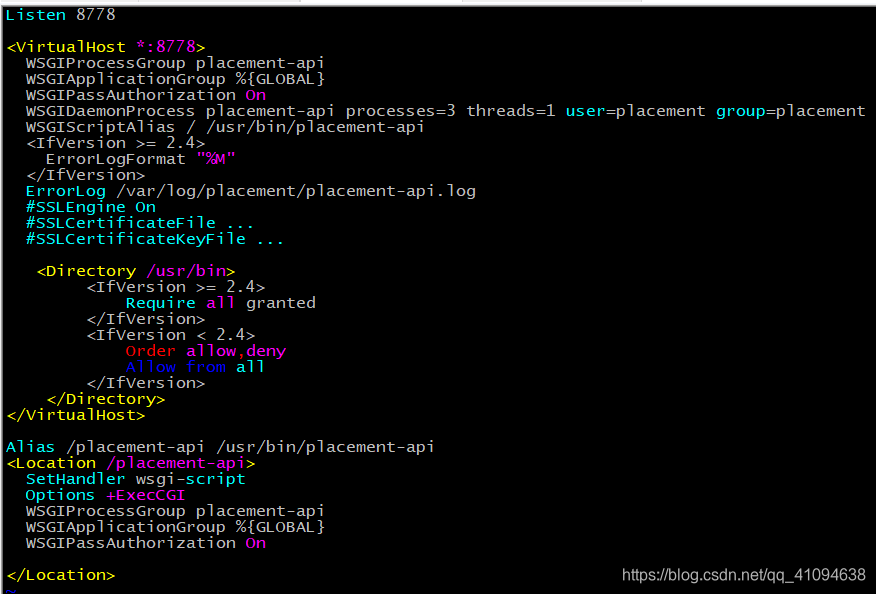
对配置文件/etc/httpd/conf.d/00-placement-api.conf 添加内容:
再次运行openstack resource provider list 验证:

keystone出错
同步数据时日志报错
#su -s /bin/sh -c “keystone-manage db_sync” keystone
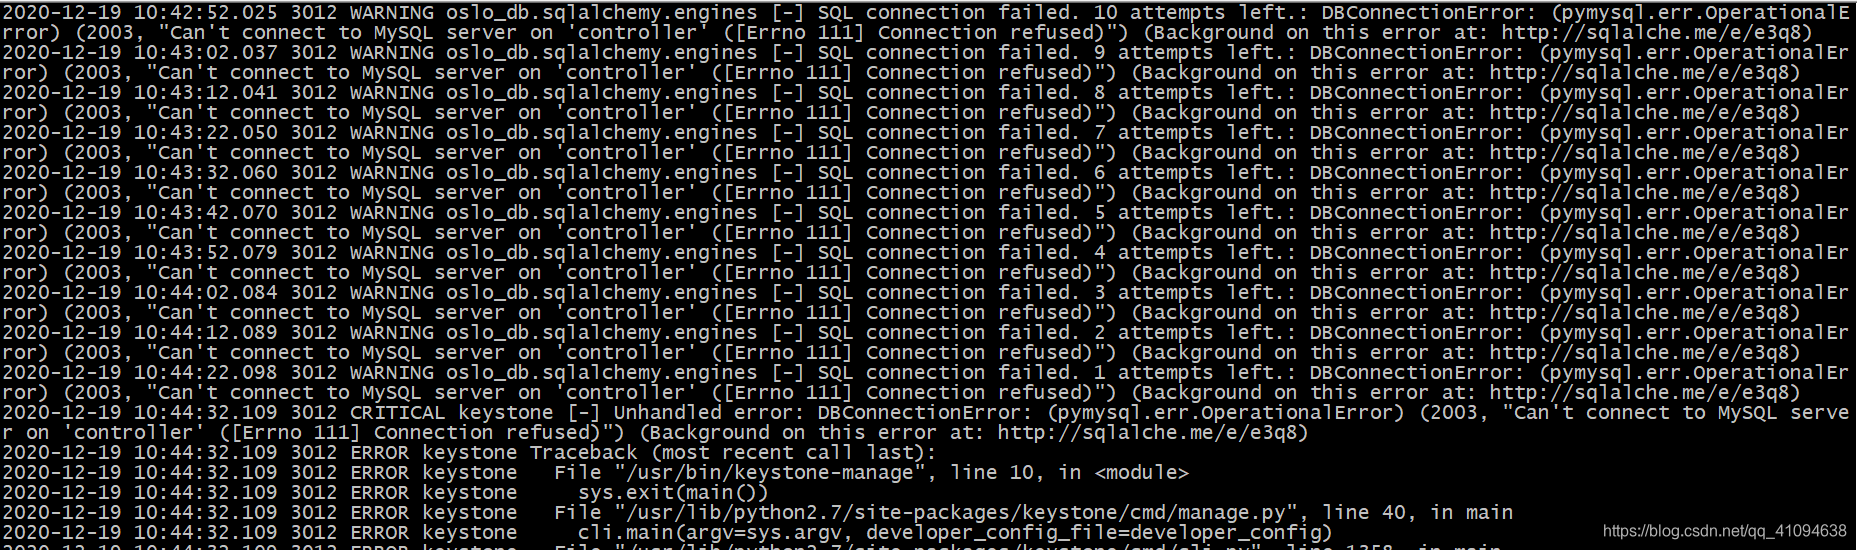
在知乎上查找到可能是/etc/hosts 文件的错误,但我hosts文件没问题(controler写的不是管理IP),我猜想是不是前面配置的时候写的是管理IP,而这里写的又不是管理IP,导致keystone查找IP出错,所以我把hosts文件的IP改为controller的管理IP,再次运行同步命令,这个就成功了。
原来的hosts文件,如下图
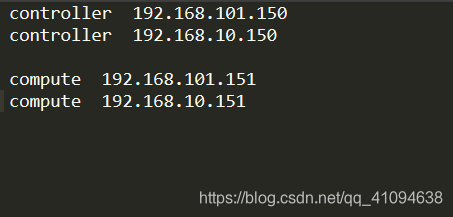
因为我controller的管理IP是192.168.10.150,然后keystone同步数据库时根据controller的解析找到第一个IP——192.168.101.150,导致出错;把第一行删掉或者换到下一行就可以解决这个问题
glance出错
配置完成后,上传镜像报服务器内部错误,查看glance日志发现好像数据库报错,但仔细看了数据库的配置貌似没有配错, 哪位仁兄发现哪里配错了麻烦留言一下
报错信息:
HTTP 500 Internal Server Error: The server has either erred or is incapable of performing the requested operation.
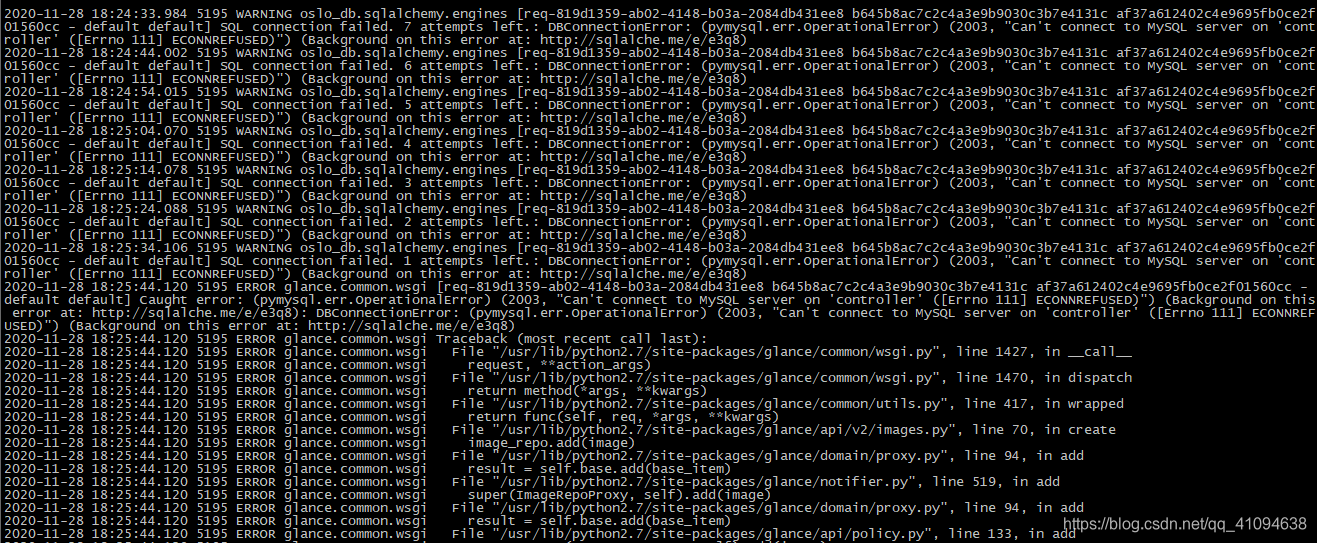
问题已解决:(同keystone数据库同步失败的原因一样)
尴尬:我原来hosts中controller的IP有两个,删除掉多余的,只留一个管理IP的映射,结果就不报错了
dashboard出错
创建网络时出现错误
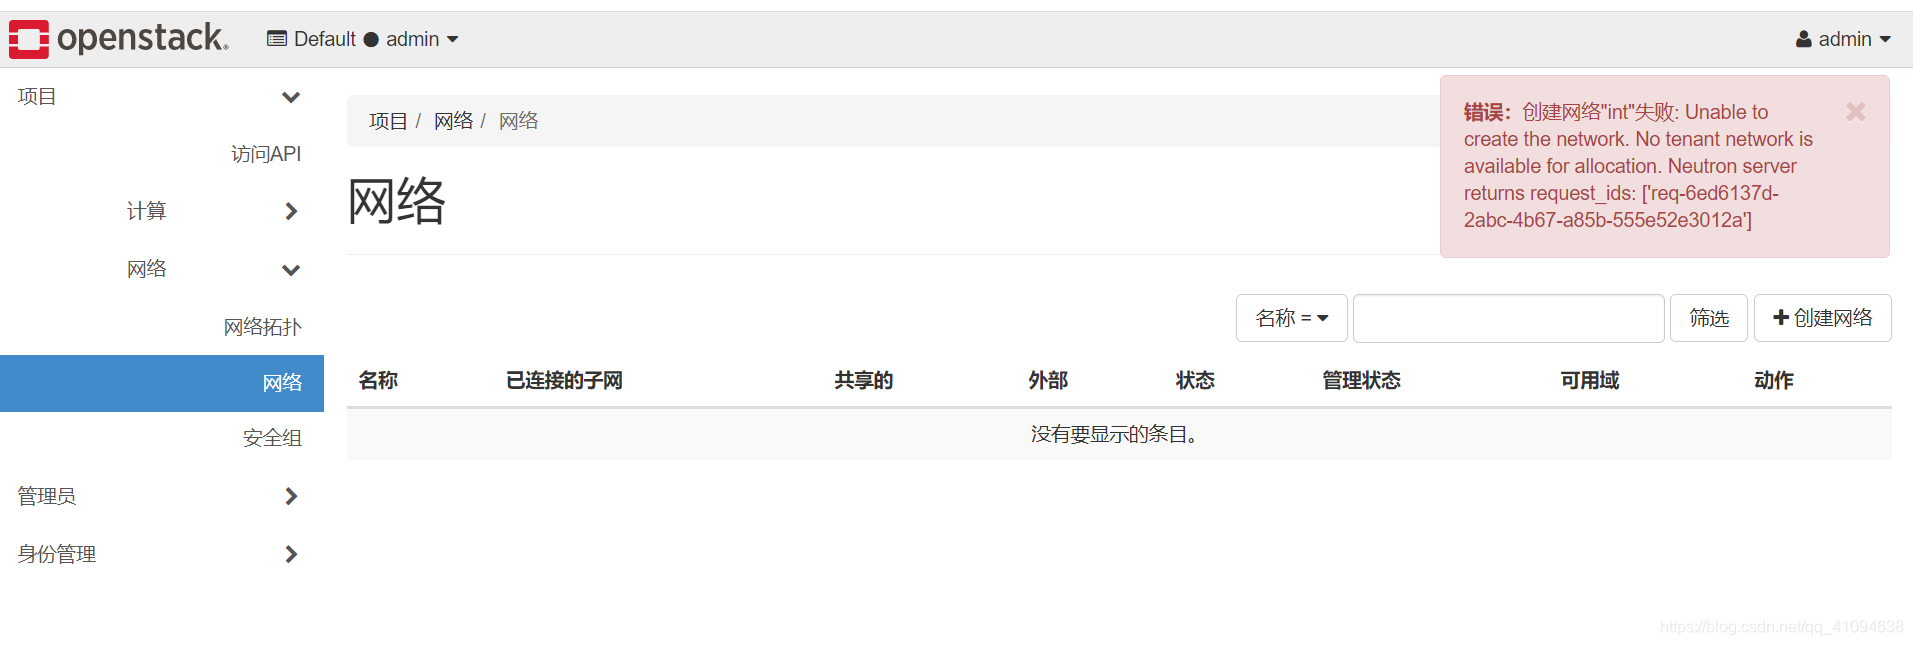
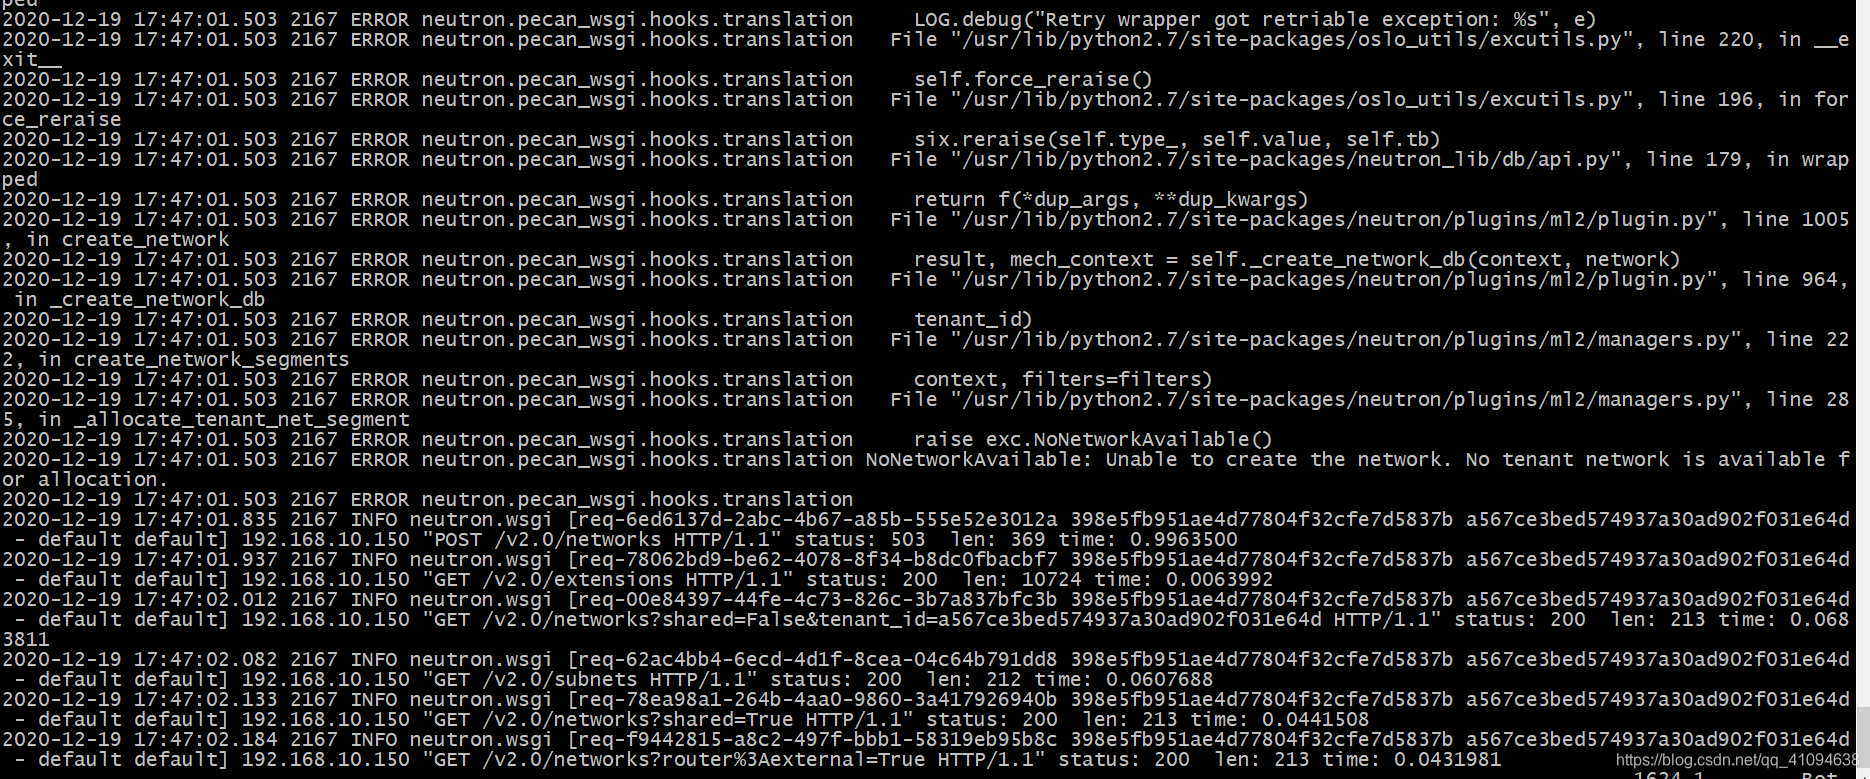

原来我在配/etc/neutron/plugins/ml2/ml2_conf.ini时配错了,跟下面参考的网站的情况一样,配错地方了。
参考了:https://blog.csdn.net/ranweizheng/article/details/87857936?ops_request_misc=%25257B%252522request%25255Fid%252522%25253A%252522160837126416780273393490%252522%25252C%252522scm%252522%25253A%25252220140713.130102334…%252522%25257D&request_id=160837126416780273393490&biz_id=0&utm_medium=distribute.pc_search_result.none-task-blog-2allsobaiduend~default-2-87857936.first_rank_v2_pc_rank_v29&utm_term=No%20tenant%20network%20is%20available%20for%20allocation.
还有一个错误是因为驱动的问题
有一个选型时type_driver,只有在里面有的驱动才能创建相应的网络
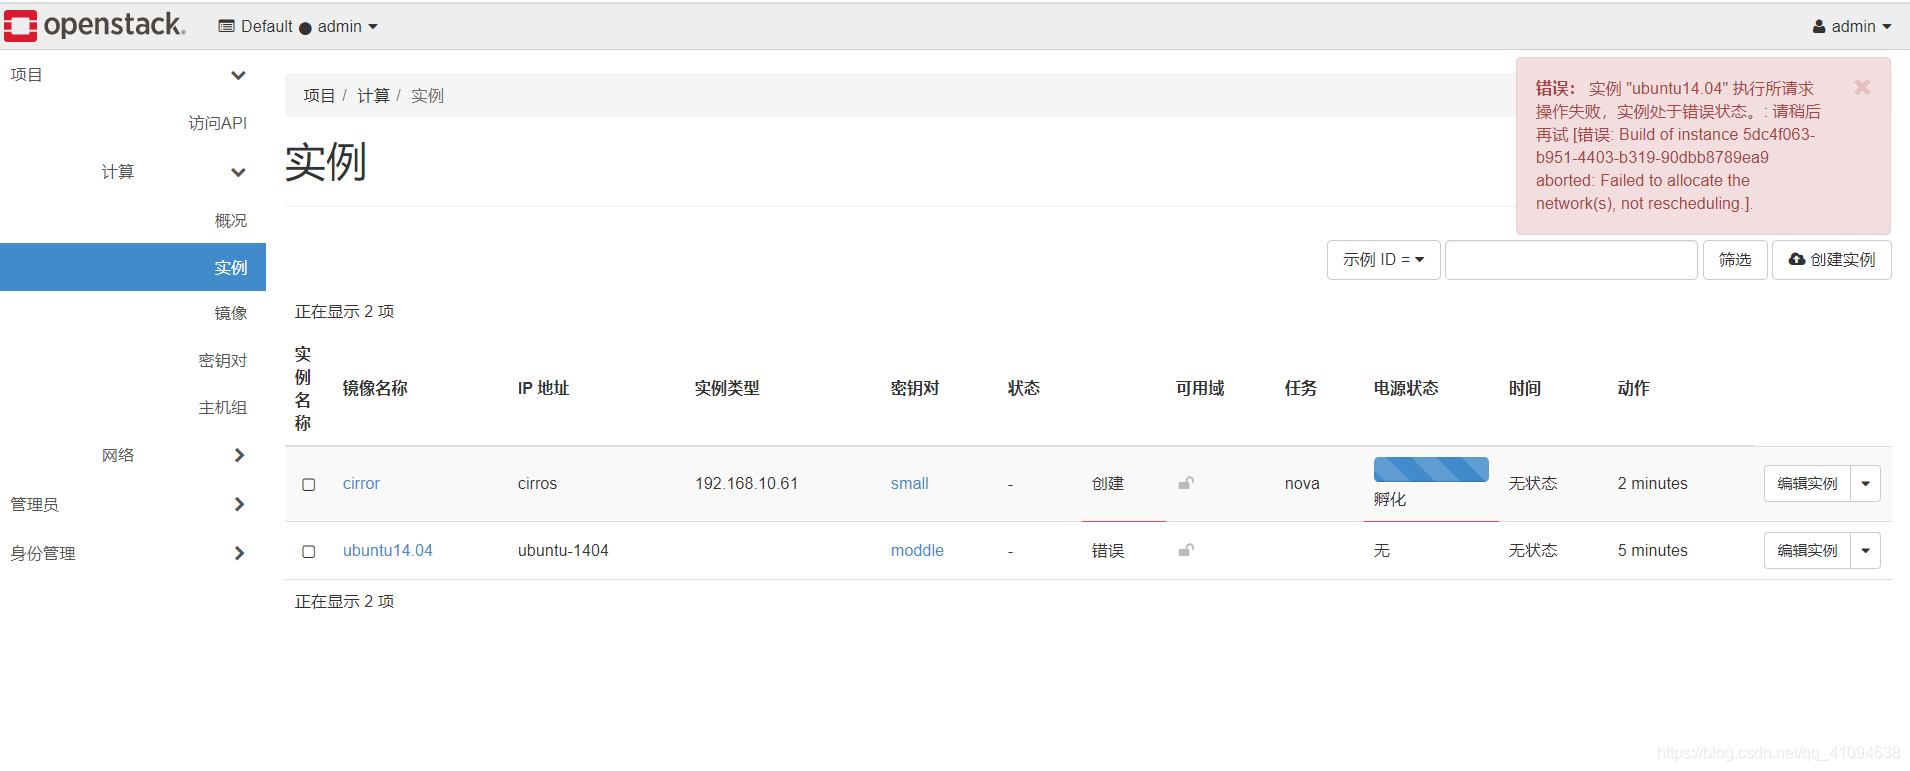
创建实例出错
1、Host ‘compute’ is not mapped to any cell

按照网上的教程:
nova-manage cell_v2 discover_hosts --verbose
再次创建实例貌似就没问题了
2、4336 ERROR nova.compute.manager [req-7c1bc64e-74da-4152-84fd-45eff53ed5ee 25b99096b60849e9b5a66dde8ce879cb dba851953a1446cfb651022214d6d486 - default default] [instance: ee763bf9-25ae-48e2-8a52-524695e9b4f1] Failed to allocate network(s): VirtualInterfaceCreateException: Virtual Interface creation failed
创建VM报错,同时网络是down的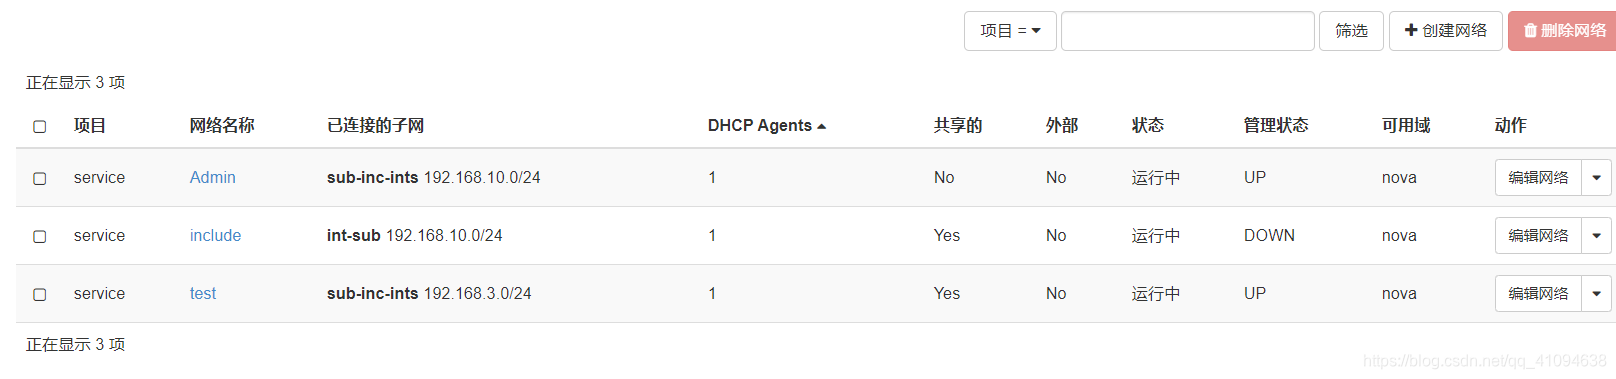
我用vxlan网络创建VM成功创建并允许,但用Local创建就报这样的错,可能local配置的原因
3、There are not enough hosts available.

计算结点上创建的VM太多了
4、oslo.messaging._drivers.impl_rabbit [-] Unexpected error during heartbeat thread processing, retrying…错误
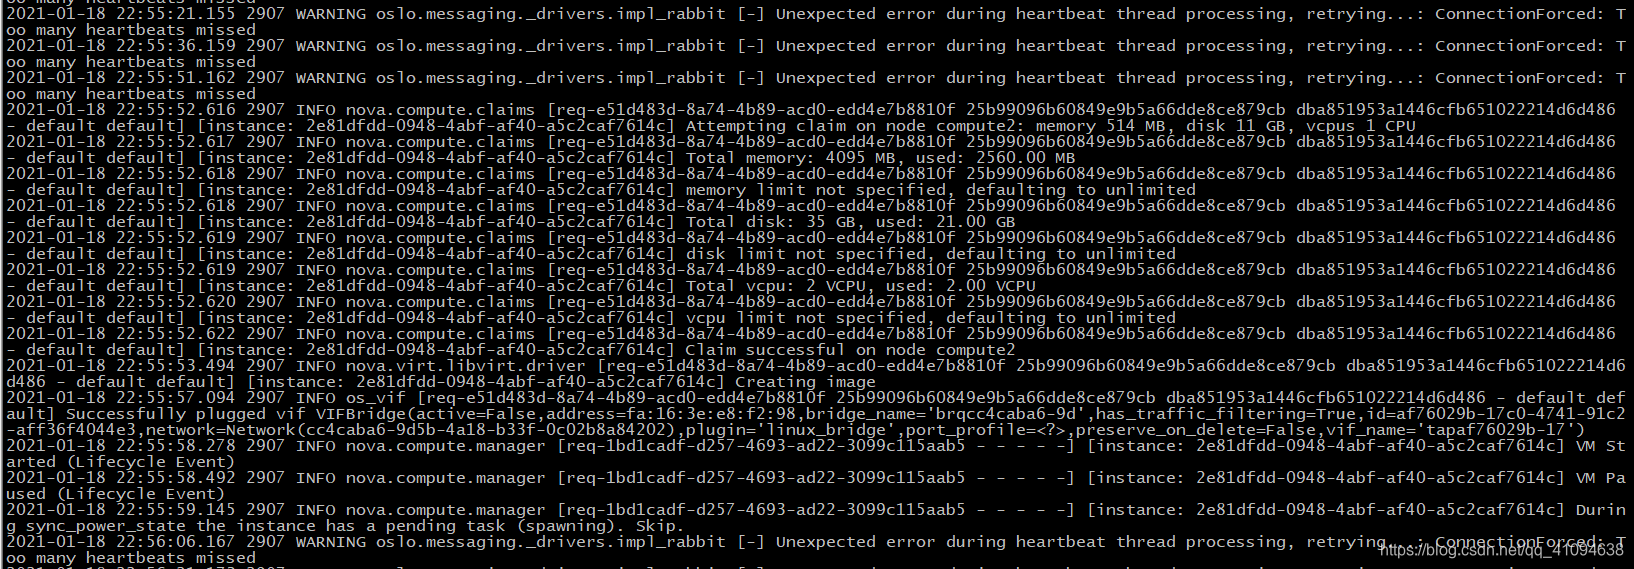
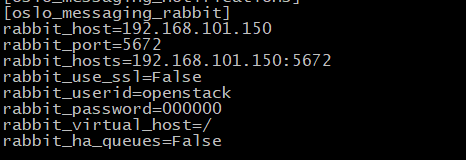
网上说添加这些
本文来自互联网用户投稿,文章观点仅代表作者本人,不代表本站立场,不承担相关法律责任。如若转载,请注明出处。 如若内容造成侵权/违法违规/事实不符,请点击【内容举报】进行投诉反馈!